Install on localhost
To install on localhost,and follow the installation prompts for seamless setup.
Follow This Instructions.
If you use windows operating system- Download and install XAMPP in
Cdrive. - Start Your Xampp Server.
- Download and Install Composer in
Cdrive. - Unzip the downloaded archive package.
- Move the unzipped file to your htdocs folder.
- Creating Database
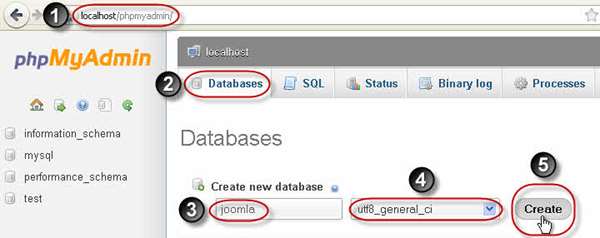
- Point your browser to phpMyAdmin address by typing
http://localhost/phpmyadmin. - In phpMyAdmin, click on Databases tab.
- Enter the name of new database that you want created.
- you may also need to select the collation for the database. Please select the collation match your language. If you do not know what to select, you can select utf8_general_ci or leave default (Collation).
- Click Create button.
Example

Recommended tutorial is below 👇
Configuration
Please copy the .env.example
and rename it to .env and
fill up the .env
- APP_NAME = (Youe App Name)
- APP_ENV = (Local Production)
- APP_URL = (https:// Your Domain Link..)
- DB_DATABASE = (Your Database Name)
- DB_USERNAME = (Your Database Username)
- DB_PASSWORD = (Your Database Password)
- MAIL_MAILER = (SMTP Email Relay Services)
- MAIL_HOST = Your Mail Host(For Example: smtp.gmail.com)
- MAIL_PORT = Your Mail Port(For Example: 587)
- MAIL_USERNAME = (Your Mail Username)
- MAIL_PASSWORD = (Your Mail Password)
- MAIL_ENCRYPTION = (SSL, TLS)
- MAIL_FROM_ADDRESS = (For Example: no-reply@gmail.com)
You need to fill the database connection details, administration details, and store details to .env example file.
Run Installation Command
- Open terminal/windows powershell and go to project folder directory
- If a terminal exists On your cpanel
- Open your terminal and go to root directory for example
(cd public_html/)
-
composer install -
php artisan migrate:fresh --seed -
php artisan storage:link -
php artisan serve
Run Project
- Open you browser
- browse
http://127.0.0.1:8000Orhttp://localhost:8000
This instruction shows how to run it locally on your PC, but it works generally the same on any hosting portals. In most case in payed portals you have any web panels to configure your public folder that reference to /public folder in laravel folder's structure.
You'll see a success message after successfully following the above steps. You now have the option to browse your application through respected domain or IP.