Mandatory setup
Change App Logo
You can generate app icon from this website: https://easyappicon.com/ Click Here
![]()
- For light mood go to
assets/images/logo.pngand replace logo.png with your own logo. - For Dark mood go to
assets/images/dark-logo.pngand replace logo.png with your own logo. - Then go to
/android/app/src/main/resand replace all mipmap folder with your<generated icon>/android folder. - Again go to
/ios/Runnerand replace Assets.xcassets with your generated Assets.xcassets folder.
Recommended tutorial is below 👇
Change App Name
- Change the value of label from
<project>/android/app/src/main/AndroidManifest.xmlandroid:label= ‘My App’; - Change the value of CFBundleName from
<project>/iOS/Runner/info.plist<Key>CFBundleName<Key> <string>My App<string>
Recommended tutorial is below 👇
Change Base URL
Must remember that don’t put slash(/) at the end of your base url. Use your admin url as
base url. First you have to install your admin panel. For example: If your admin url is
https://your_domain.com/admin then base url will be https://your_domain.com. Open lib/config/app_constant.dart and replace baseUrl
variable value with your own URL.
    lib/constants/config.dart

    static const String baseUrl= 'https://your_domain.com';
Recommended tutorial is below 👇
Change App Package
Run this command to change the package name.
flutter pub run change_app_package_name:main com.new.package.name
First you have to find out the existing package name. You can find it out from top of
/app/src/main/AndroidManifest.xml file. Now right click
on project folder from android
studio and click on replace in path. You will get a popup
window with two input box. In
first box you have to put existing package name that you saw in AndroidManifest.xml file
previously and write down your preferred package name in second box and then click on
Replace All button.
Recommended tutorial is below 👇
Setup Firebase for Push Notification
First you have to change your package name. If you didn’t then follow this.
-
Create your own firebase project from
https://console.firebase.google.com and also add an android app there
with your own package name and app name.
 WARNING
Do not create multiple project if you have multiple app like User App, Delivery App. Create only one project and add multiple app under project.
- Click register app and download
google-services.jsonfile from there. - Copy that file and paste it under
<project> /android/app/ folder. - Create a totally white png logo for notification icon. Paste it on
<project> /android/app/src/main/res/drawable/and replacenotification_icon.pngwith your whiter version logo. - For IOS again create an app under same project and download
GoogleService-Info.plistand paste it under<project>/iOS/ folder. Also follow this documentation for full setup for IOS: https://firebase.flutter.dev/docs/messaging/apple-integration - Paste firebase server key in admin panel Notification Settings section. You can get
server key from
Firebase project settings->Cloud Messaging->Server Key.
After your setup please restart your IDE and uninstall your previously installed app then run it. Also don’t try to test it on emulator or simulator. Emulator and simulators are unable to get push. Use real device in this case.
Recommended tutorial is below 👇
Add Google Map API Key
- You need to generate the google API key. Visit this link - https://developers.google.com/maps/documentation/embed/get-api-key
Click Here

- You need to enabled mentione APIs: Direction API, Distance Matrix API, Geocoding API, Maps SDK for Android, Maps SDK for iOS, Place API.
- You have to enable billing account. Visit this url for activating:
https://support.google.com/googleapi/answer/6158867?hl=en Click Here

- After generating API key, you have to put it on 3 different place for Android, iOS and web.
For android, open <project> /android/app/src/main/AndroidManifest.xml
and place the value of com.google.android.geo.API_KEY
/android/app/src/main/AndroidManifest.xml
<meta-data android:name =" com.google.android.geo.API_KEY android:value= “YOUR_MAP_API_KEY_HERE”/>
For iOS: open <project> /iOS/Runner/AppDelegate.swift and place the
value of GMSServices.provideAPIKey
/iOS/Runner/AppDelegate.swift
GMSServices.provideAPIKey <" YOUR_MAP_API_KEY_HERE ">
For web: open <project> /web/index.html and place the value of https://maps.googleapis.com/maps/api/js?key
/web/index.html
< script src ="https://maps.googleapis.com/maps/api/js?key=YOUR_MAP_API_KEY_HERE "></ script >
Get AdMob App IDs
- Go to AdMob and set up an account. This could take some time because you need to provide banking information, sign contracts, and so on.
- With the AdMob account ready, create two Apps in AdMob: one for Android and one for iOS.
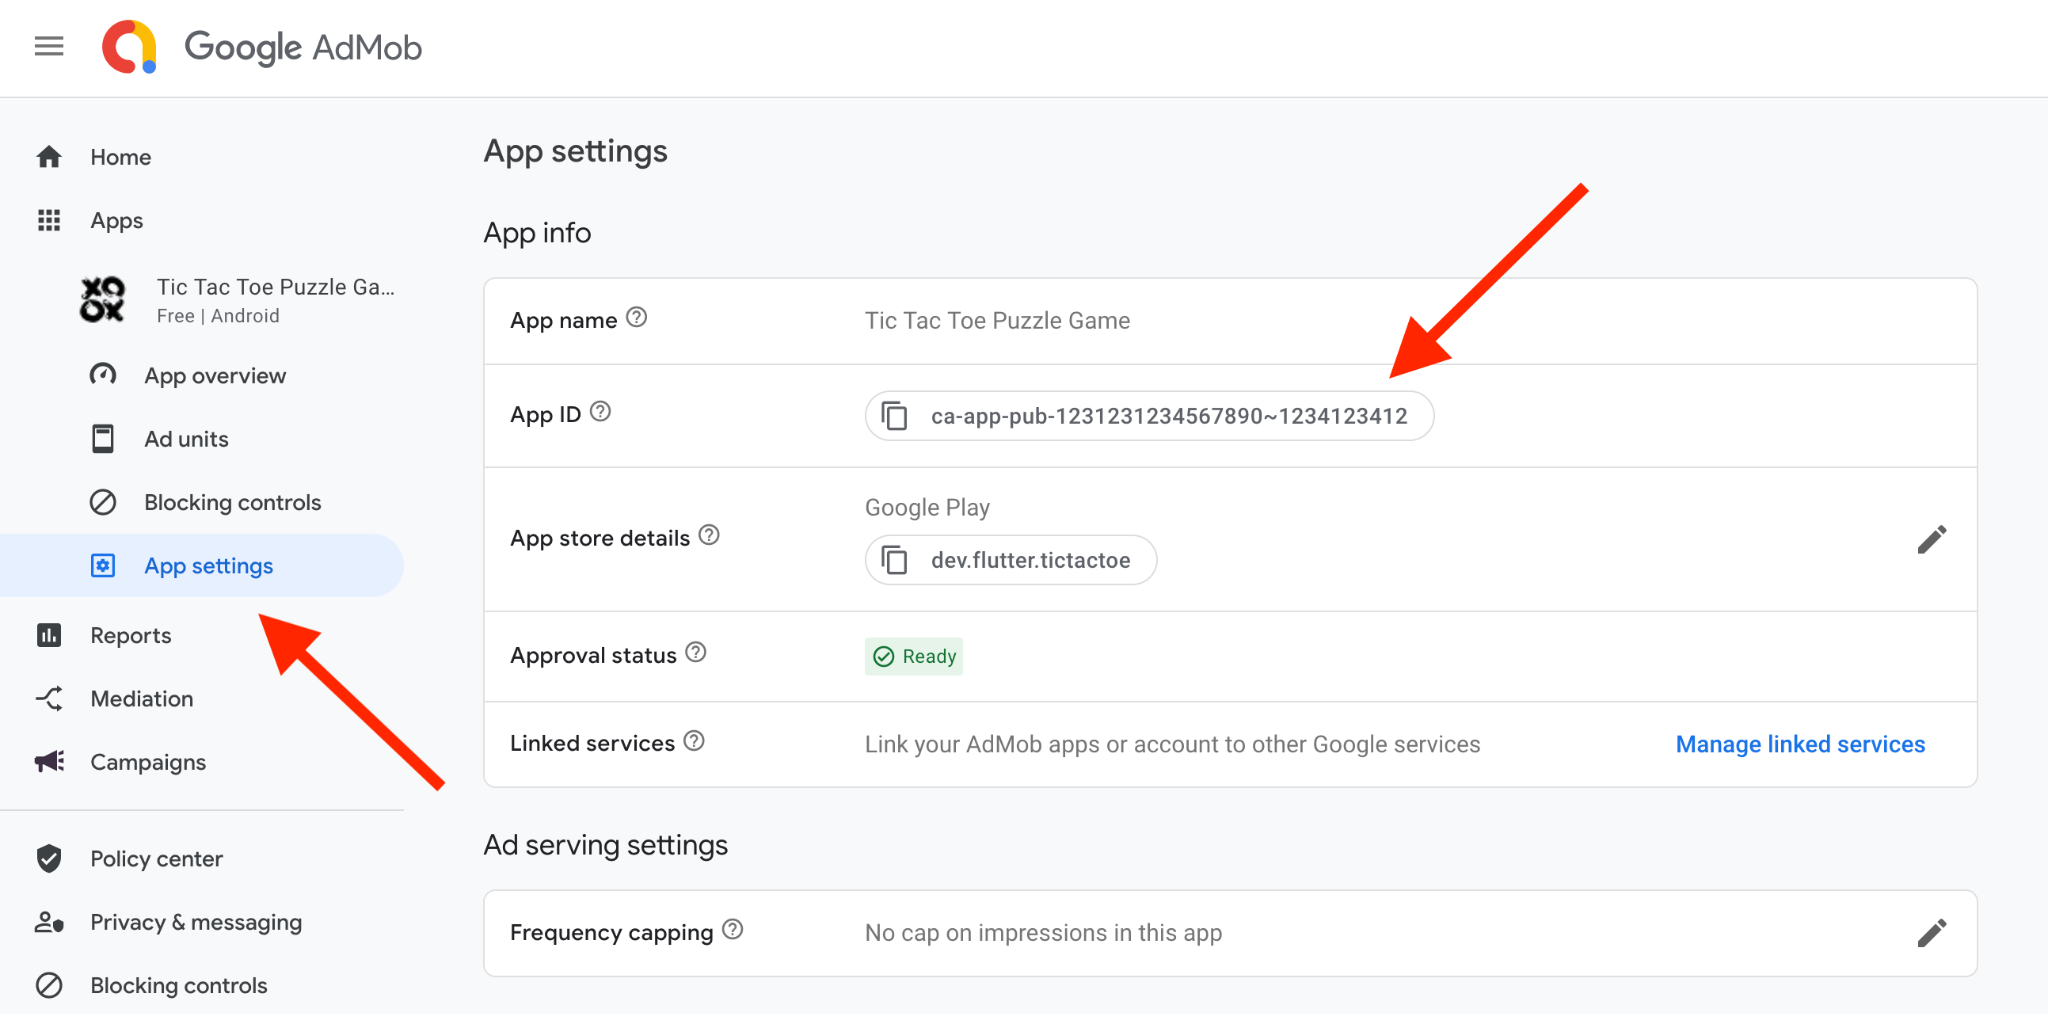
- Open the
App settingssection. - Get the AdMob App IDs for both the Android app and the iOS app. They resemble
ca-app-pub-1234567890123456~1234567890.Note the tilde (~) between the two numbers.
Platform-specific setup
Update your Android and iOS configurations to include your App IDs.
Android
Add your AdMob app ID to your Android app.
- Open the app’s
android/app/src/main/AndroidManifest.xmlfile. - Add a new
<meta-data>tag. - Set the
android:nameelement with a value ofcom.google.android.gms.ads.APPLICATION_ID. - Set the
android:valueelement with the value to your own AdMob app ID that you got in the previous step. Include them in quotes as shown:<manifest> <application> ... <!-- Sample AdMob app ID: ca-app-pub-3940256099942544~3347511713 --> <meta-data android:name="com.google.android.gms.ads.APPLICATION_ID" android:value="ca-app-pub-xxxxxxxxxxxxxxxx~yyyyyyyyyy"/> </application> </manifest>
iOS
Add your AdMob app ID to your iOS app.
- Open your app’s
ios/Runner/Info.plistfile. - Enclose
GADApplicationIdentifierwith akeytag. - Enclose your AdMob app ID with a
stringtag. You created this AdMob App ID in Step 1.<key>GADApplicationIdentifier</key><string>ca-app-pub-################~##########</string>
Set Banner And Interstitial ads UnitId
~/lib/services/ad_helper.dart
Change it with Your Banner UnitID
- Replies with your Banner UnitID
// Banner ads unitId static const String androidInterstetialUnitId ='ca-app-pub-################';static const String iosInterstetialUnitId ='ca-app-pub-################';
Change it with Your Interstitial ads UnitID
- Replies with your Interstitial ads UnitID
    // Interstetial ads UnitId
    static const String androidInterstetialUnitId ='ca-app-pub-################';

    static const String iosInterstetialUnitId ='ca-app-pub-################';