Introducing MusicStar,
the all-in-one music streaming solution designed for seamless performance and user
experience. Whether you are an entrepreneur looking to launch your own music
streaming service or a developer seeking a robust, feature-rich platform,
MusicStream has got you covered.
Key Features:
Beautiful UI/UX: Crafted with Flutter, our mobile app boasts a
sleek and modern interface, ensuring a smooth user experience on both Android
and iOS devices.
Extensive Music Library: Upload, manage, and stream unlimited
tracks.
Organise your music with albums, artists, genres, and playlists.
Smart Search & Filtering: Users can
easily find their favourite tracks, albums, or artists with advanced search and
filtering options.
Social Sharing: Allow users to share their favourite music or
playlists on social media platforms directly from the app.
User Authentication: Secure login and registration with email,
social
media, or OTP verification.
Admin Panel: Powerful Laravel-based admin panel for managing
users, tracks, albums, artists, playlists, and more. Monitor app performance
with real-time analytics.
Push Notifications: Engage users with push notifications about new
releases, featured playlists, or special promotions.
Multi-Language Support: Reach a global audience with multi-language
support for both the mobile app and admin panel.
Why Choose MusicStream?
MusicStar is a complete package that
provides both a stunning mobile application and a robust admin panel. It is designed
to be easily customizable, allowing you to tailor it to your specific needs. With
detailed documentation and dedicated support, launching your music streaming service
has never been easier.
What’s
Included:
Full Flutter source code for the mobile app for android and ios
Full source code for vue.js website
Powerfull laravel-based admin panel
Step-by-step documentation for Installation and publication
Launch your music streaming service with MusicStream and offer your
users a premium music experience.
Whether you’re targeting a niche genre or going global, MusicStream is the
ultimate solution to turn your vision into reality.
Mobile App 1.1
1. Cross-Platform Compatibility:
Flutter-Powered: Enjoy a smooth, consistent, and high-performance user
experience across both Android and iOS devices, all from a single codebase.
Responsive Design: Optimized layouts ensure a seamless experience on
both smartphones and tablets, adapting to different screen sizes and orientations.
2. User-Friendly Interface:
Modern UI/UX Design: A sleek and intuitive user interface designed with
user experience in mind, making navigation simple and enjoyable.
Dark & Light Themes: Users can toggle between dark and light modes
to match their preferences or device settings.
3. Music Library & Playback:
Extensive Music Library: Easily manage a vast collection of songs,
albums, and artists through a robust backend system.
High-Quality Audio Streaming: Stream music in high quality, with
options for lower quality to save data.
Gapless Playback: Enjoy uninterrupted listening with seamless
transitions between tracks, perfect for live albums and DJ mixes.
Repeat & Shuffle: Users can set tracks on repeat or shuffle their
playlists to mix up the listening experience.
4. Playlist Management:
Create & Manage Playlists: Users can easily create, edit, and
manage their own playlists, making it simple to organize favorite tracks.
Smart Playlists: Automatically generate playlists based on user
preferences, listening history, or mood settings.
Collaborative Playlists: Enable users to share and collaborate on
playlists with friends, fostering a social music experience.
5. Advanced Search & Discovery:
Smart Search: Quickly find songs, artists, albums, and playlists with a
powerful search engine that delivers accurate results.
Explore New Music: Users can discover new music through curated
playlists, genre-based recommendations, and trending tracks.
Personalized Recommendations: Leverage machine learning to provide
users with personalized music recommendations based on their listening habits.
6. Social Integration:
Share & Connect: Users can share their favorite tracks, playlists,
and albums on social media platforms or directly with friends.
Follow Artists: Stay updated with the latest releases and updates from
favorite artists by following them within the app.
Activity Feed: Users can see what their friends are listening to and
explore trending playlists within their network.
7. Multi-Language & Localization:
Multi-Language Support: The app supports multiple languages, making it
accessible to a global audience.
RTL Support: Full Right-to-Left (RTL) support ensures the app is usable
in languages like Arabic, Hebrew, and more.
8. User Accounts & Profiles:
User Registration & Login: Secure and quick registration and login
options, including social media login support.
Profile Customization: Users can personalize their profiles with
avatars, bios, and custom playlists.
Listening History: Track user listening habits with a detailed history
of played songs and playlists.
9. Subscription & Monetization:
Multiple Subscription Plans: Offer users various subscription plans
(e.g., free, premium) with different access levels and features.
In-App Purchases: Enable users to purchase premium tracks, albums, or
additional features directly within the app.
Ad-Supported Free Tier: Integrate with ad networks to provide a free,
ad-supported version of the app while generating revenue.
10. Notifications & Alerts:
Push Notifications: Keep users engaged with custom push notifications
for new releases, playlist updates, and special offers.
In-App Alerts: Provide timely alerts within the app for important
updates or recommendations.
11. Analytics & Reporting:
User Engagement Metrics: Track and analyze user engagement with
detailed analytics on app usage, listening habits, and more.
Admin Dashboard: A powerful Laravel-based admin dashboard provides
real-time insights, user management, and content control.
12. Secure & Scalable Backend:
Laravel Backend: A robust and secure backend built on Laravel ensures
smooth content management, user authentication, and data handling.
Scalable Infrastructure: Designed to handle large volumes of data and
users, making it perfect for growing your music platform.
13. Regular Updates & Support:
Ongoing Updates: The app is regularly updated with new features, bug
fixes, and performance improvements.
Comprehensive Documentation: Detailed documentation guides you through
setup, customization, and deployment.
Vue.js Website 1.2
Overview
The Music App Vue.js Website is a fully responsive and feature-rich web application designed
for music lovers. Built using Vue.js, this app delivers a smooth and intuitive user
experience, allowing users to explore, stream, and manage their music collections
effortlessly.
Key Features
Modern & Responsive Design
Cross-Browser Compatibility: The website is optimized for all
major browsers, ensuring a consistent user experience across Chrome, Firefox,
Safari, and Edge.
Responsive Layout: Automatically adjusts to various screen
sizes, providing a seamless experience on desktops, tablets, and smartphones.
Customizable Themes: Choose from dark and light themes to match
user preferences or brand guidelines.
Rich Music Library
Extensive Collection: Access a vast library of songs, albums,
and artists spanning multiple genres and eras. Regular updates ensure that users
have access to the latest releases.
High-Quality Streaming: Stream music in high quality with the
option to switch to lower quality for bandwidth savings.
Track Details: Each song comes with detailed information,
including album art, artist bio, release date, and lyrics (if available).
Advanced Search & Discovery
Smart Search: Find songs, artists, and albums quickly with a
powerful search engine that offers predictive search suggestions.
Discover New Music: Users can explore new tracks through
genre-based recommendations, trending lists, and curated playlists.
Personalized Suggestions: The app offers music recommendations
tailored to user preferences and listening history.
Playlist Management
Create & Manage Playlists: Users can easily create, edit,
and organize their playlists, making it simple to keep track of favorite tracks.
Smart Playlists: Generate playlists automatically based on user
preferences, mood, or activity.
Collaborative Playlists: Enable users to share and co-create
playlists with friends, fostering a social music experience.
User Profiles & Accounts
User Registration & Login: Quick and secure sign-up
options, including social media integrations, for easy access to the
website's features.
Profile Customization: Users can personalize their profiles
with avatars, bios, and custom playlists.
Listening History: Track and revisit previously played songs,
albums, and playlists with ease.
Social Integration
Share Music: Users can share their favorite tracks, albums, and
playlists on social media platforms directly from the website.
Activity Feed: Users can see what their friends are listening
to and discover new music based on their activity.
Subscription & Monetization
Multiple Subscription Plans: Offer users a variety of
subscription options, including free, ad-supported tiers, and premium plans with
additional features.
Ad Integration: Seamlessly incorporate ads into the user
experience, providing a free version while generating revenue.
Notifications & Alerts
Push Notifications: Engage users with custom notifications
about new releases, playlist updates, and special offers.
In-App Alerts: Provide timely notifications within the website
for important updates, recommendations, and more.
Admin Panel
Content Management: Admins can easily upload, organize, and
manage music content, including songs, albums, and artist profiles.
User Management: Monitor and manage user accounts, track user
activity, and handle subscription plans.
Analytics & Reporting: Gain insights into user engagement,
content performance, and revenue with comprehensive analytics and reporting
tools.
Security & Performance
Secure Authentication: Ensure user data is protected with
robust authentication mechanisms, including two-factor authentication and
encrypted passwords.
Scalable Architecture: The app is built to handle high traffic
and large volumes of data, ensuring smooth performance even as the user base
grows.
Regular Updates: The app is maintained with regular updates,
including new features, security patches, and performance enhancements.
Web Admin Panel 1.3
Start Music web admin panel using Laravel, here are some feature
descriptions you might consider:
1. Dashboard:
- Overview of key metrics (e.g., total number of users, songs, albums,
playlists, etc.)
- Recent activity and notifications
2. User Management:
- View and manage user profiles
- Search and filter users
- Admin roles and permissions
3. Music Library Management
- Add, edit, or delete songs
- Upload and manage music files
- Organize songs into albums and genres
4. Playlist Management:
- Create, edit, or delete playlists
- Organize playlists by genre, mood, or user preferences
- Manage playlist contents (add/remove songs)
5. Subscription and Payment Management:
- View and manage subscription plans
- Handle payment processing
- Track user subscriptions and payment history
6. Analytics and Reporting:
- Generate reports on user engagement, song popularity, and revenue
- Track download and streaming statistics
- Analyze trends and user behavior
7. Notification Management:
- Send announcements or updates to users
- Manage notification settings and templates
8. Settings and Configuration:
- Manage site-wide settings (e.g., site name, contact information)
- Configure system integrations (e.g., payment gateways, social media)
Device/Emulator: An Android or iOS device/emulator for
testing.
Flutter Project Run 2.1
3. Download and Extract the Project:
Download the Package: Go to your Codecanyon account and download the
Music Flutter app package.
Extract the Files: Extract the downloaded ZIP file to a preferred
location on your computer.
4. Set Up Your Development Environment:
Install Flutter and Dart: Follow the instructions on the Flutter
installation page to install Flutter and Dart.
Configure Your IDE: Install and configure your preferred IDE (Android
Studio, VS Code, or IntelliJ IDEA). Install the Flutter and Dart plugins.
5. Open the Project:
Open Your IDE: Launch your IDE (Android Studio, VS Code, or IntelliJ
IDEA).
Open the Project Folder: Use the "Open" or "Import" option in your IDE
to open the folder where you extracted the project.
6. Install Dependencies:
Open Terminal/Command Prompt: Navigate to the project directory:
bash
cd path/to/your/project
Install Dependencies: Run the following command to fetch and install
the required dependencies:
bash
flutter pub get
7. Set Up Emulator or Device:
Android Emulator: Open Android Studio and go to the AVD Manager. Create
or start an Android Virtual Device (AVD).
iOS Simulator (macOS only): Open Xcode and start the iOS Simulator.
8. Run the App:
Run the App: Ensure your emulator/device is connected and running. In
your IDE, run the following command or use the built-in run feature:
bash
flutter run
9. Build the App for Release:
For Android: Run the following command to generate a release APK:
bash
flutter build apk --release
The release APK will be located in build/app/outputs/flutter-apk/.
For iOS: Run the following command to prepare the app for release:
bash
flutter build ios --release
Open the ios/Runner.xcworkspace file in Xcode to configure the app for
distribution and follow Apple’s guidelines.
10. Troubleshooting:
Check for Issues: Use the command flutter doctor to
diagnose and resolve common setup issues:
bash
flutter doctor
Common Issues: Ensure you have the necessary environment variables set
up. Resolve any dependency issues indicated in the terminal output.
11. Documentation and Support:
Refer to the docs/ folder in the project for any additional documentation
provided by the Codecanyon author.
For further support, contact the Codecanyon author through their support channels.
12. Conclusion:
You should now have the Music Flutter mobile app up and running on your device or emulator.
If you encounter any issues or need further customization, refer to the project's
documentation or seek support from the Codecanyon community.
Feel free to adjust this document according to any specific features or requirements of your
app.
Play store Publish 2.2
StarMusic - Publishing on Google Play Store
This documentation provides a step-by-step guide to publishing your Flutter music app on the
Google Play Store.
Prerequisites
Flutter SDK installed and configured.
A Google Play Developer account.
Complete Flutter StarMusic app ready for production.
A keystore file for signing your app.
A high-quality app icon (512x512 pixels).
App screenshots for the Play Store listing.
Step 1: Prepare Your App for Release
Before publishing, you need to prepare your app for release:
Open your Flutter app project.
Update the android/app/build.gradle file with your app’s version code and
version name:
Sign in with your Google account and follow the prompts to create a Developer account.
Pay the one-time registration fee.
Complete your account setup, including entering your developer profile information.
Step 3: Create a New App on Google Play Console
Now that your Developer account is set up, you can create a new app:
Log in to your Google Play Console.
Click on Create App.
Enter your app’s name, select the default language, and choose the app type (e.g., App).
Complete the required information, including the app’s description, category, and
contact details.
Step 4: Set Up the Play Store Listing
Provide the necessary details for your app's Play Store listing:
Enter the app’s title, short description, and full description.
Upload your app’s icon (512x512 pixels) and screenshots.
Select the app’s category and content rating.
Provide contact information and a privacy policy URL (if applicable).
Step 5: Upload the APK or App Bundle
Upload your signed APK or App Bundle to the Play Store:
Go to the Release > Production section.
Click on Create New Release.
Upload the APK or App Bundle you generated earlier.
Provide release notes for the version you are publishing.
Click Save and then Review Release.
After reviewing, click Start Rollout to Production to publish your app.
Step 6: Review and Publish
Once everything is set up, review your app’s details and make sure everything is correct:
Check for any errors or warnings in the Play Console.
Ensure all required fields are filled out.
Submit your app for review by Google.
Once your app passes the review, it will be published on the Play Store, and users can start
downloading it.
Step 7: Post-Publishing
After your app is live, you can monitor its performance and manage updates:
Use the Play Console to view app analytics, crash reports, and user feedback.
Regularly update your app to fix bugs, improve performance, and add new features.
Engage with users through reviews and respond to their feedback.
Conclusion
Publishing your Flutter music app on the Google Play Store is a straightforward process that
involves preparing your app, creating a Play Console account, setting up the store listing,
uploading the app, and submitting it for review. Follow these steps carefully to ensure a
successful launch.
App store Publish 2.3
Flutter Music App - Publishing on Apple App Store
This documentation provides a step-by-step guide to publishing your Flutter music app on the
Apple App Store.
Prerequisites
Flutter SDK installed and configured.
A Mac computer with the latest version of Xcode installed.
An Apple Developer Program membership.
Complete Flutter StarMusic app ready for production.
A distribution certificate and provisioning profile.
A high-quality app icon (1024x1024 pixels).
App screenshots for the App Store listing.
Step 1: Prepare Your App for Release
Before publishing, you need to prepare your app for release:
Open your Flutter app project in Xcode.
Update the ios/Runner.xcodeproj with your app’s version number and build
number:
Version: 1.0.0 (1)
Configure the app name, bundle identifier, and other settings in
ios/Runner/Info.plist:
Click on My Apps and then click the + (plus) button to
create a new app.
Enter your app’s name, primary language, bundle ID, and SKU. Select the correct platform
(iOS).
Complete the required app information, including app description, keywords, and support
URL.
Step 4: Configure App Store Listing
Provide the necessary details for your app's App Store listing:
Enter the app’s title, subtitle, and promotional text.
Upload your app’s icon (1024x1024 pixels) and screenshots (5.5-inch and 6.5-inch iPhone
screenshots required).
Select the app’s category and content rating.
Provide contact information and a privacy policy URL (if applicable).
Step 5: Submit Your App for Review
After configuring the App Store listing, you can submit your app for review:
Go to the App Information section and complete any remaining fields.
In the Pricing and Availability section, set your app's price or make
it free.
Go to the Prepare for Submission section.
Select the build you uploaded from Xcode and assign it to this version.
Answer any required compliance questions (e.g., export compliance, content rights).
Click Submit for Review to send your app to Apple for review.
Step 6: Review and Approval Process
Apple will review your app before it goes live on the App Store:
Monitor the review status in App Store Connect. The review process may take a few days.
If there are any issues, Apple will contact you with details on what needs to be fixed.
Once approved, your app will be published on the App Store.
Step 7: Post-Publishing
After your app is live, you can monitor its performance and manage updates:
Use App Store Connect to view app analytics, crash reports, and user feedback.
Regularly update your app to fix bugs, improve performance, and add new features.
Engage with users through reviews and respond to their feedback.
Conclusion
Publishing your Flutter music app on the Apple App Store is a detailed process that involves
preparation, account setup, configuring your app in App Store Connect, and submitting it for
review. Follow these steps carefully to ensure a successful launch.
FCM Configuration 2.4
FCM Configuration for Flutter Mobile App
This document provides a comprehensive guide to configuring Firebase Cloud Messaging (FCM)
for your Flutter mobile app on both Android and iOS platforms.
Android: Use the Firebase Console to send test messages or use the
firebase_messaging package to test messages locally.
iOS: Ensure you have a real device or use the simulator to test push
notifications,
as push notifications don't work on iOS simulators.
Following these steps will help you successfully configure Firebase Cloud Messaging (FCM) for
your Flutter mobile app on both Android and iOS platforms.
Web and Admin
Vue.js Website 3.1
Running Vue.js Music App
This documentation provides a step-by-step guide to running a Vue.js-based music app. Follow
these instructions to set up your development environment and run the app locally.
1. Prerequisites
Node.js installed (version 12.x or higher).
npm or Yarn package manager installed.
Vue CLI installed (optional but recommended for easier setup).
2. Clone the Repository
Start by cloning the repository from your version control system:
Once inside the project directory, install the necessary dependencies:
If using npm:
npm install
If using Yarn:
yarn install
4. Running the Development Server
To start the development server and view the app in your browser, run:
If using npm:
npm run serve
If using Yarn:
yarn serve
The app will be available at http://localhost:8080 (or another port if
specified). Open this URL in your browser to view the app.
5. Building for Production
To create a production build of your app, use the following command:
If using npm:
npm run build
If using Yarn:
yarn build
This command will create a dist/ directory containing the optimized files for
production deployment.
6. Troubleshooting
If you encounter issues while running or building the app, consider the following
troubleshooting steps:
Check Node.js Version: Ensure you are using a compatible version of
Node.js. You can check your Node.js version by running node -v.
Clear Cache: Sometimes clearing the npm or Yarn cache can resolve
issues. Use npm cache clean --force or yarn cache clean.
Delete Node Modules: Remove the node_modules directory and
reinstall dependencies:
rm -rf node_modules
npm install
Check Configuration: Verify your configuration files (e.g.,
vue.config.js, package.json) for any misconfigurations.
Consult Logs: Review the error messages in your terminal or browser
console for clues on what might be going wrong.
7. Conclusion
By following these steps, you should be able to run your Vue.js music app locally and prepare
it for production. If you encounter issues, refer to the troubleshooting section or consult
the Vue.js documentation for additional guidance.
Running Laravel Admin Panel for Star Music
This documentation provides a step-by-step guide to running a Laravel-based admin panel for a
Star Music. Follow these instructions to set up your development environment and run
the
admin panel locally.
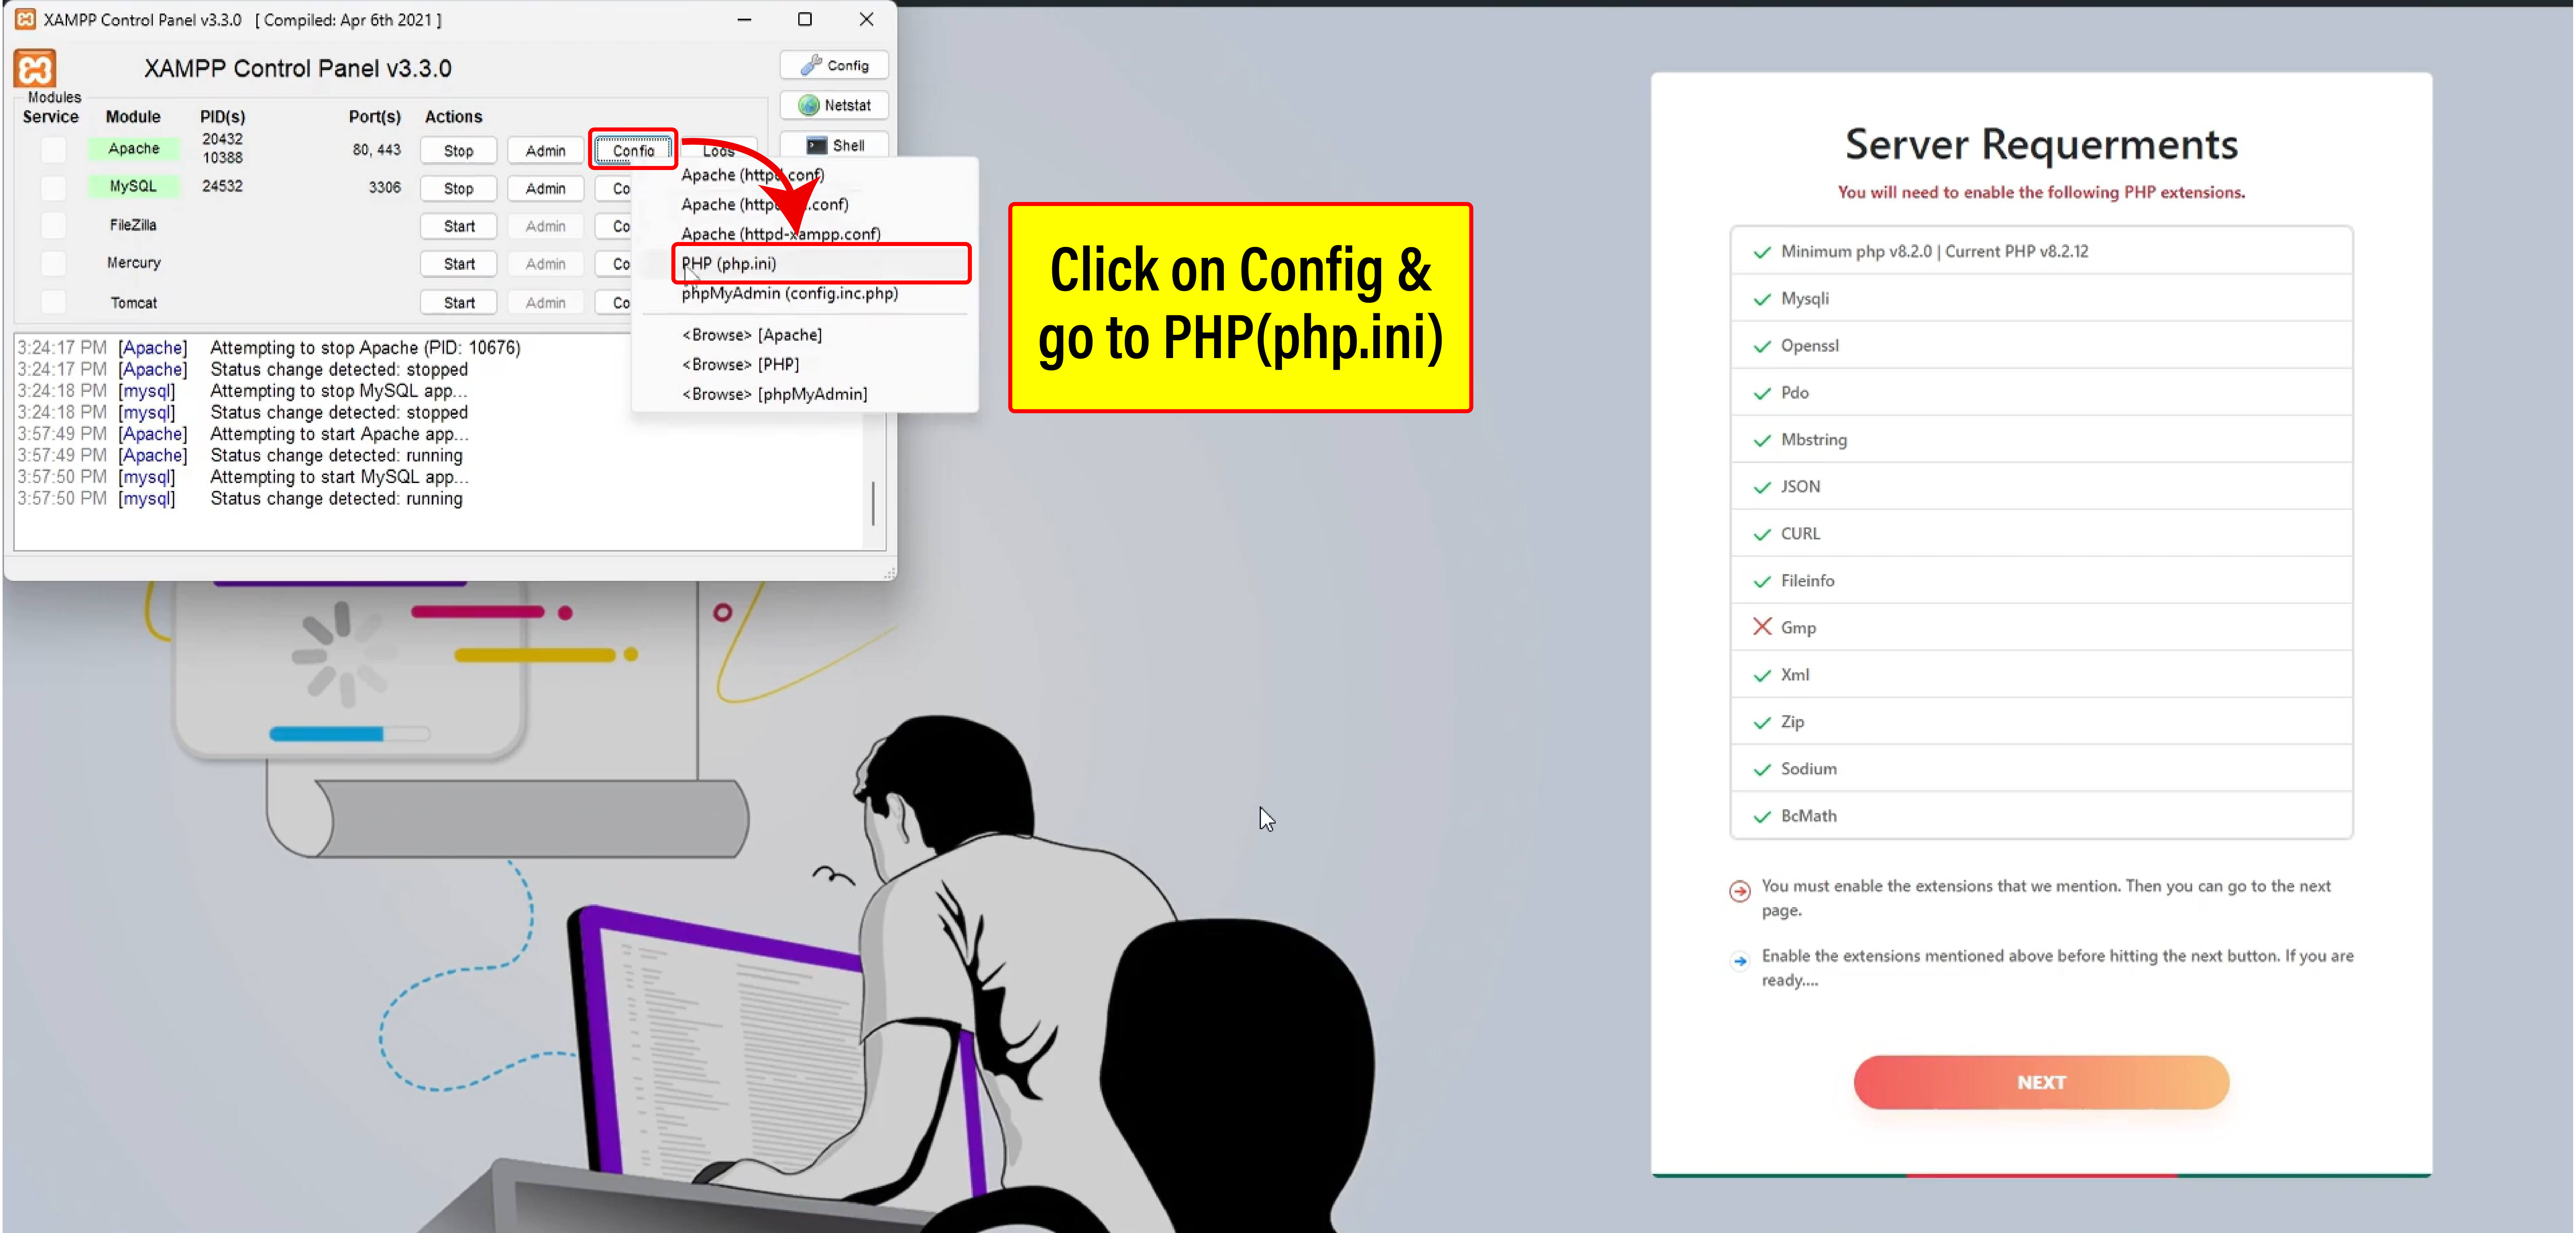
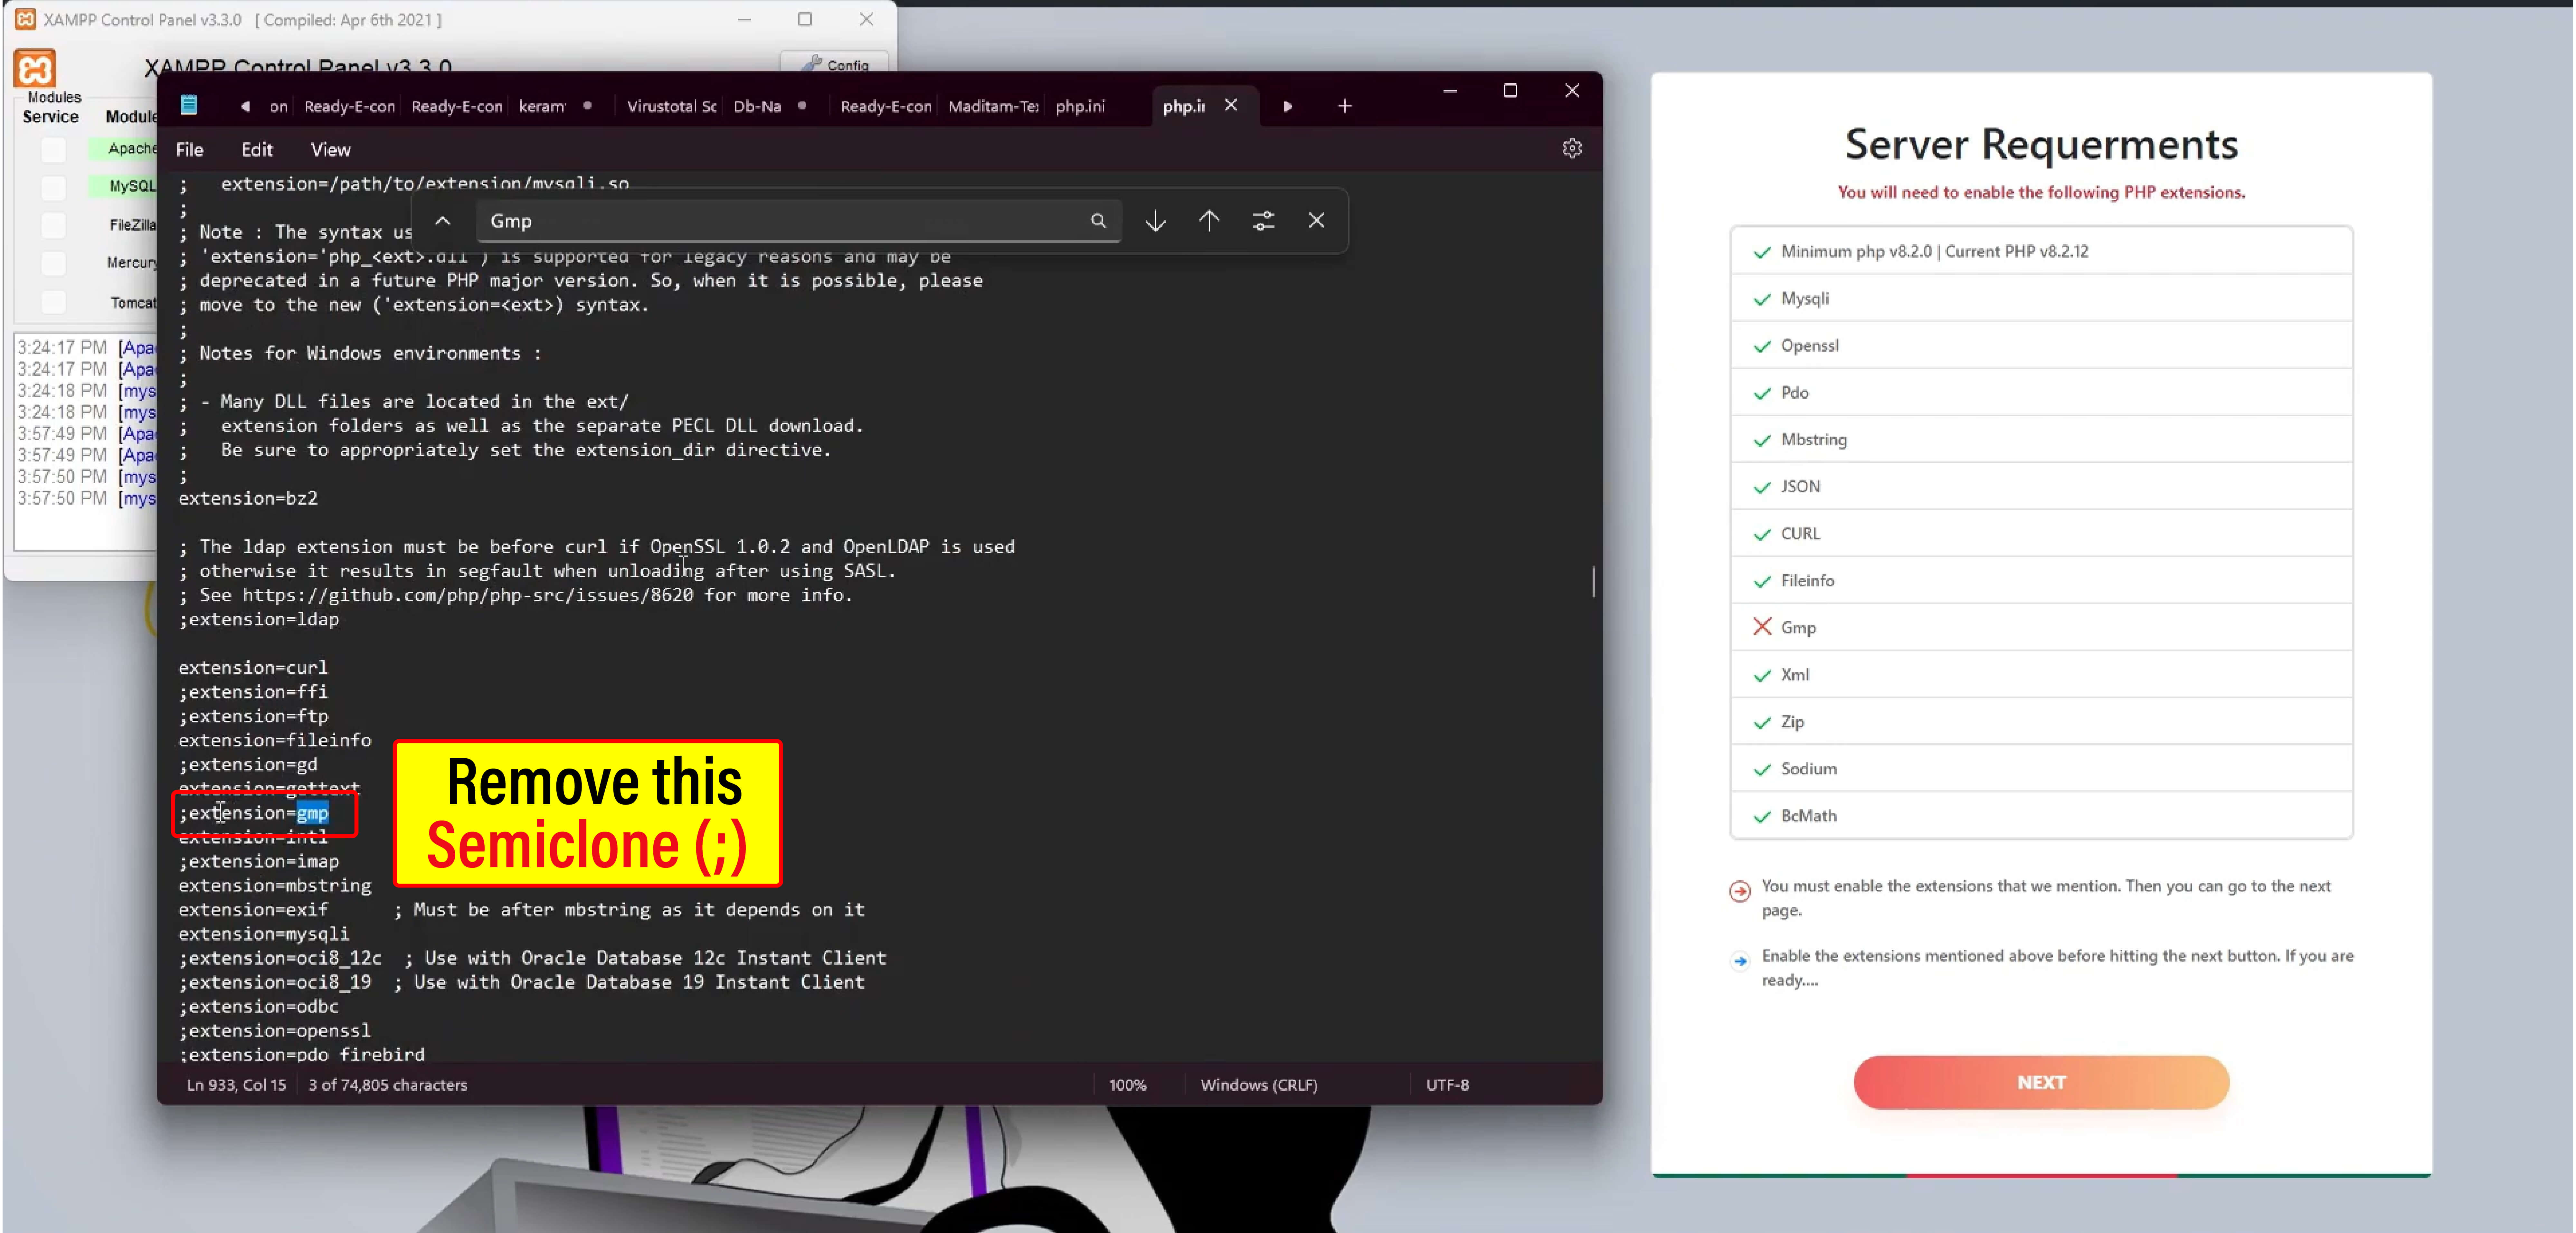
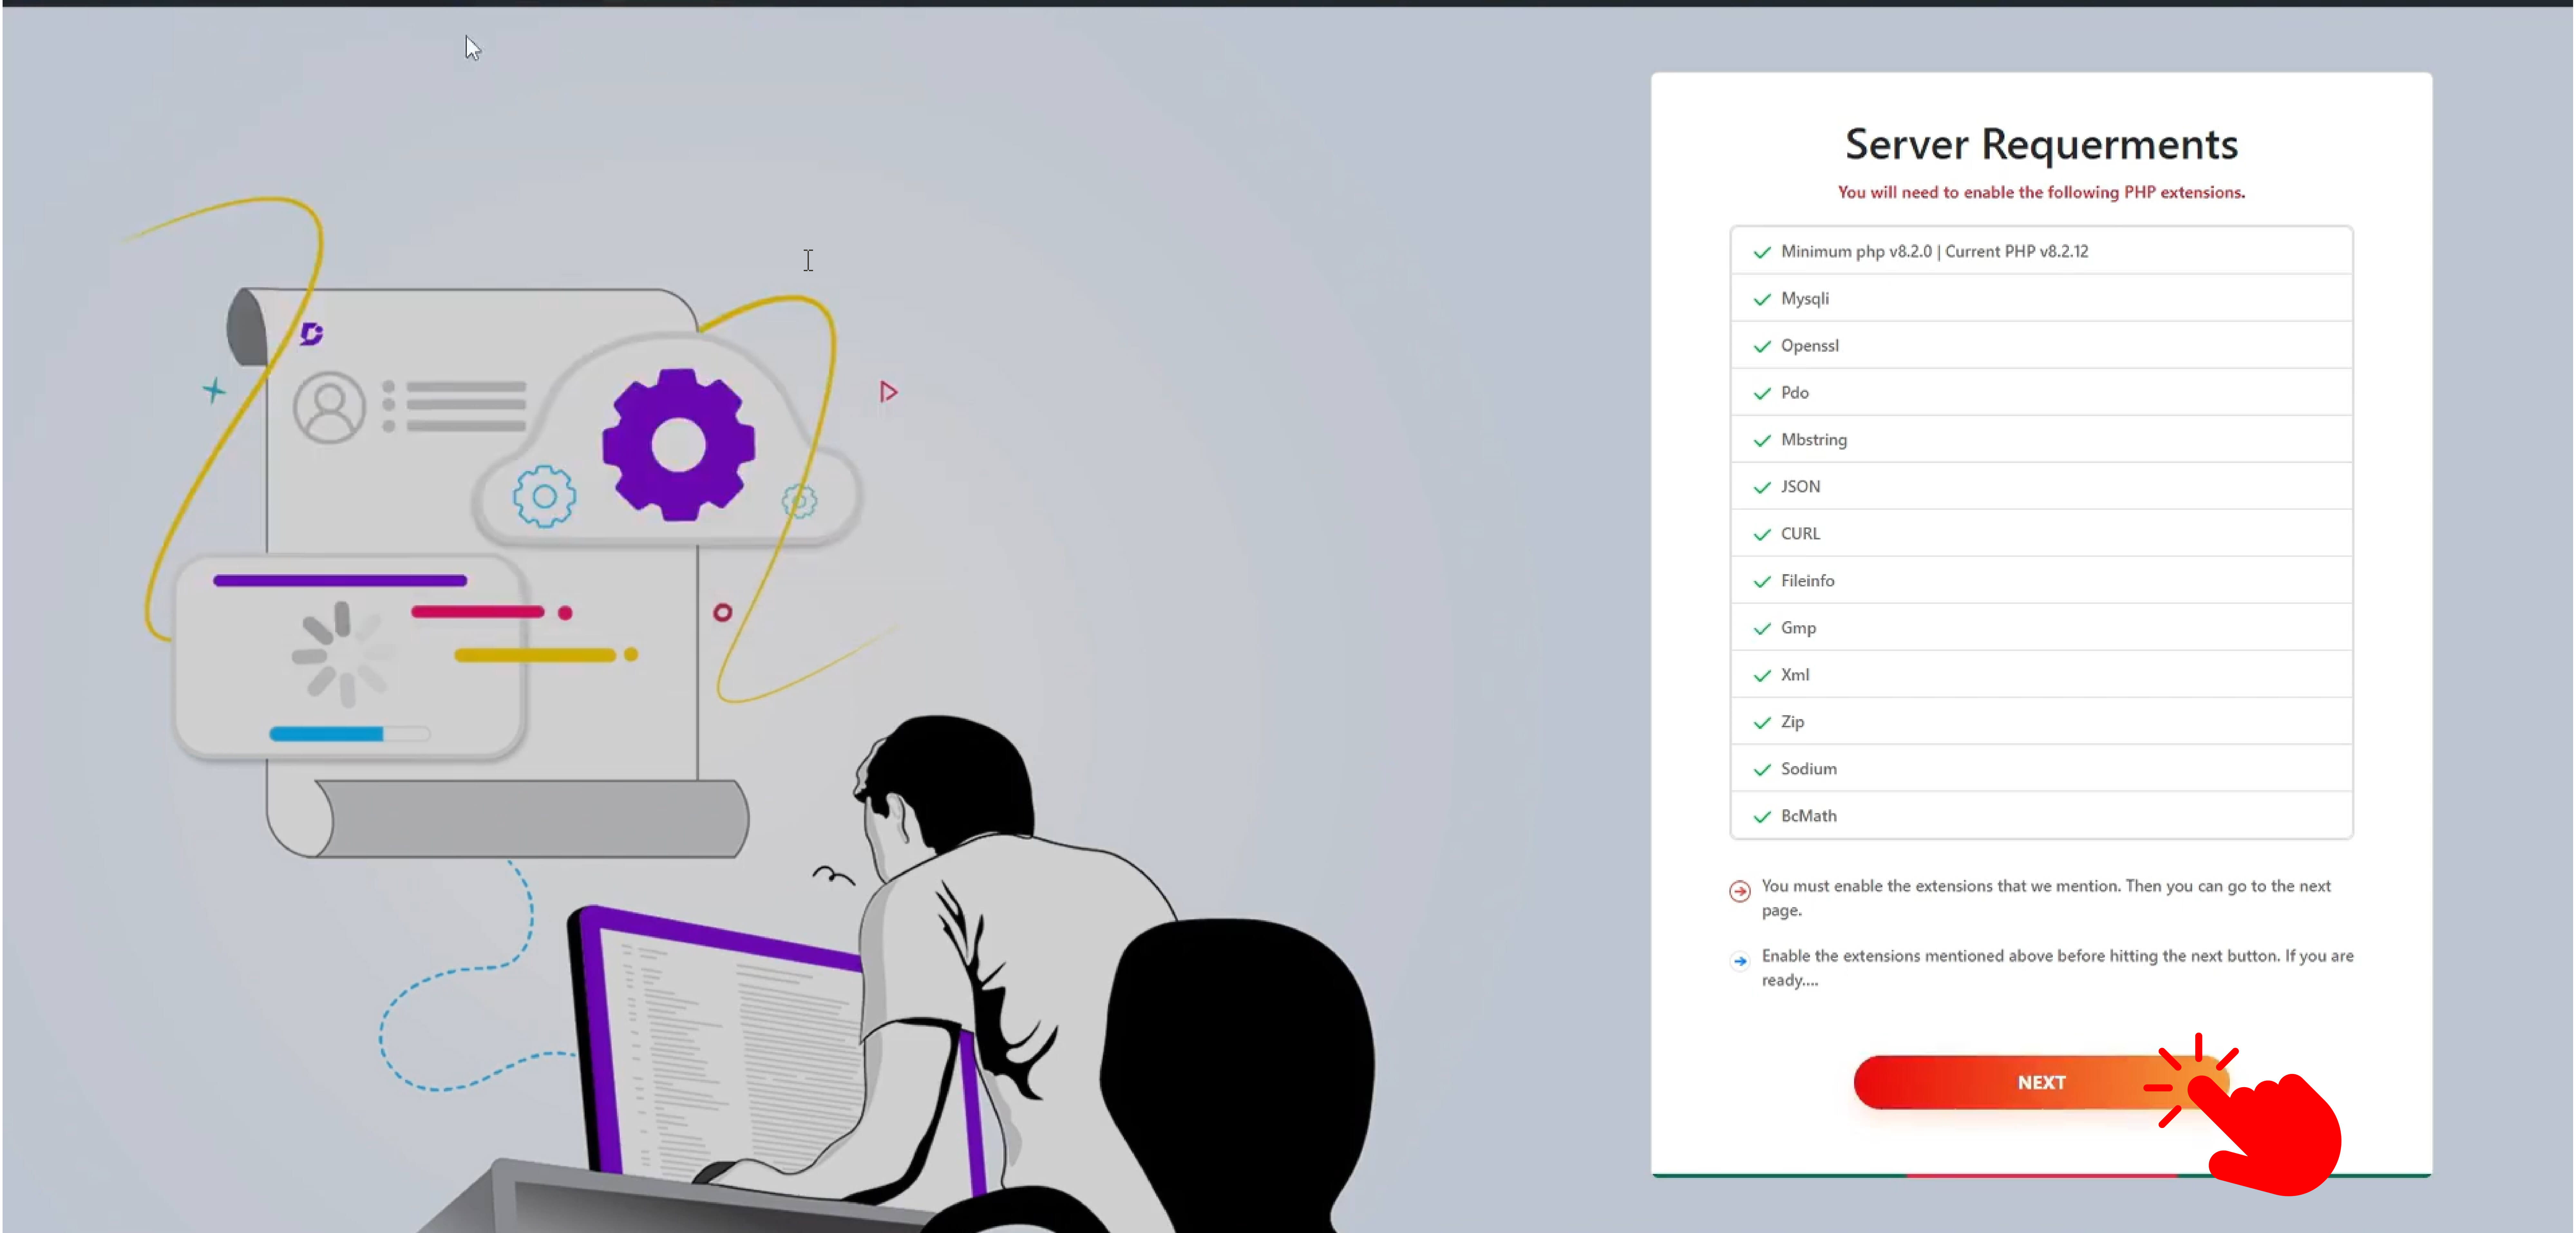
1. Prerequisites
PHP installed (version 8.1 or higher).
MySQL 5.7 or MariaDB 10.0.
Intl PHP Extension
Intl Curl PHP Extension
PDO PHP Extension
Mbstring PHP Extension
XML PHP Extension
JSON PHP Extension
Zip Extension
Sodium Extension
BCMath Extension
How to Install Star Music on cPanel Hosting
A step-by-step guide on setting up your Star Music project in cPanel hosting.
Follow This Instructions
Zip your project folder.
Log in to your cPanel account.
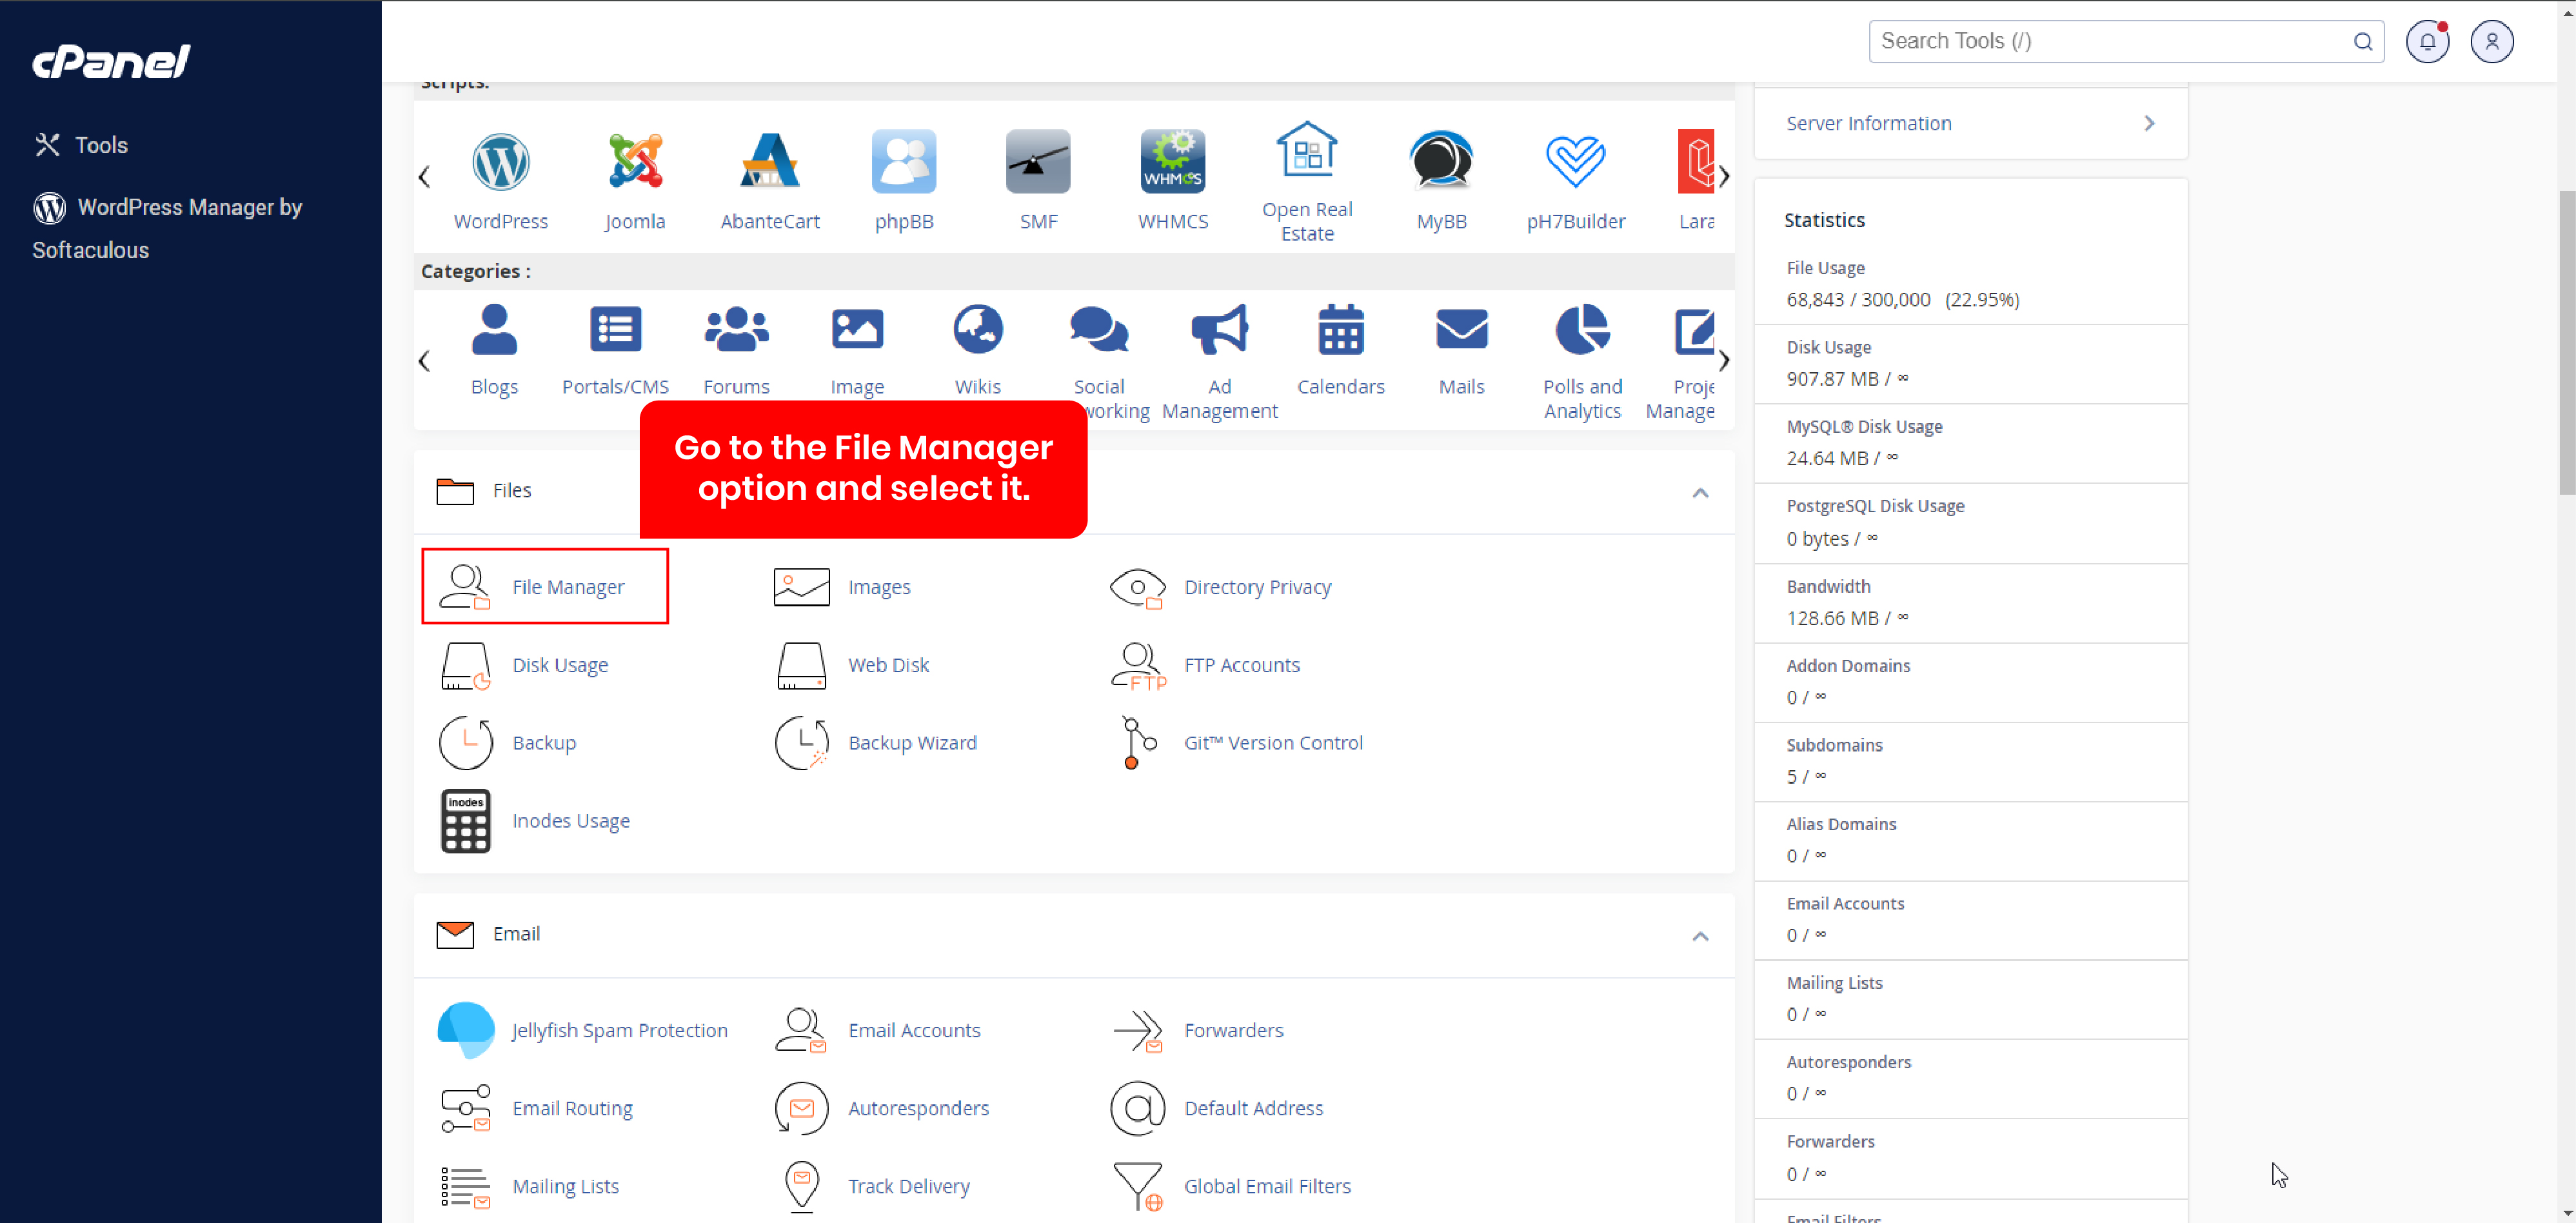
Navigate to the File Manager option and select it.
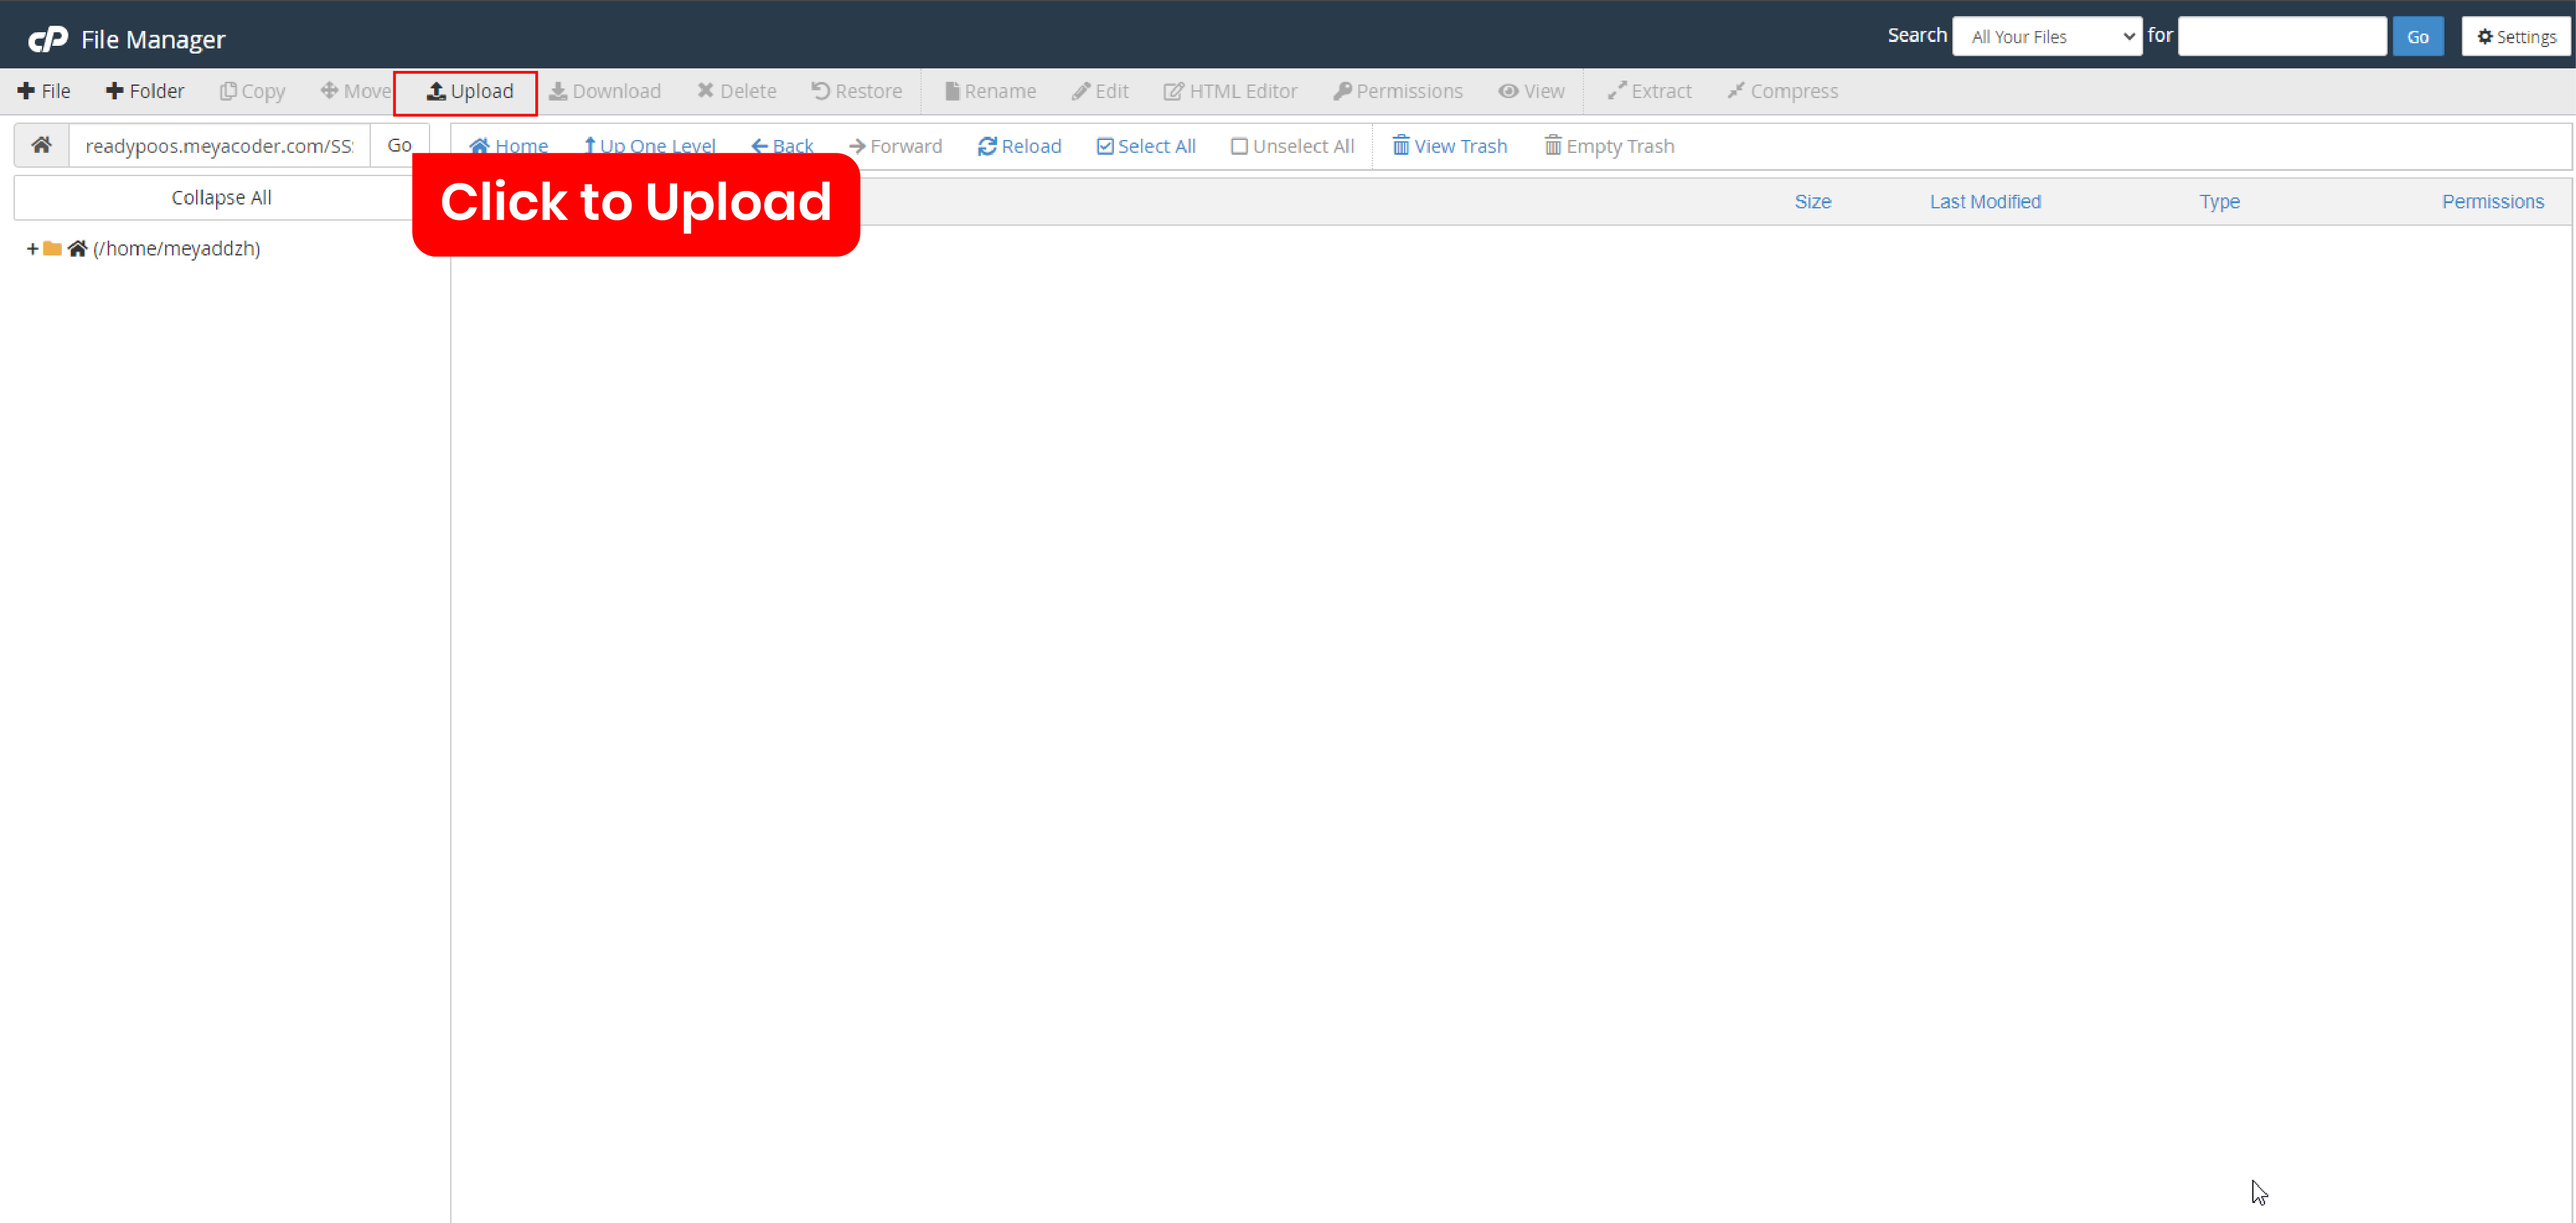
Ensure that you are in the root folder, then click on the Upload
button.
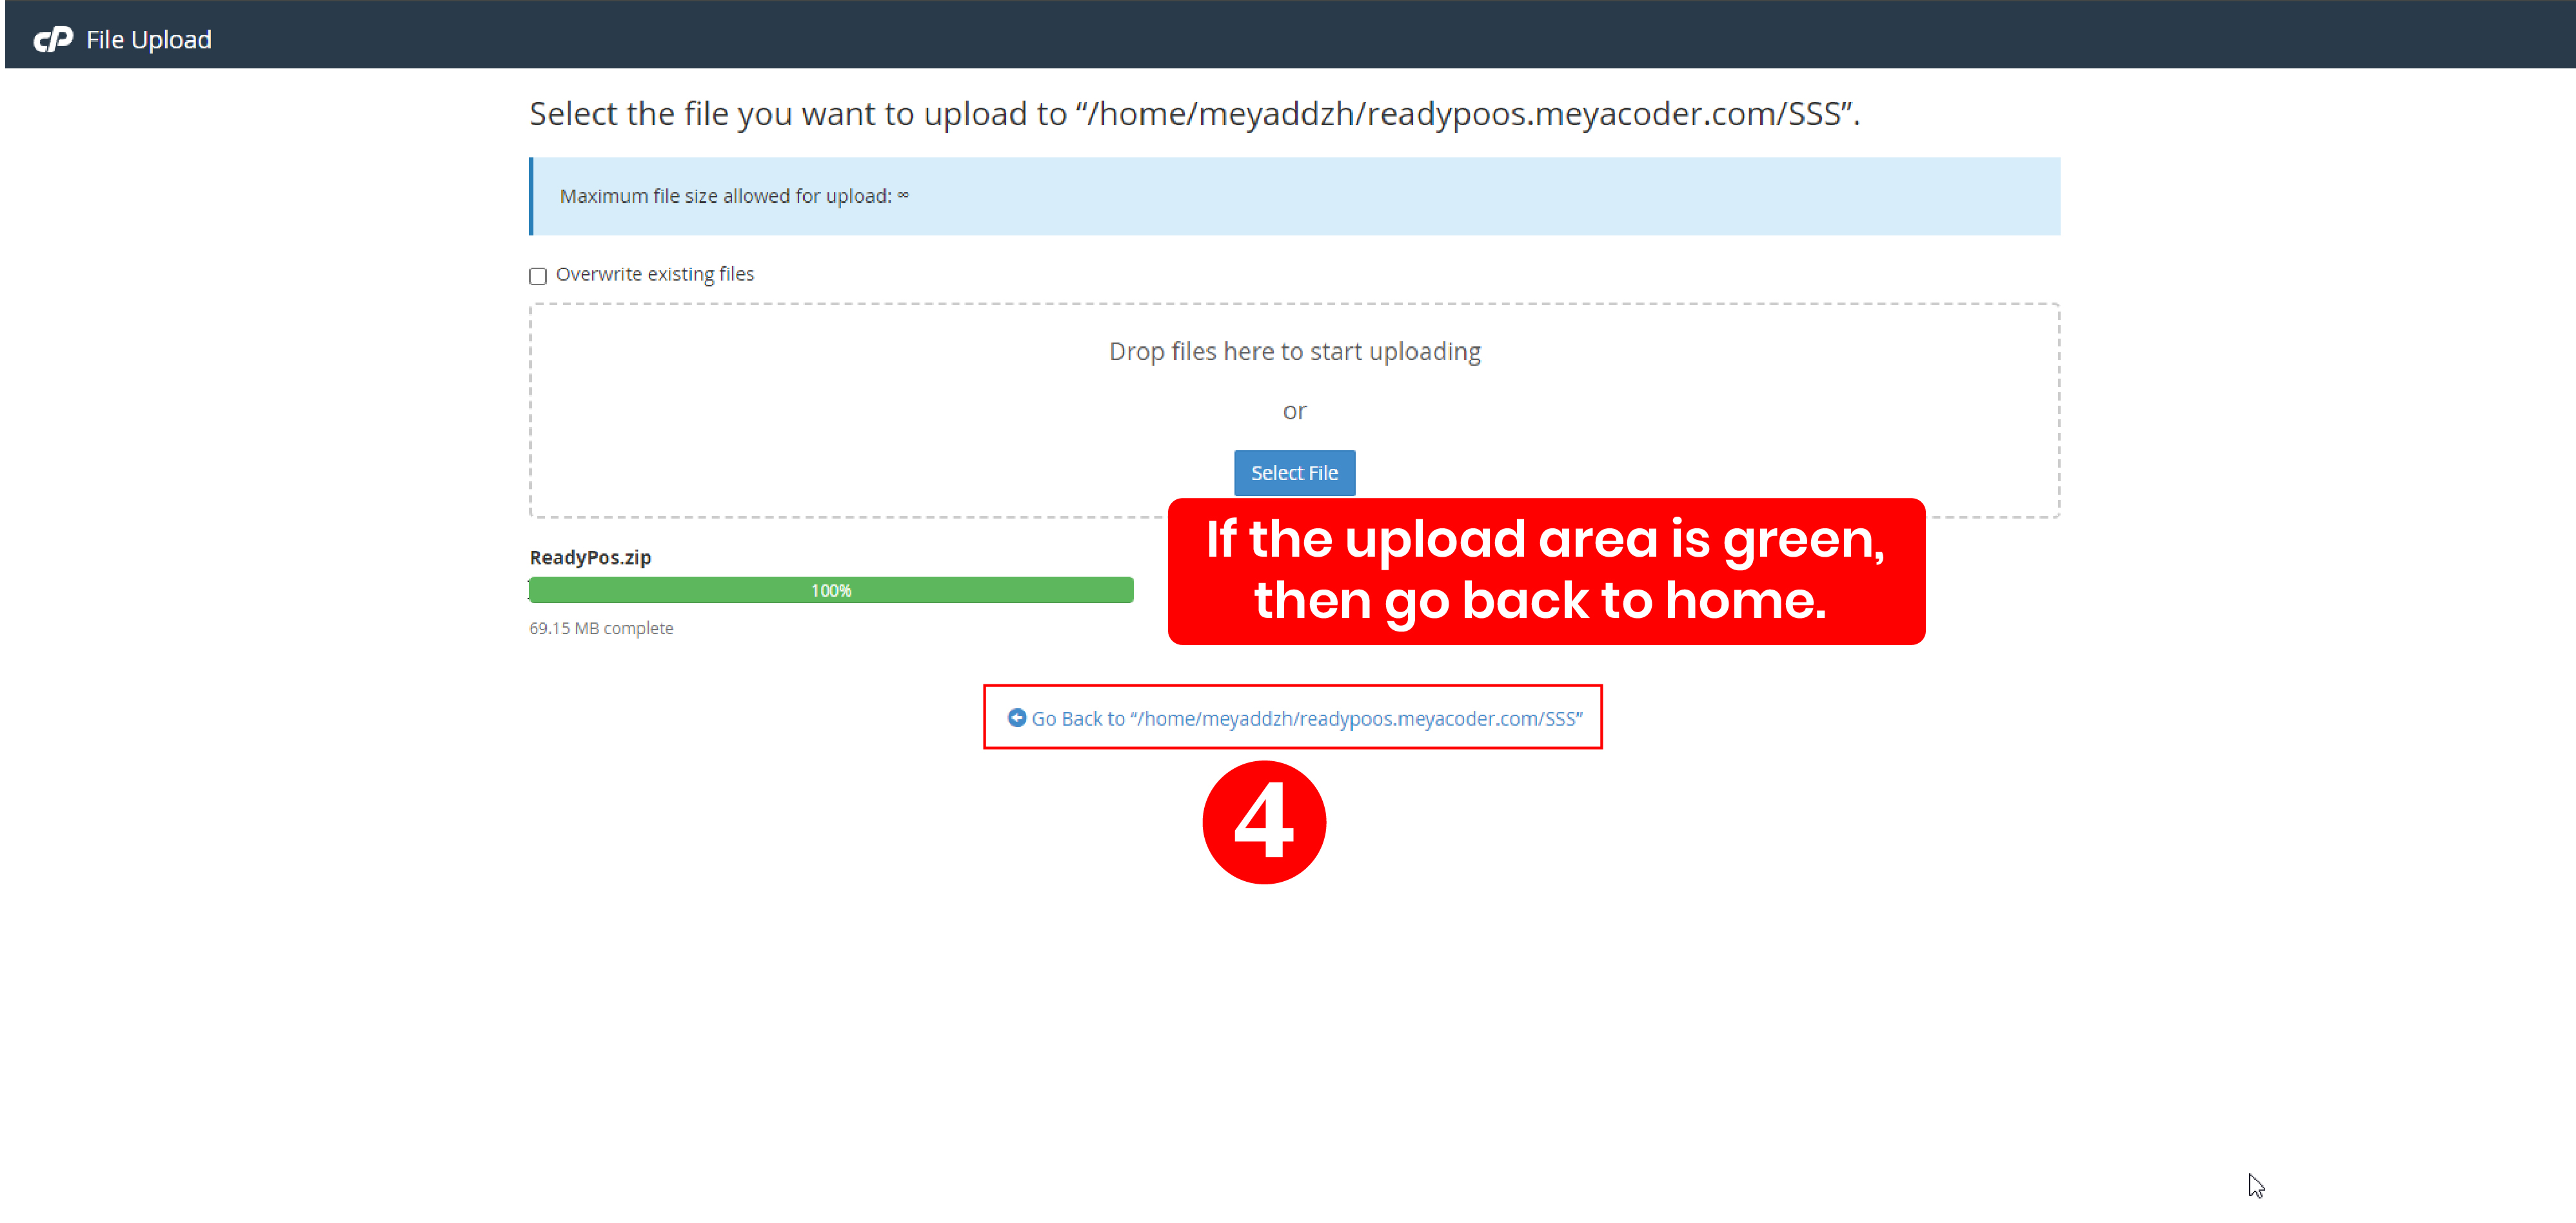
Select your zip folder and wait for the upload to complete.
If the upload area turns green, proceed to the next step.
Return to the File Manager home and unzip the uploaded folder.
Select all files and directories, then move them to the root folder.
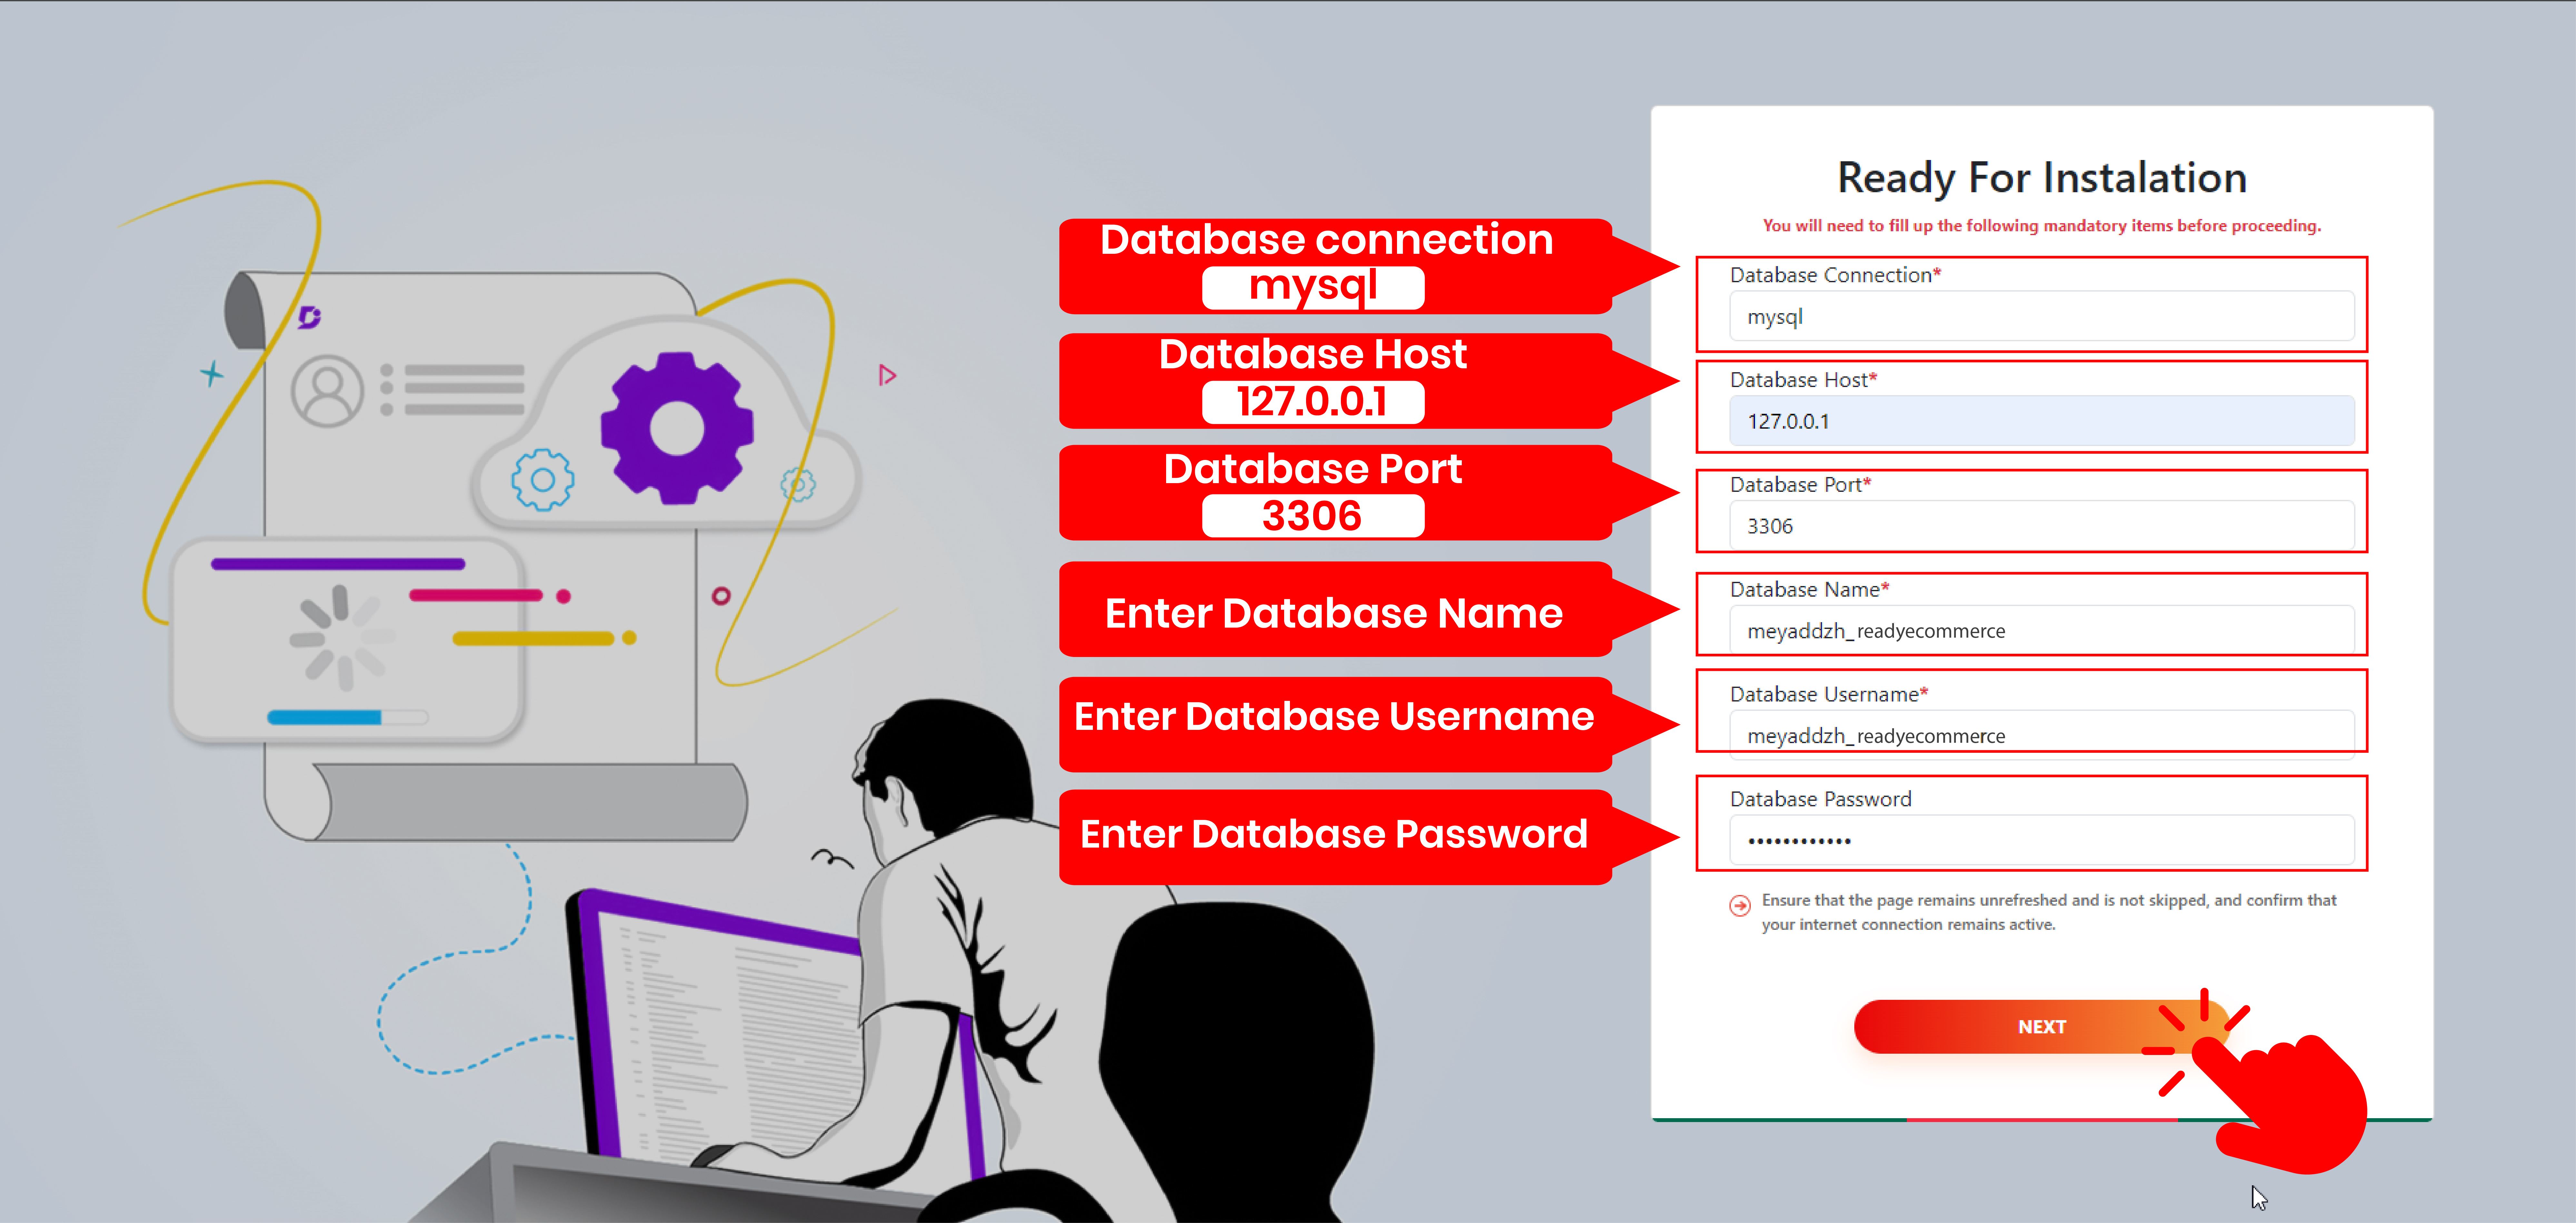
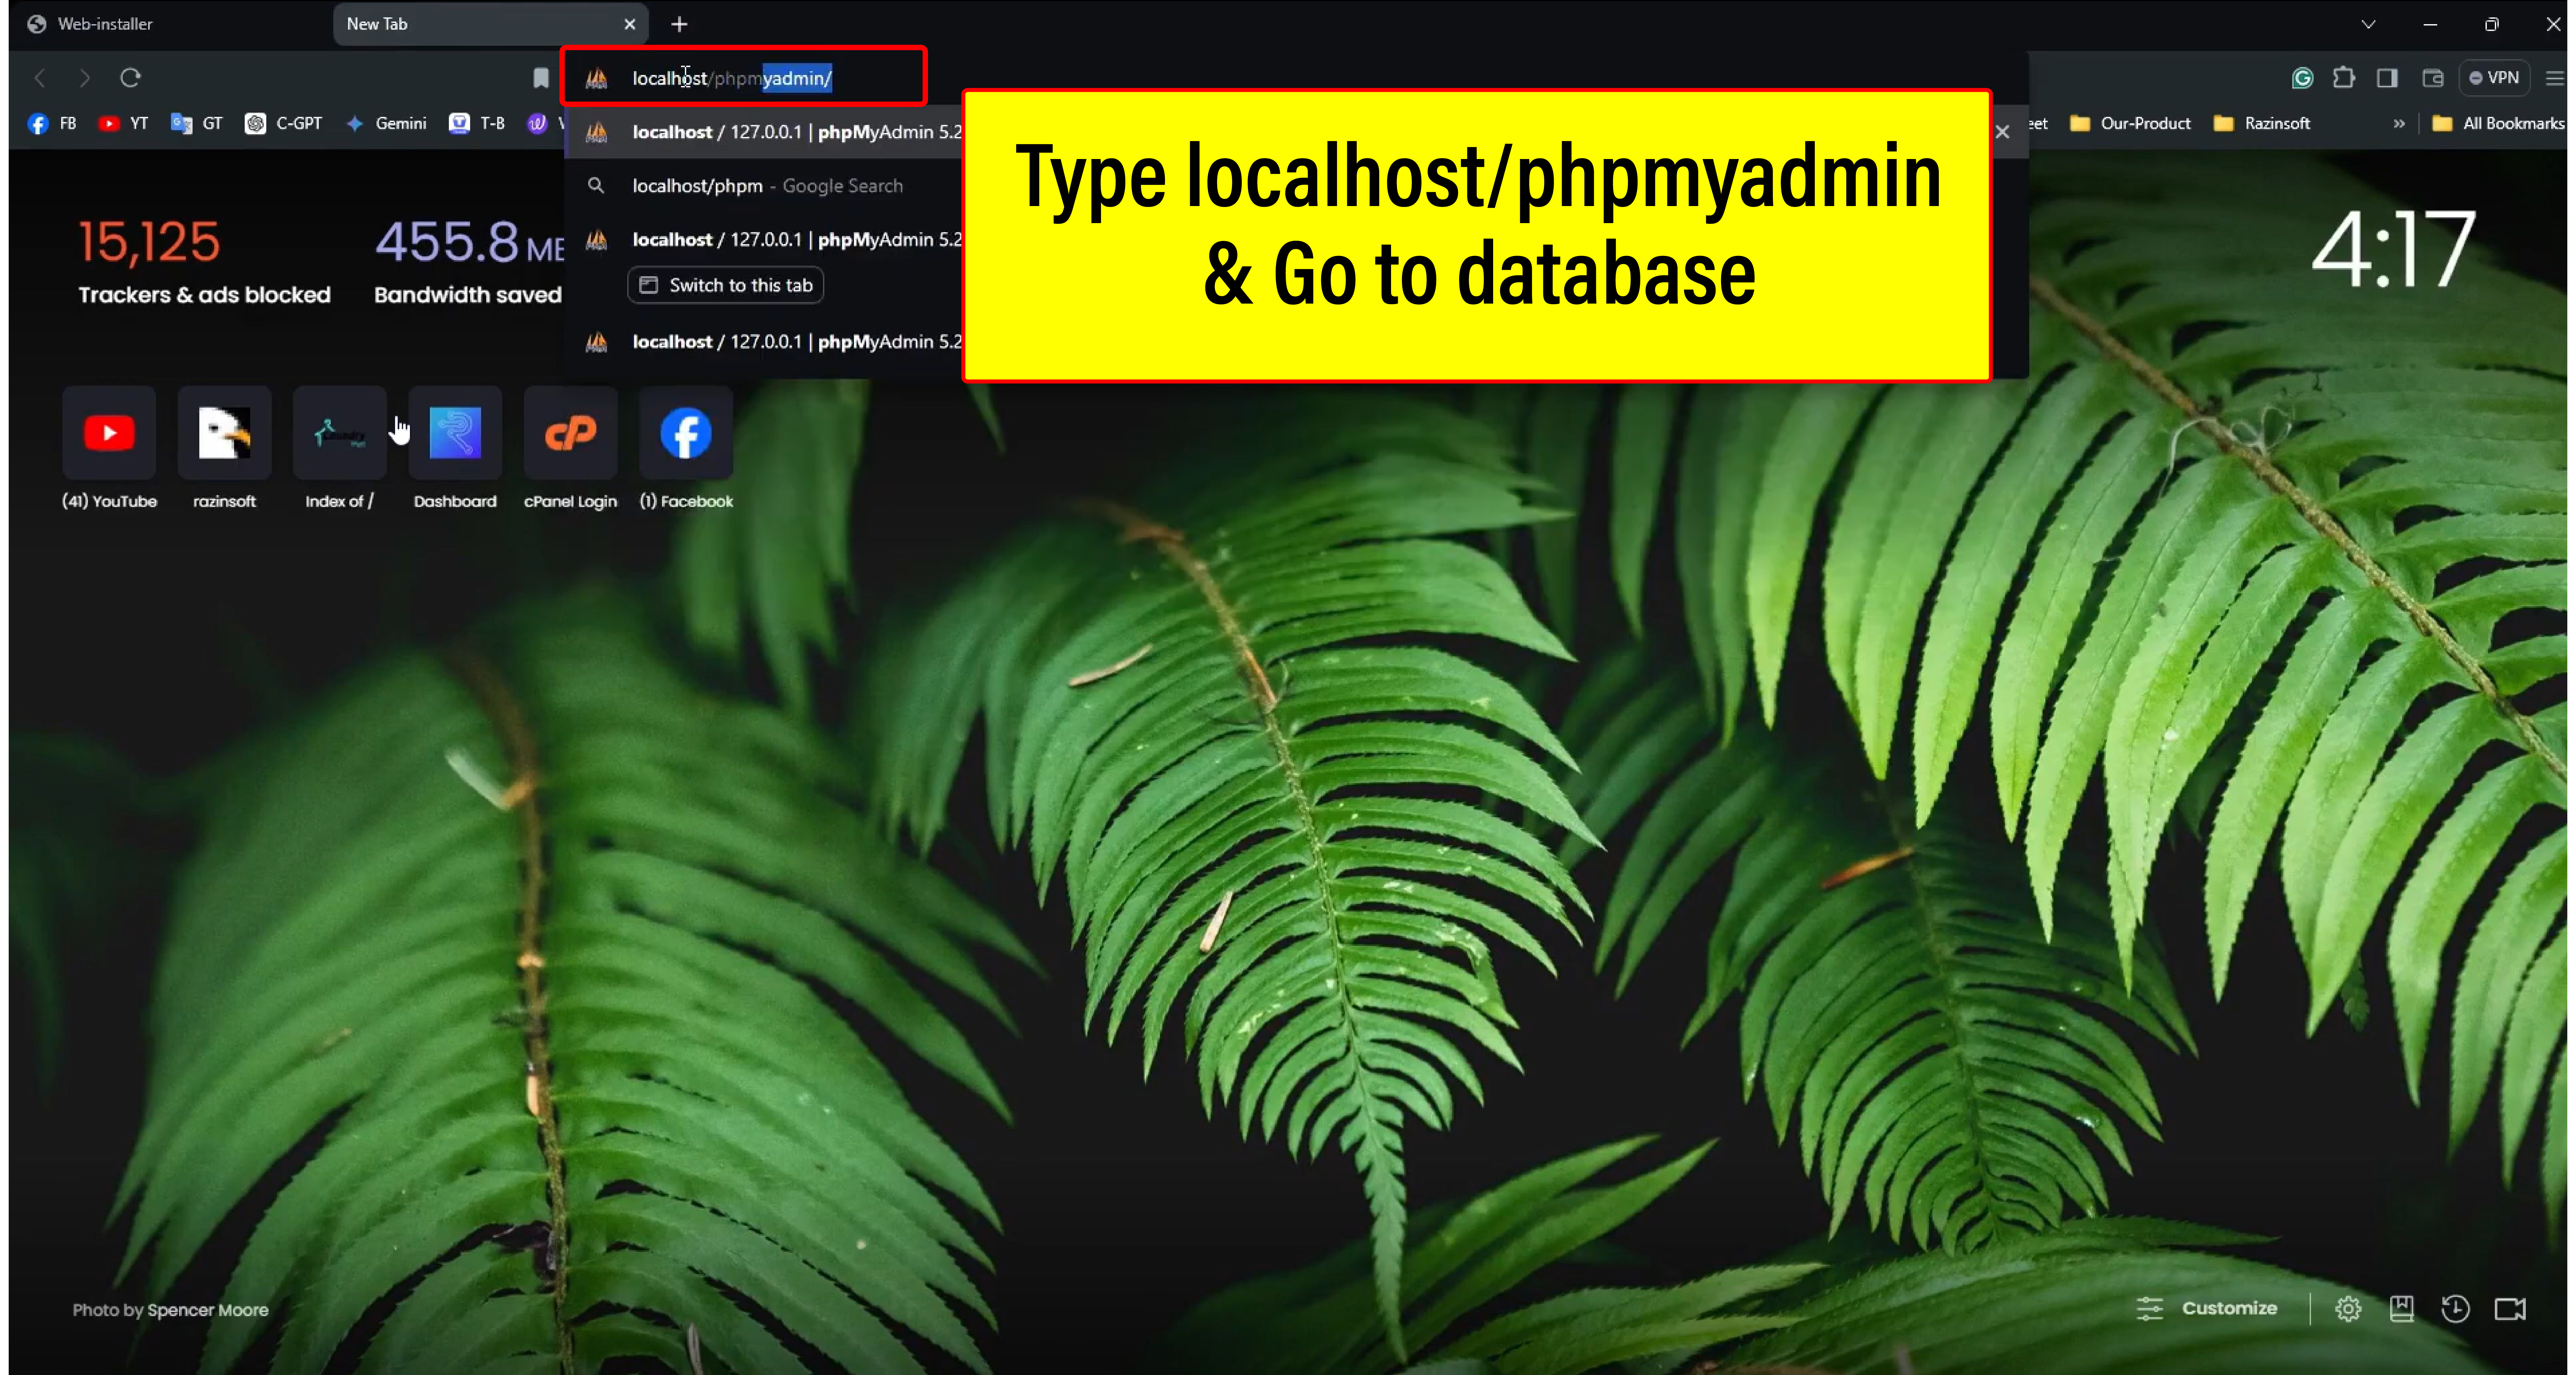
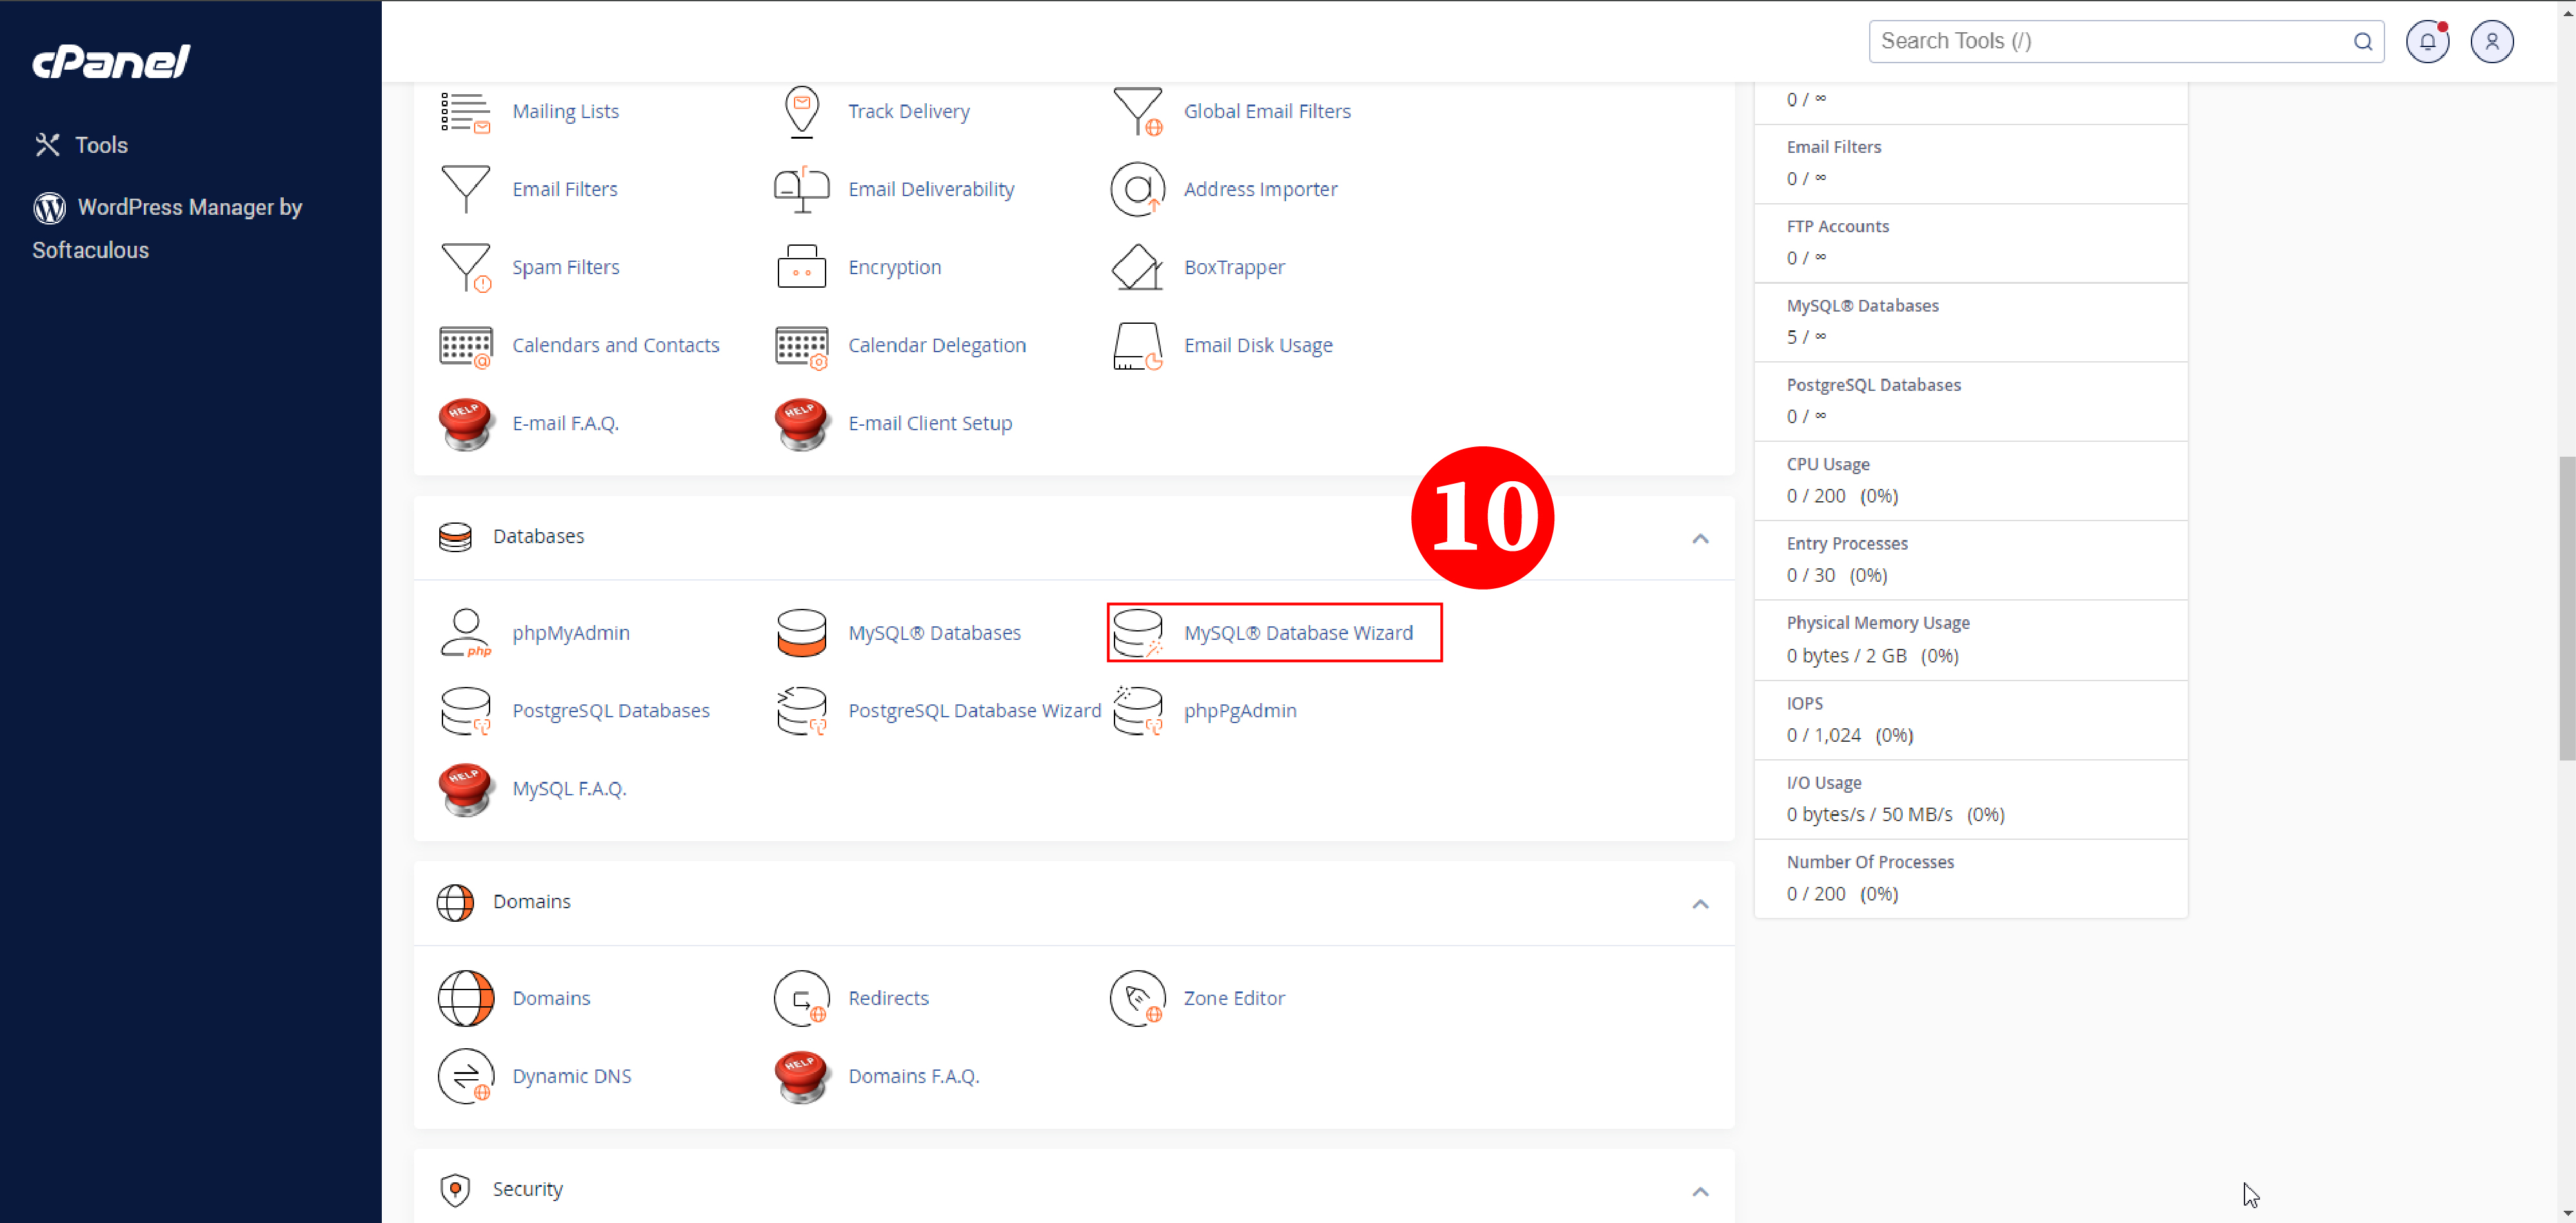
Return to cPanel and navigate to the Database section.
Create a new database. If a database user does not already exist,
create one and add it to the database.
Open your domain in a browser to begin the installation process.
Click the Start Installation Process button that appears on the
screen.
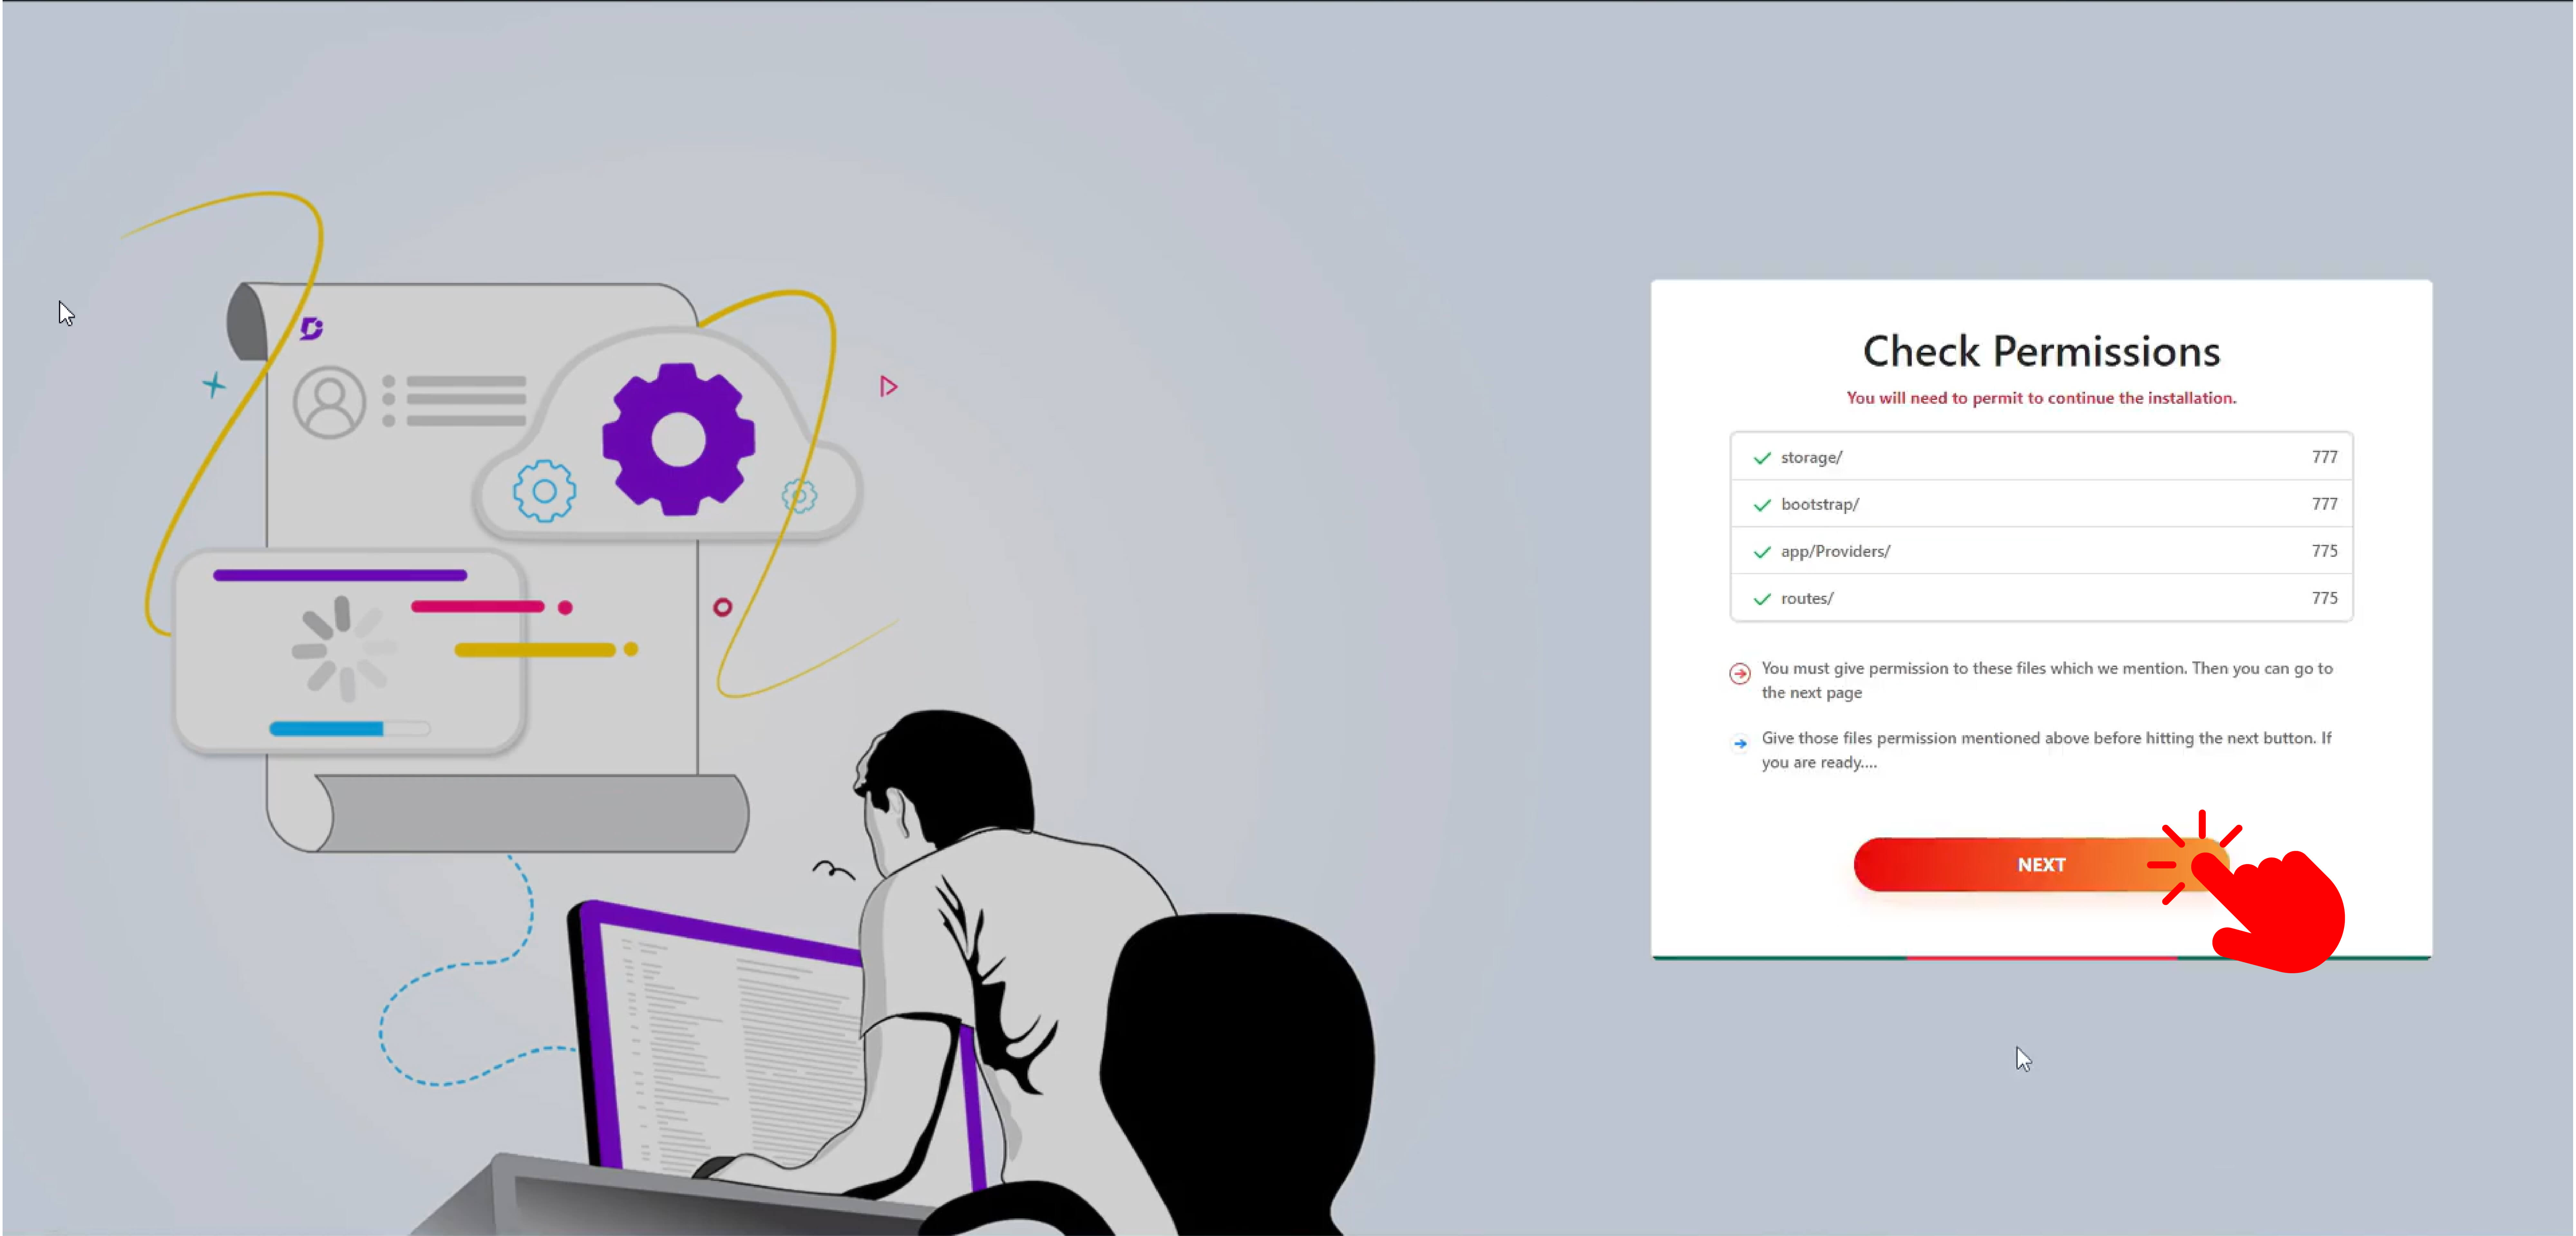
Navigate to the root folder to check file permissions. Ensure that
the mentioned folders have the correct permissions.
Once the file permissions are correctly set, click the Next
button.
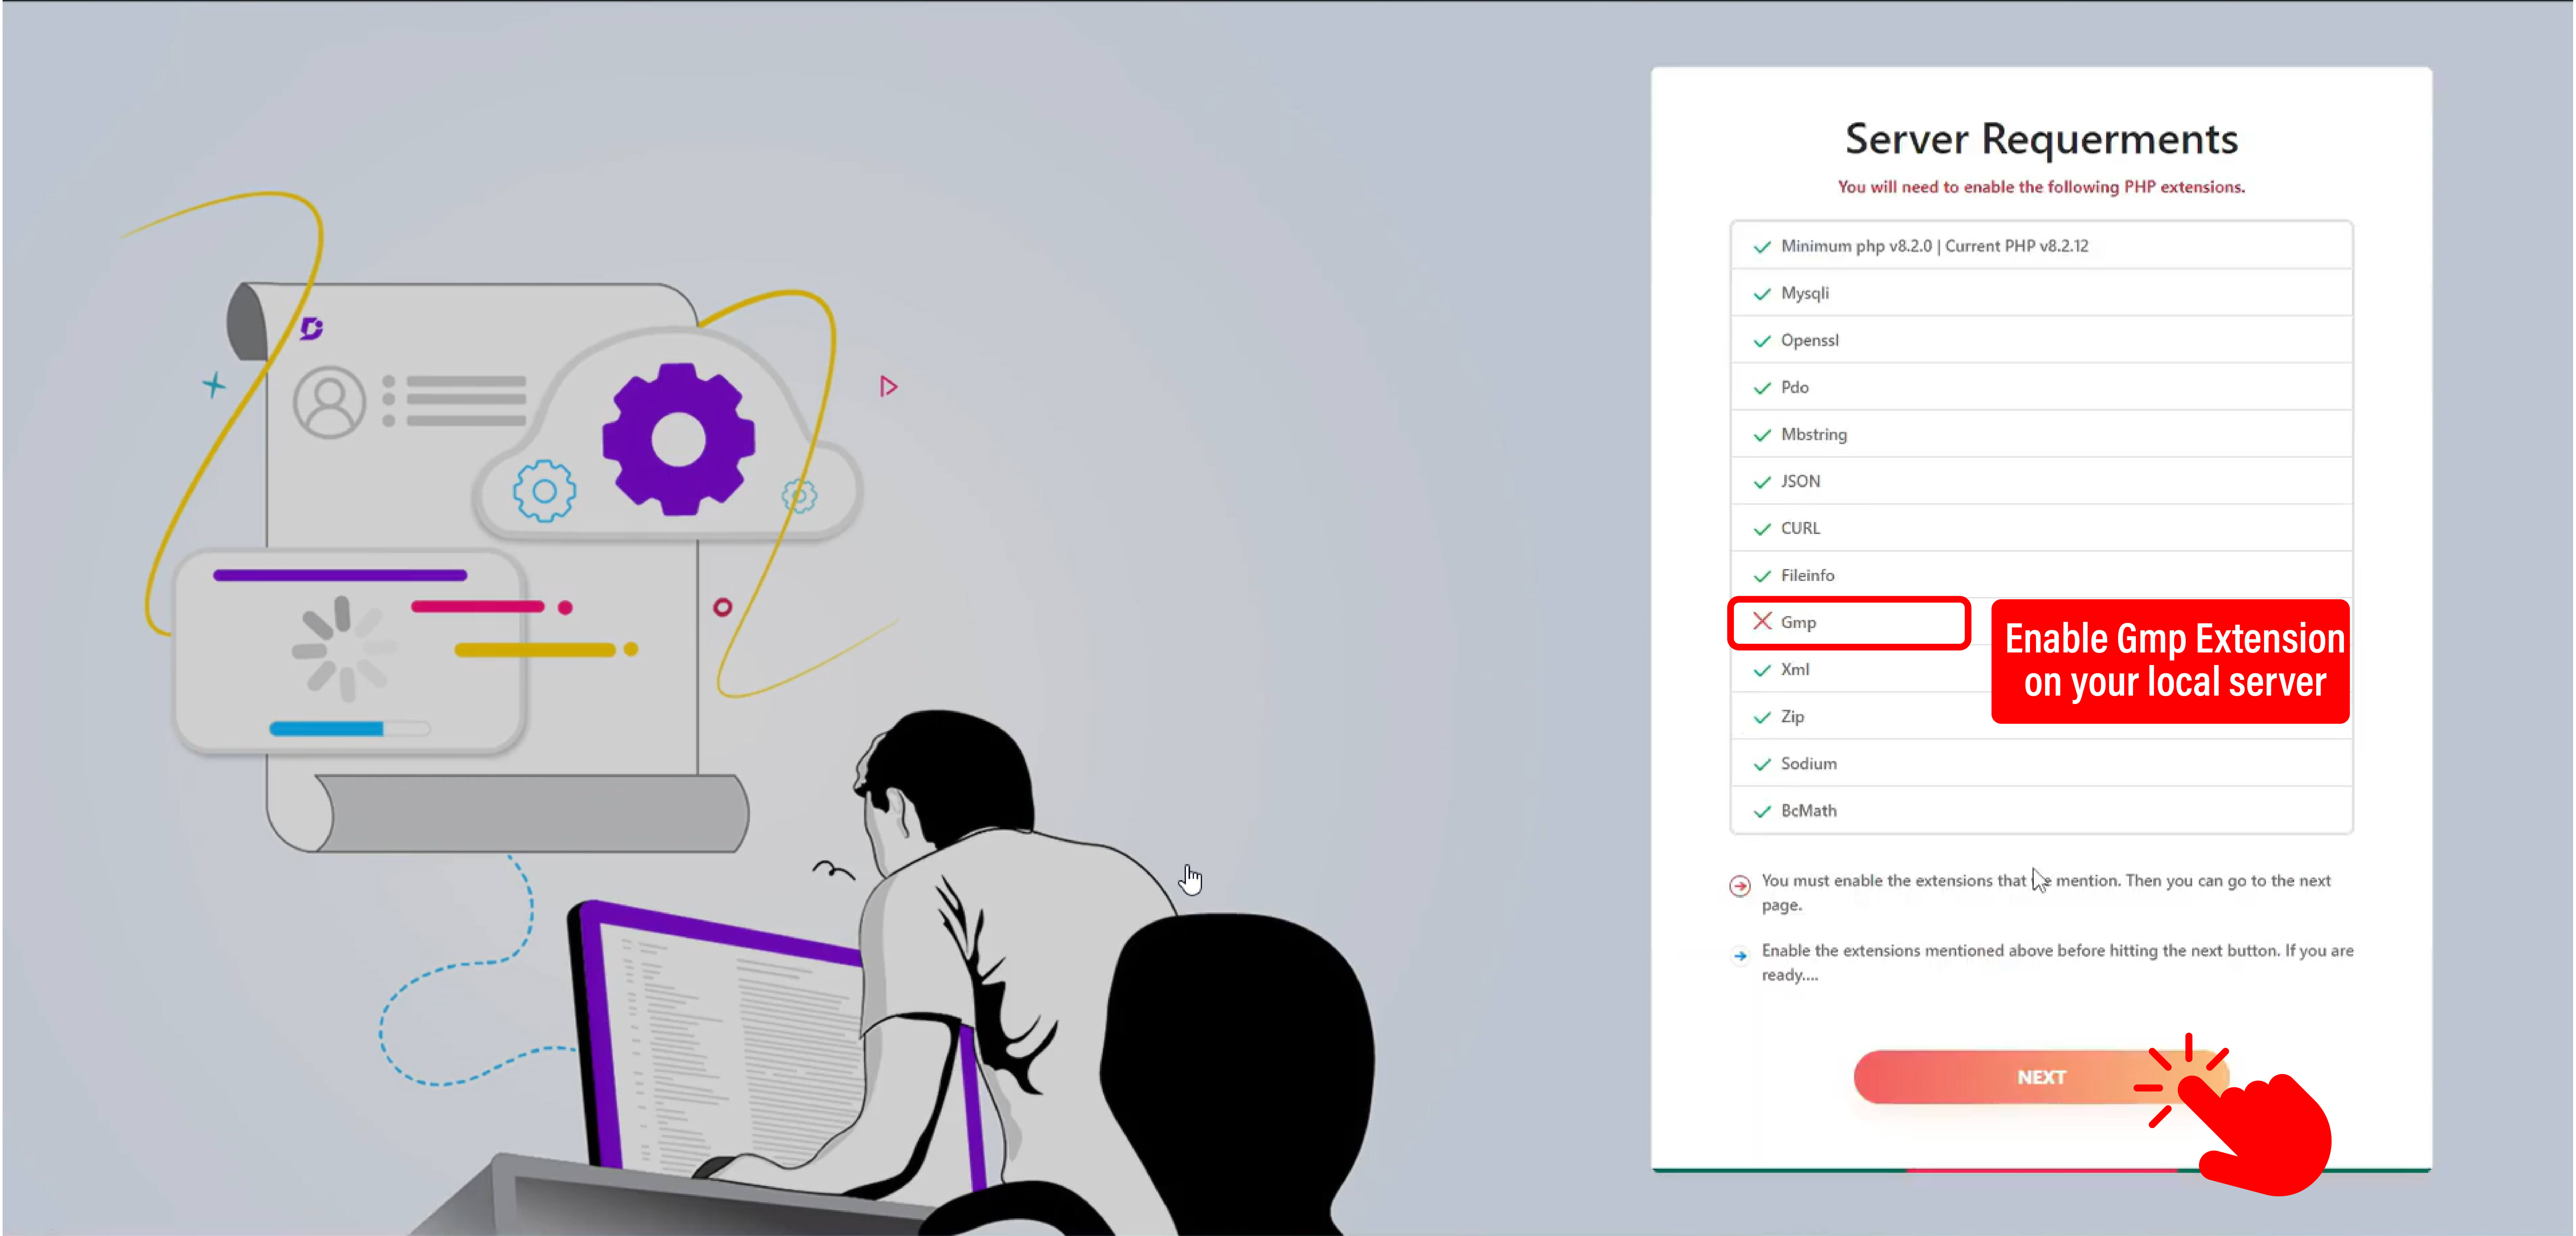
If the server requests that certain PHP extensions be enabled, go to the
Select PHP Version option in cPanel. Enable any extensions
that are currently disabled, refresh the browser, and then click the Next
button.
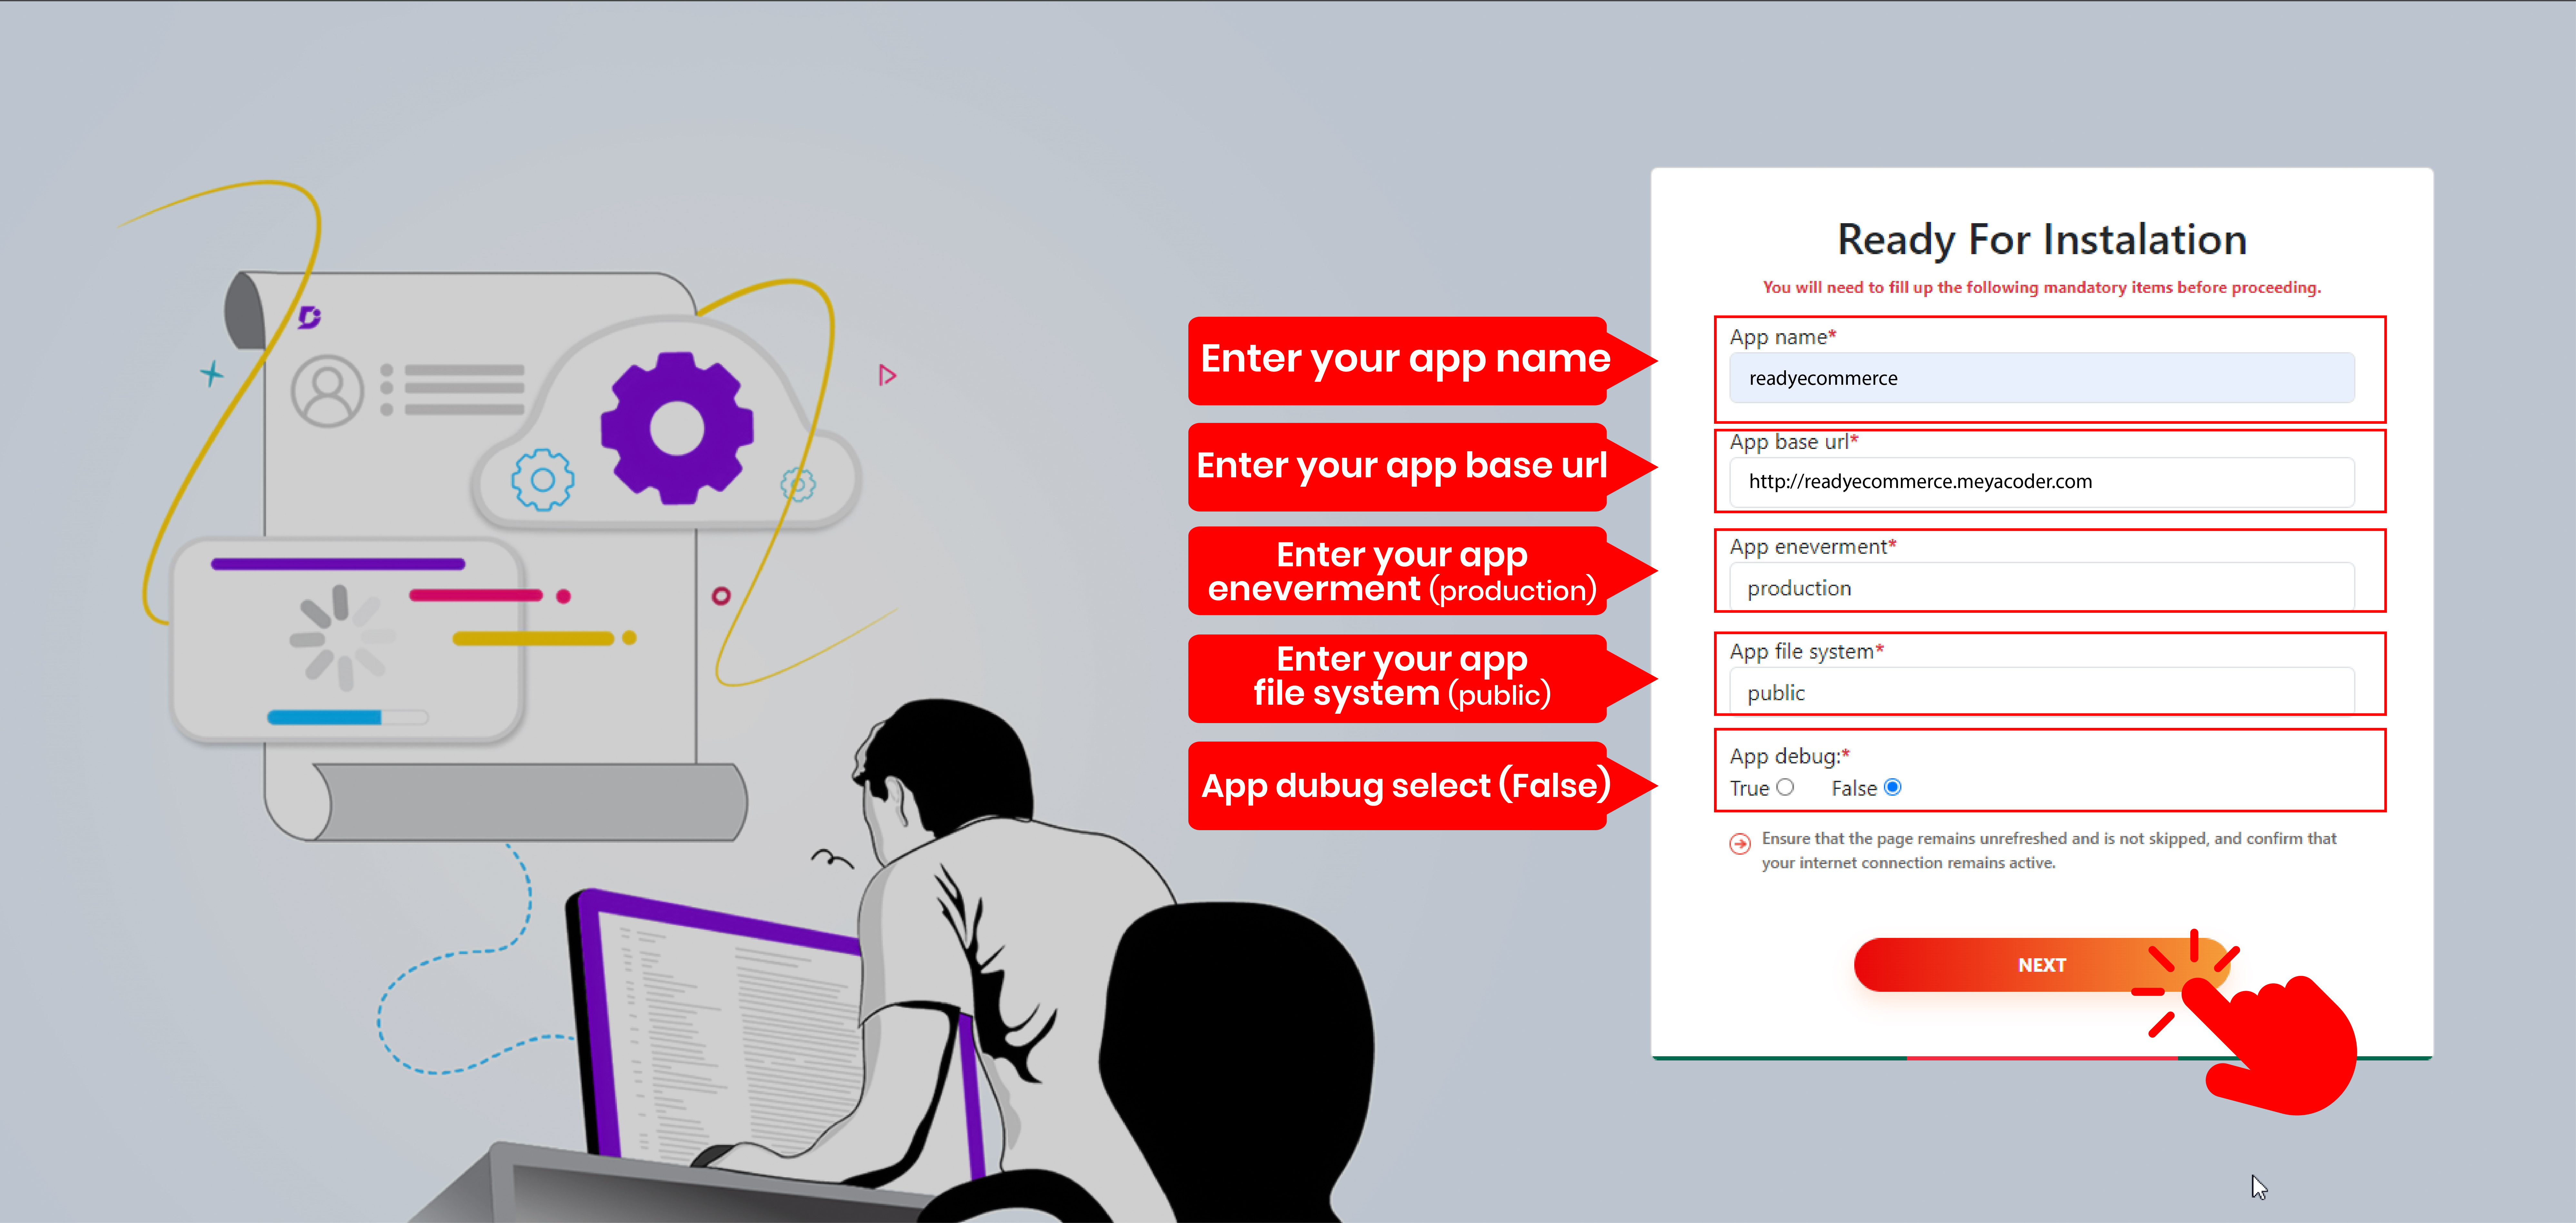
Fill in the required forms as prompted, then press the Next
button.
Connect to the database you created earlier and press the Next
button.
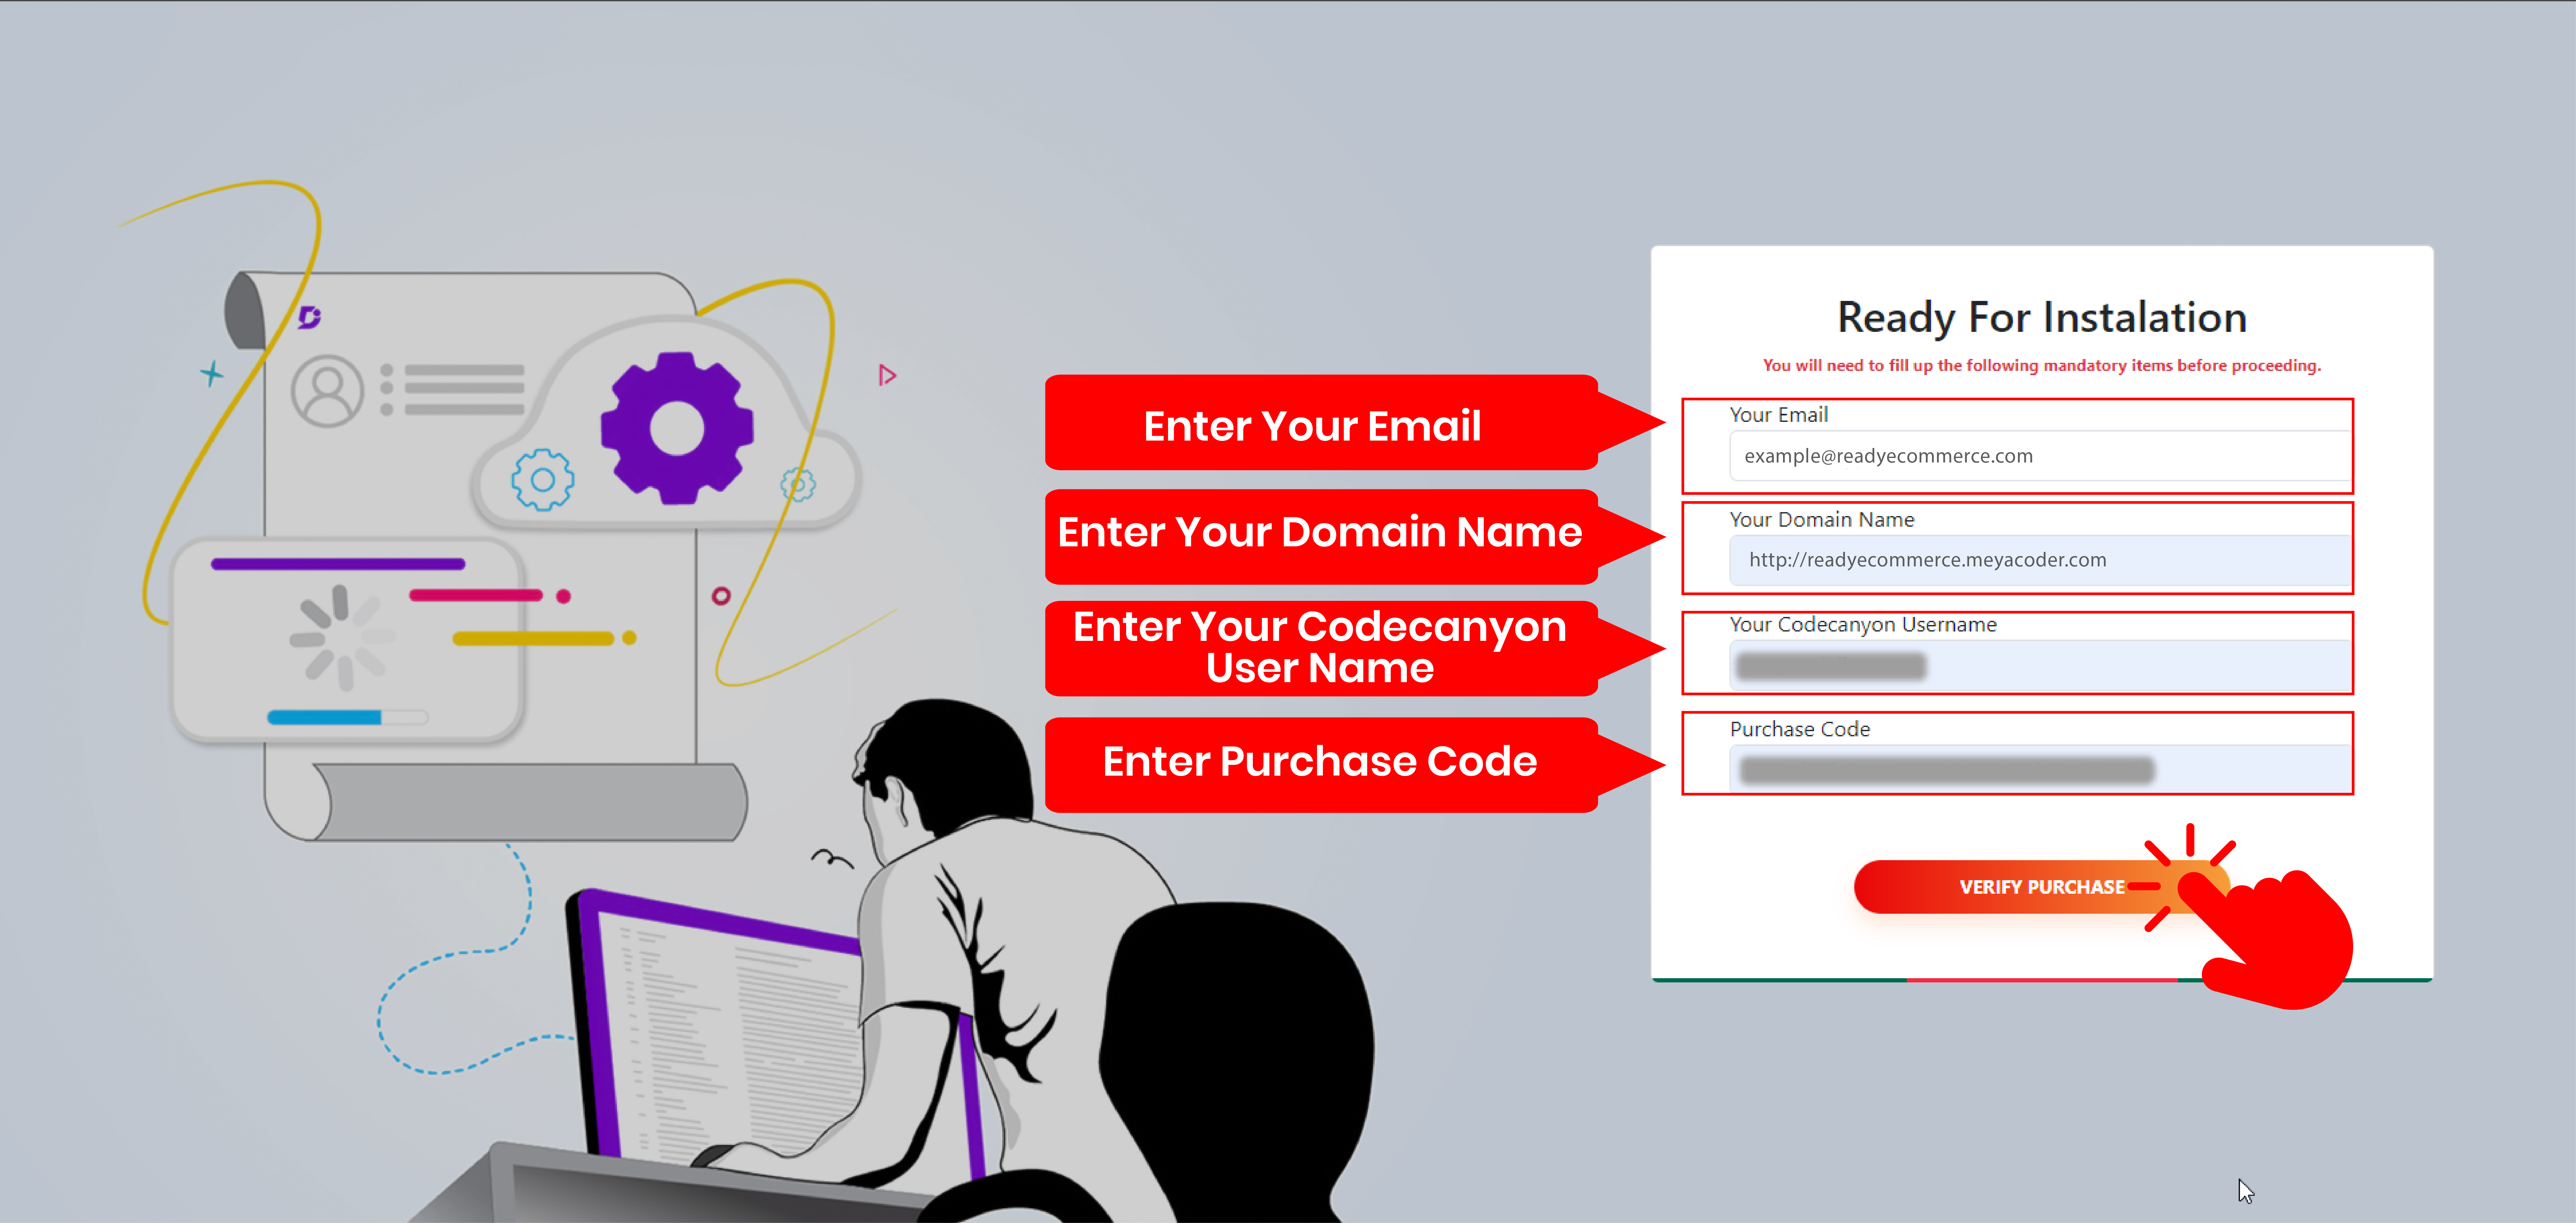
Fill out the form with your Email Account, Domain, Codecanyon Username, and
Purchase Code. Click the Verify Purchases button.
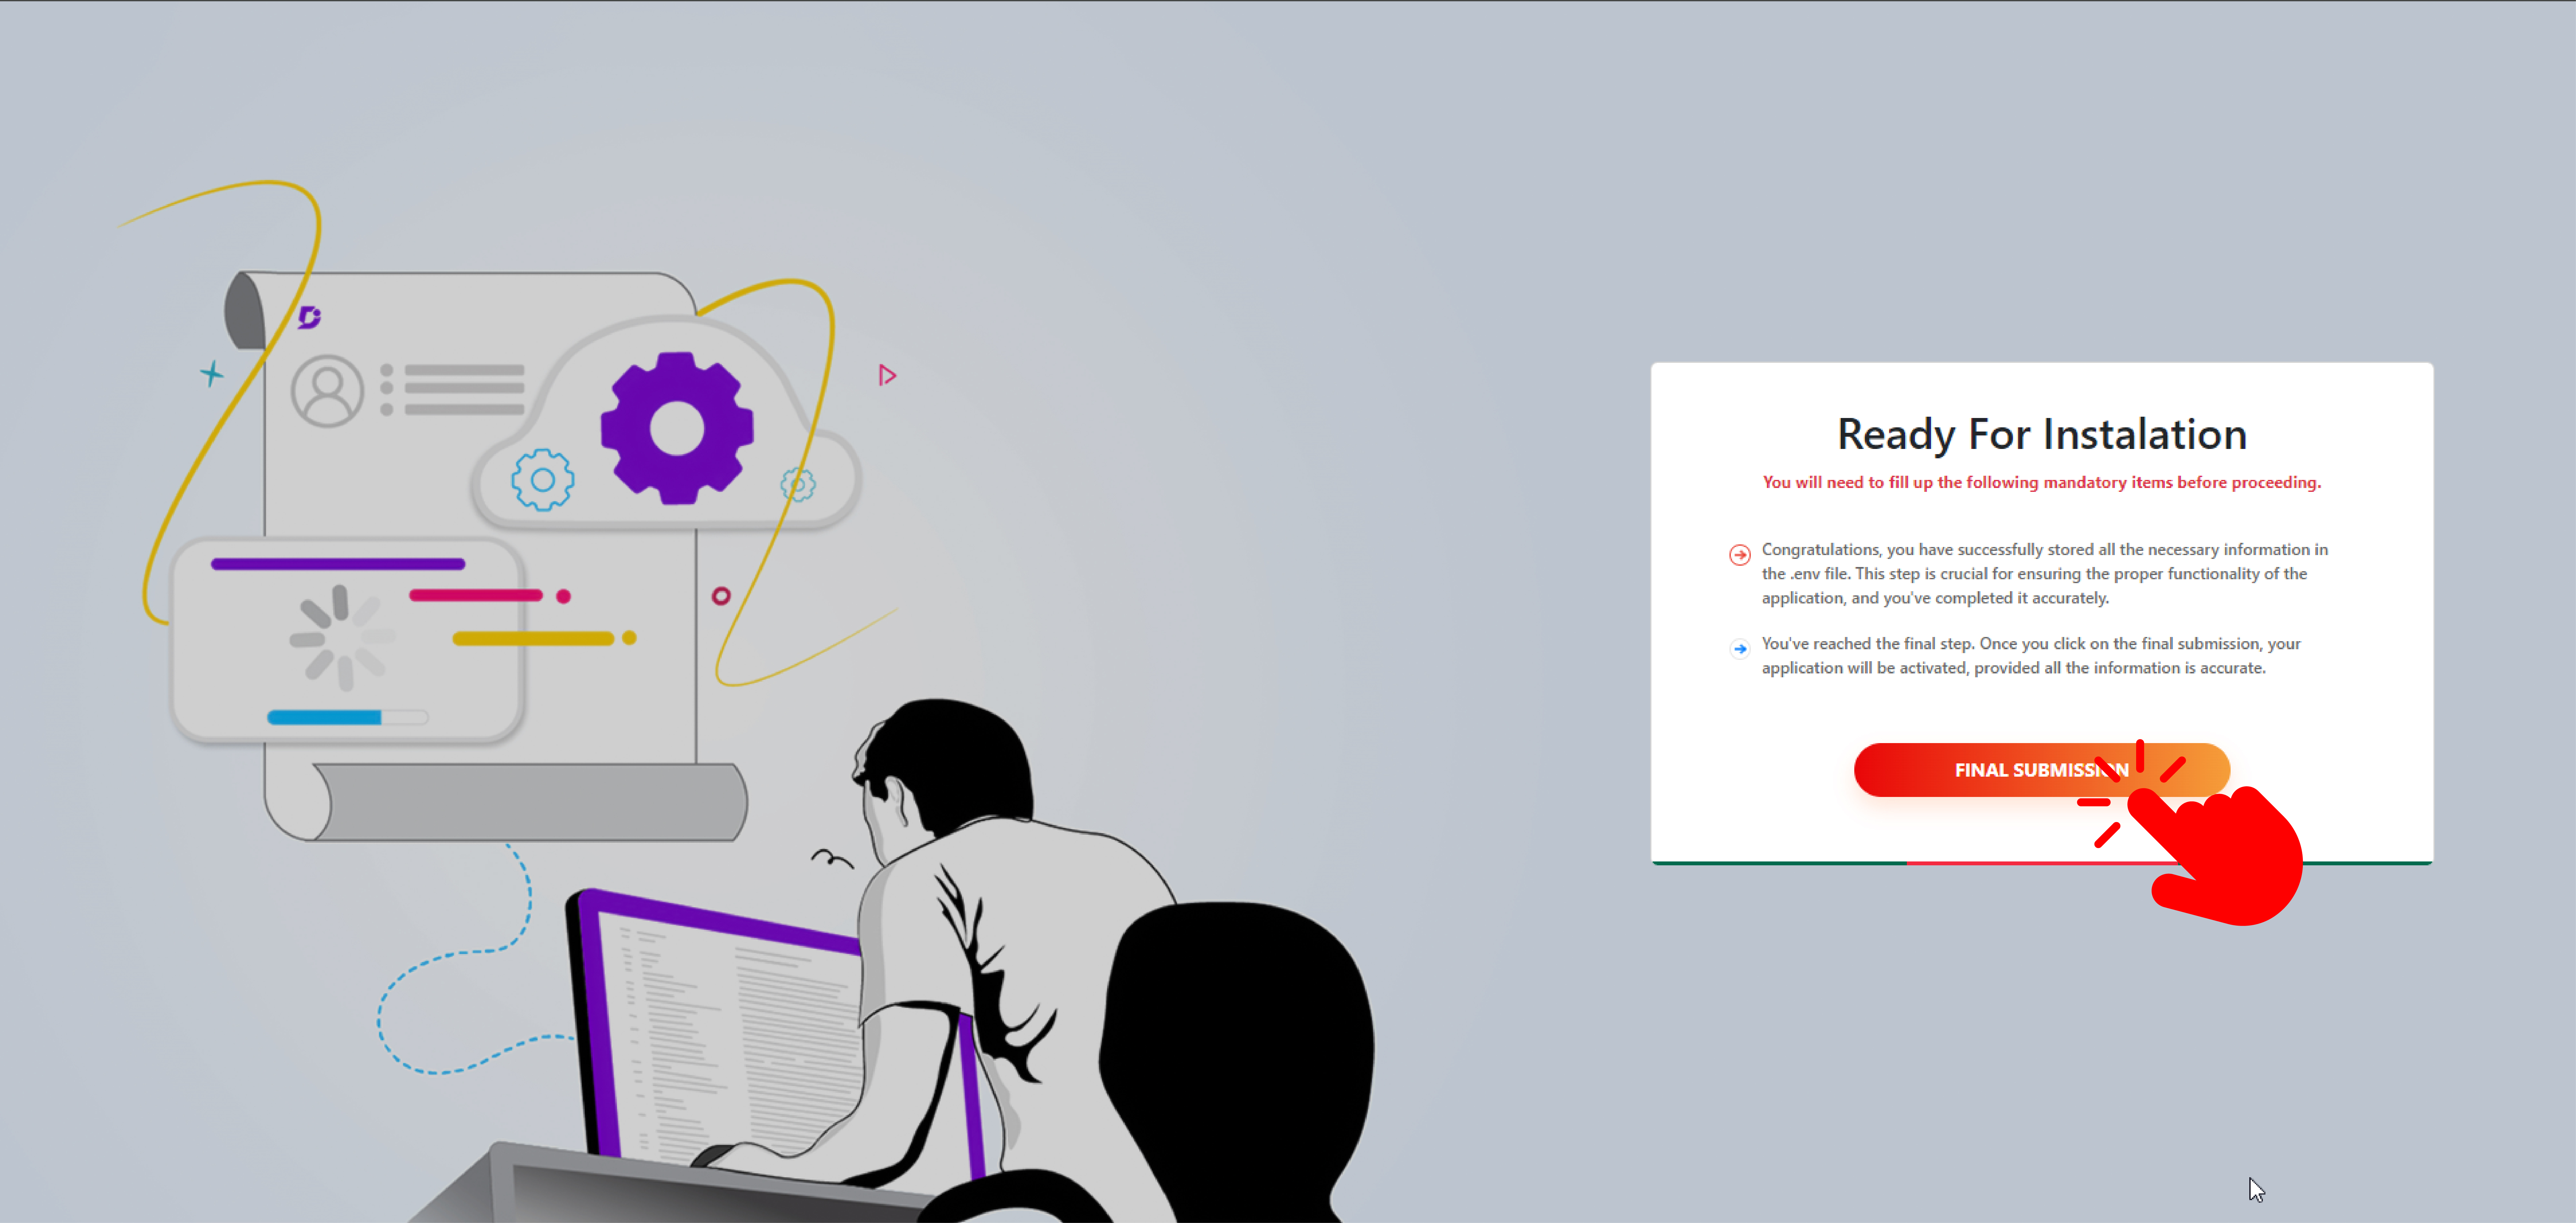
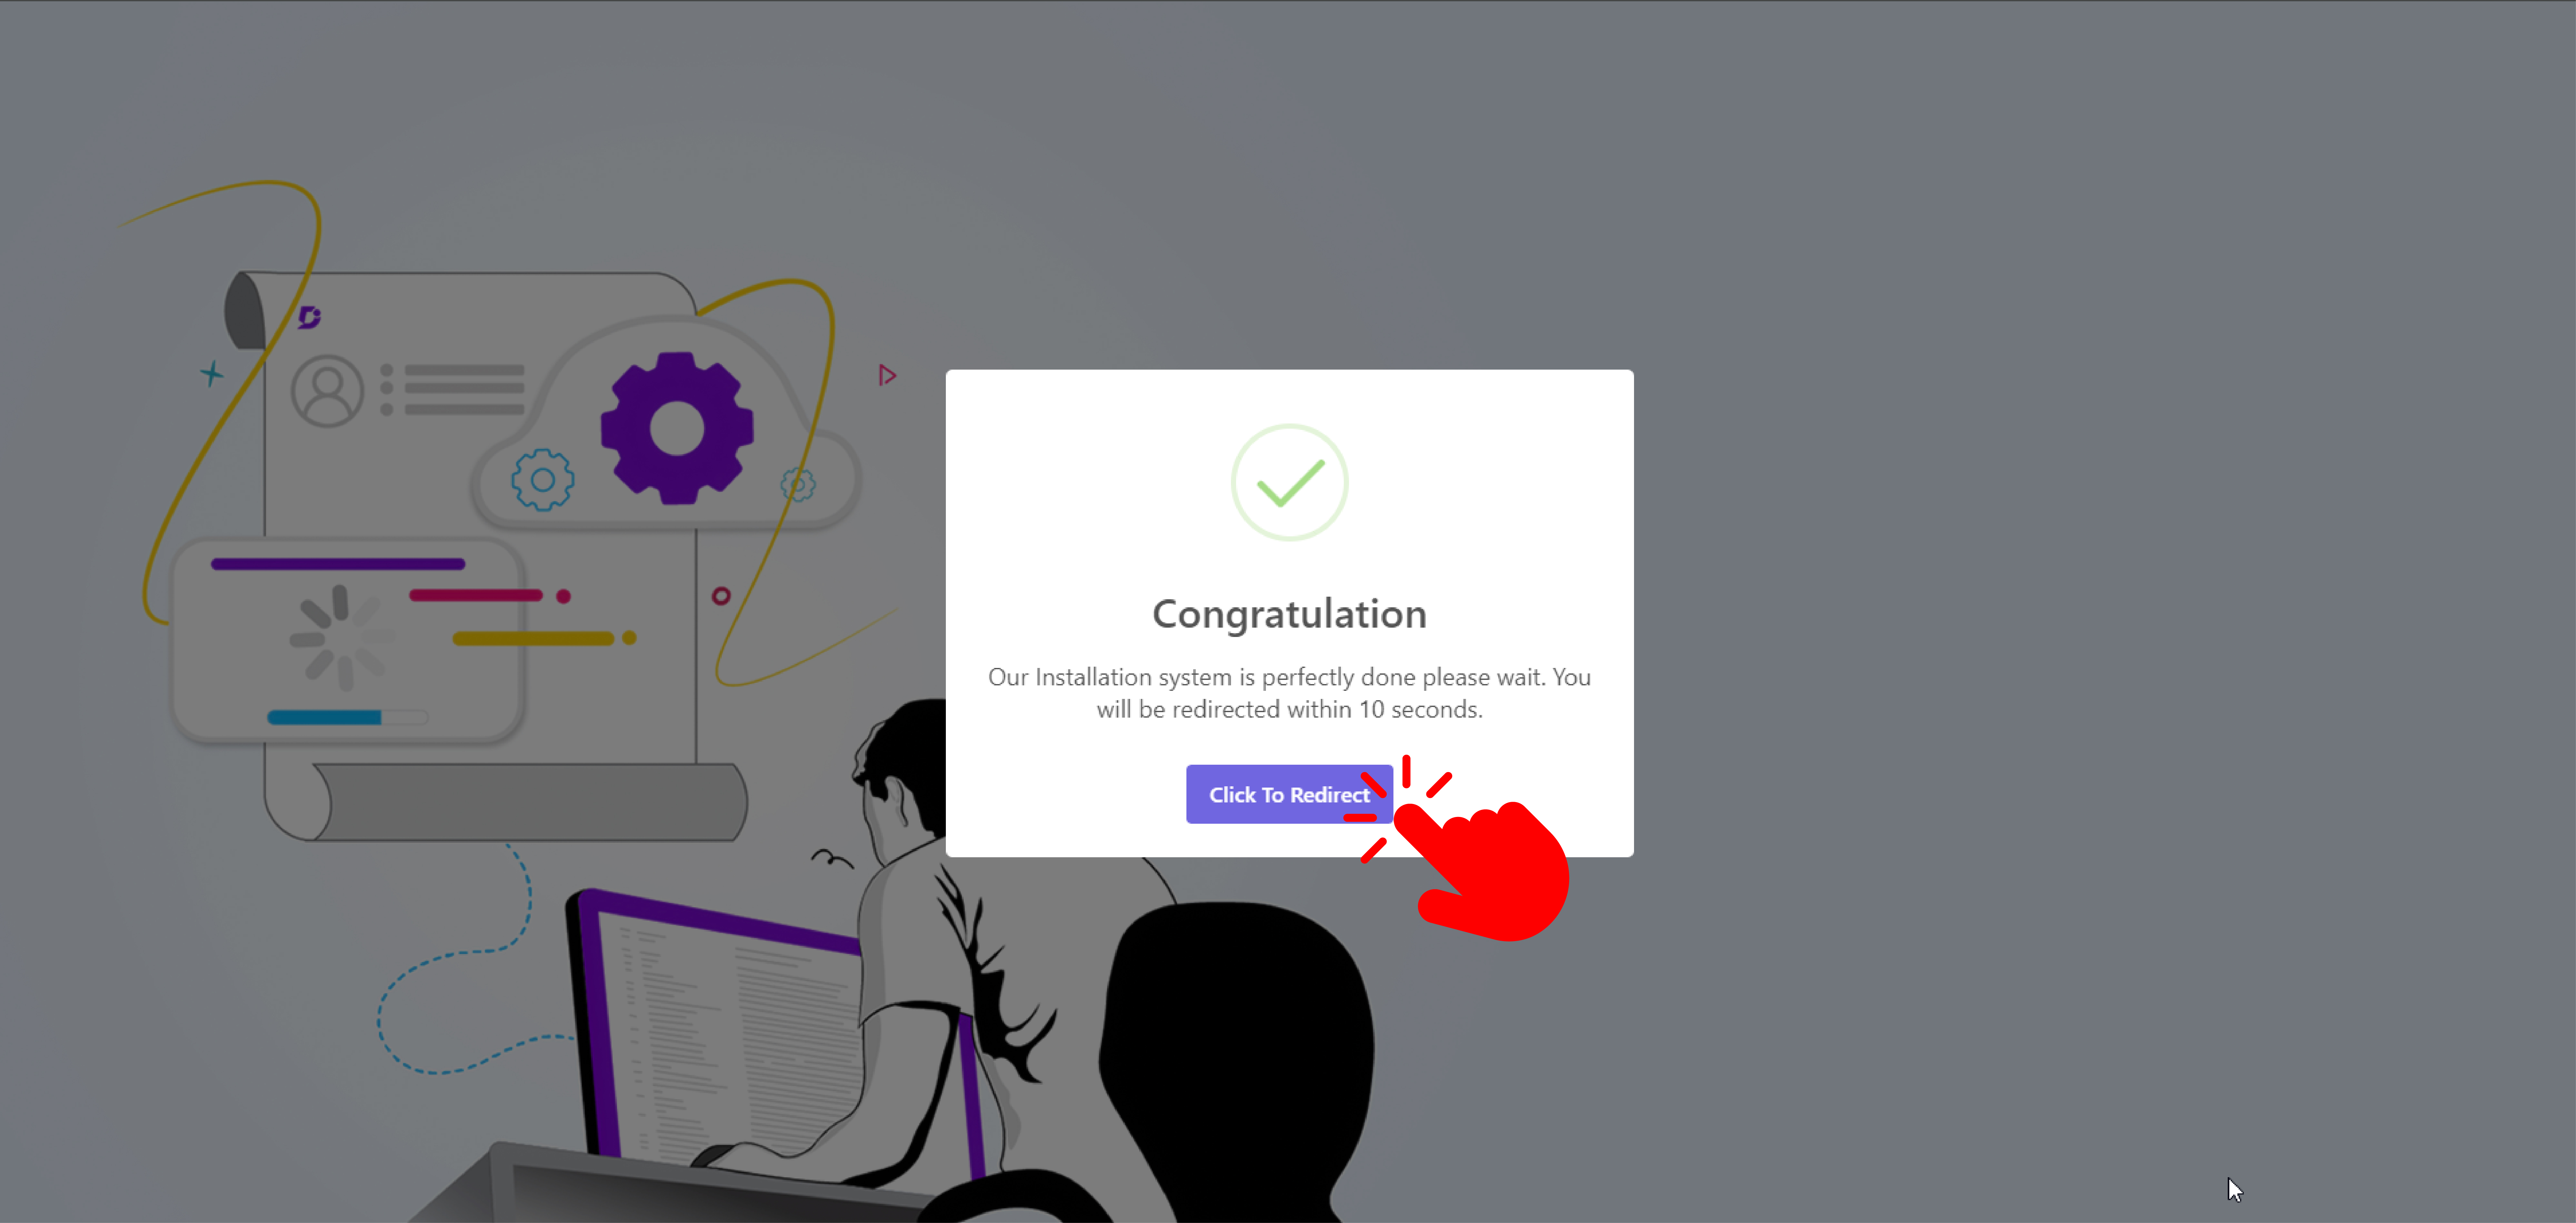
Click the Final Submission button. Complete the
installation process by clicking the Click to Redirect button.
Full Installation Journey By Image Example:
Install on Localhost
To install on localhost,and follow the installation prompts for seamless
setup.
How to Install Star Music on localhost
A step-by-step guide on setting up your Star Music project in Localhost.
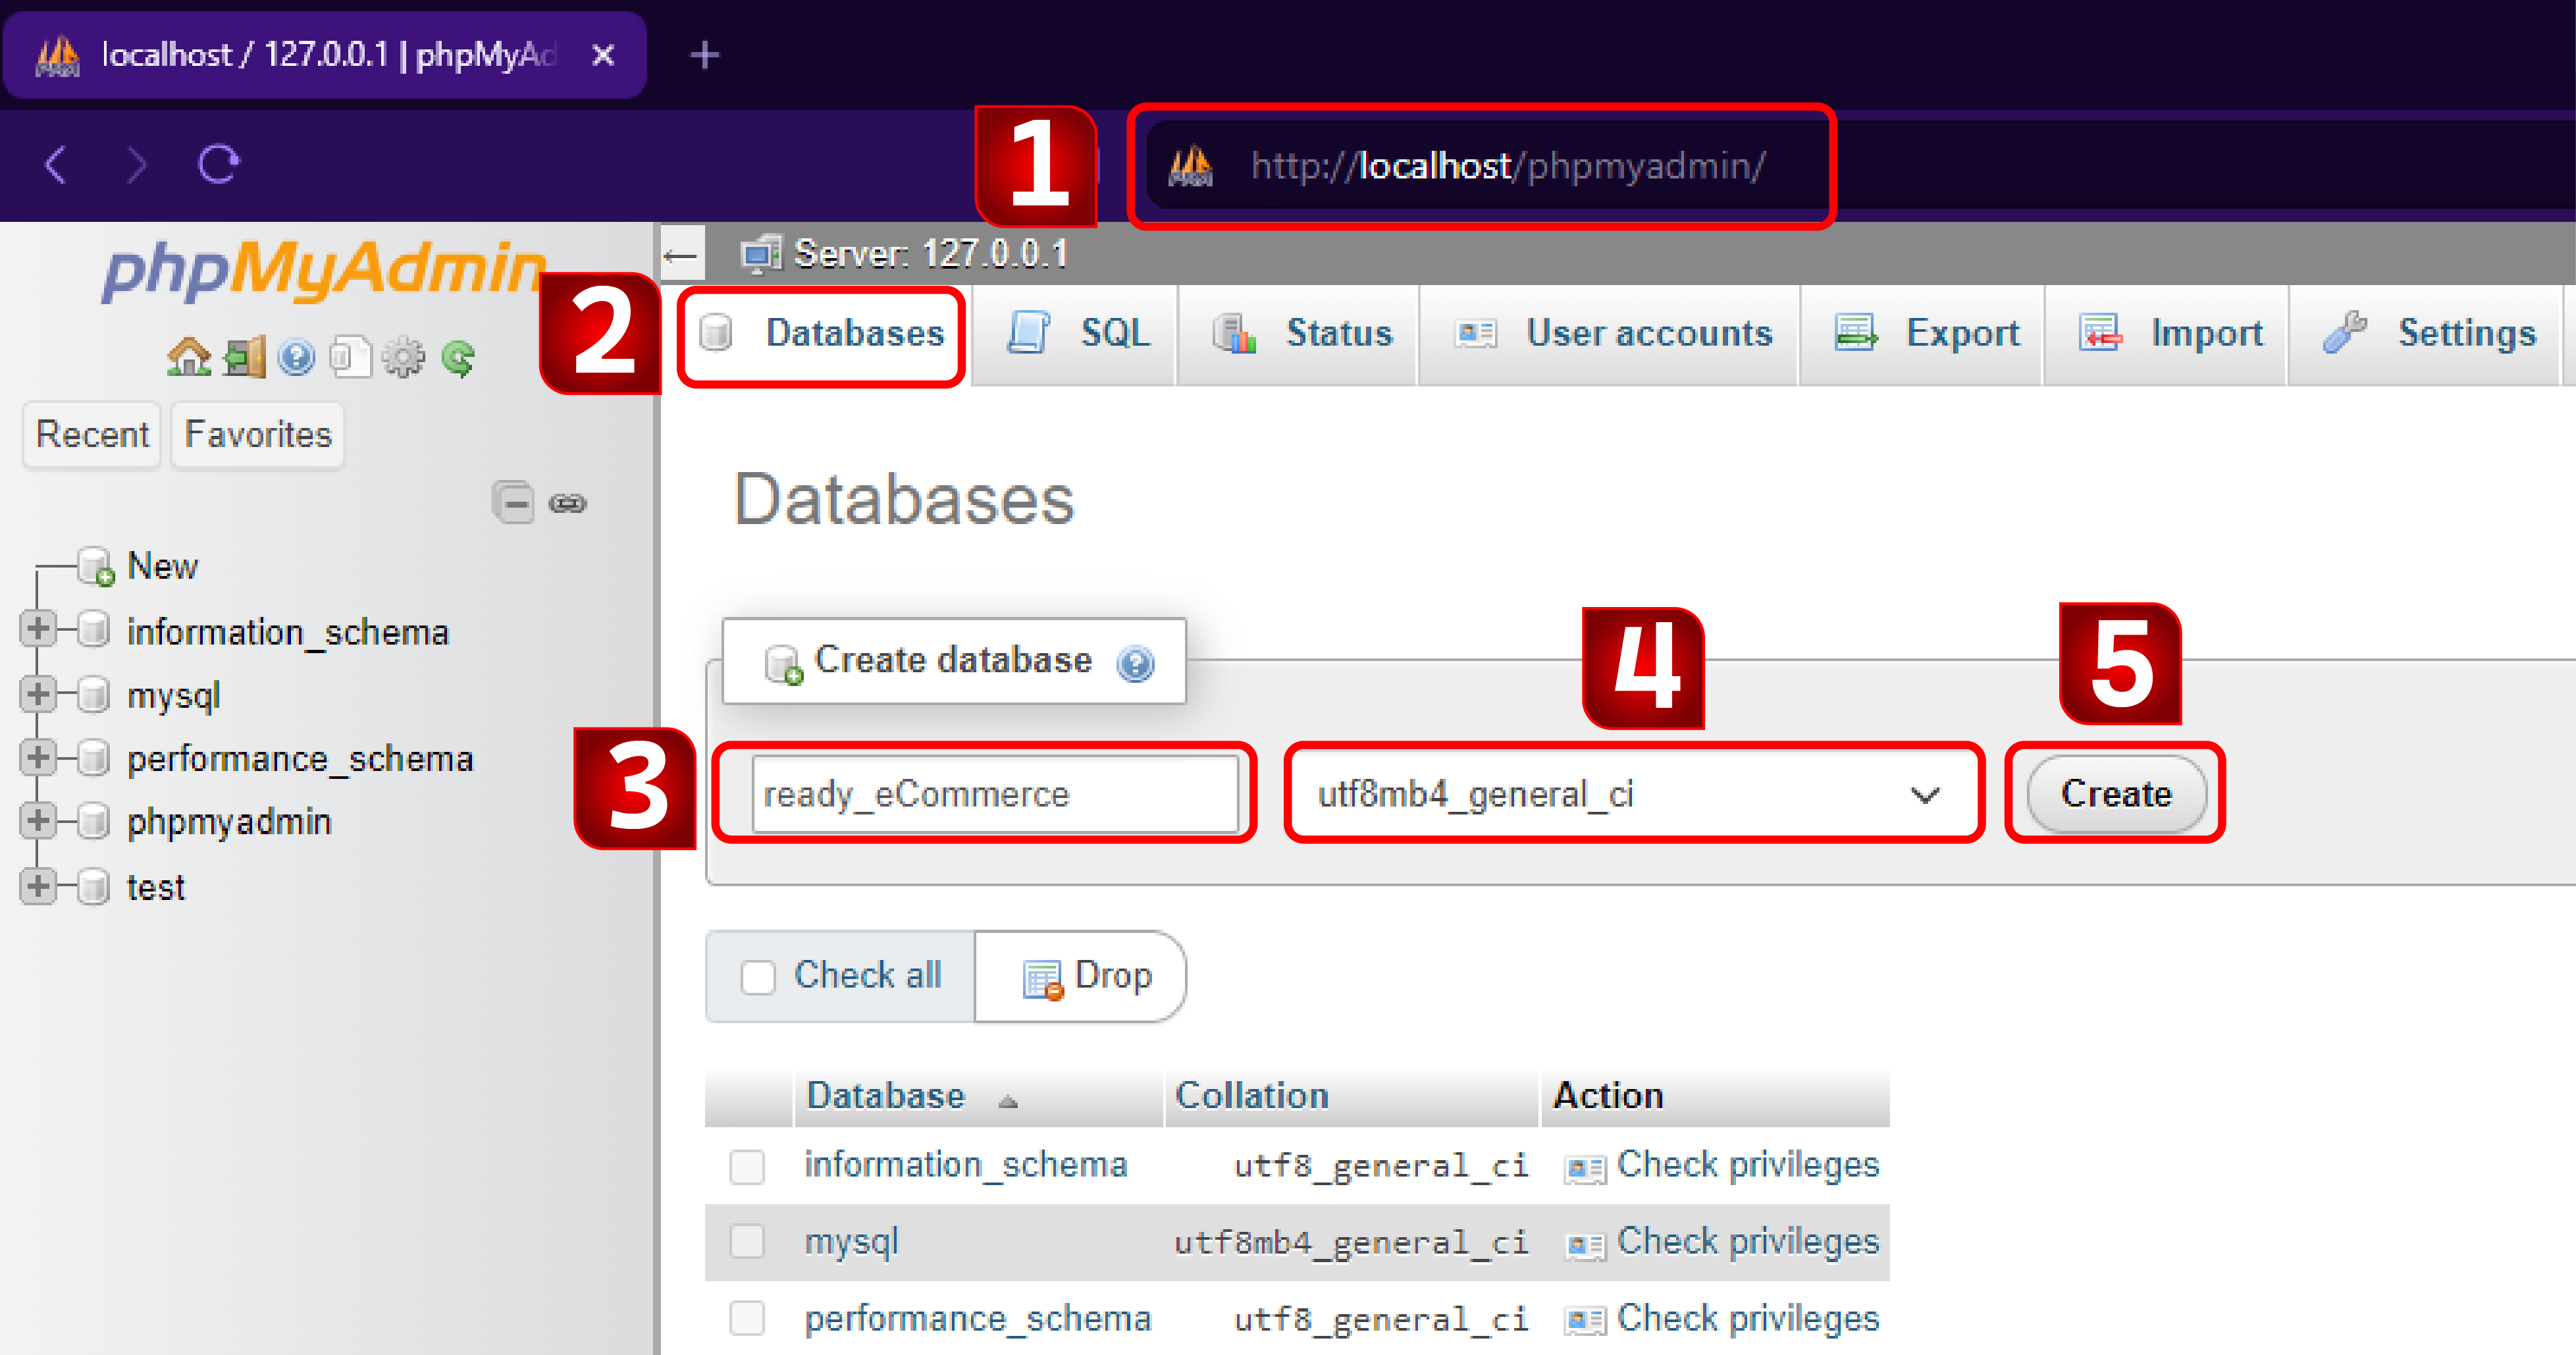
Enter the name of the new database that you want to create.
Select the collation that matches your language. If unsure, select
`utf8_general_ci` or leave it as the default (Collation).
Click the Create button.
Example
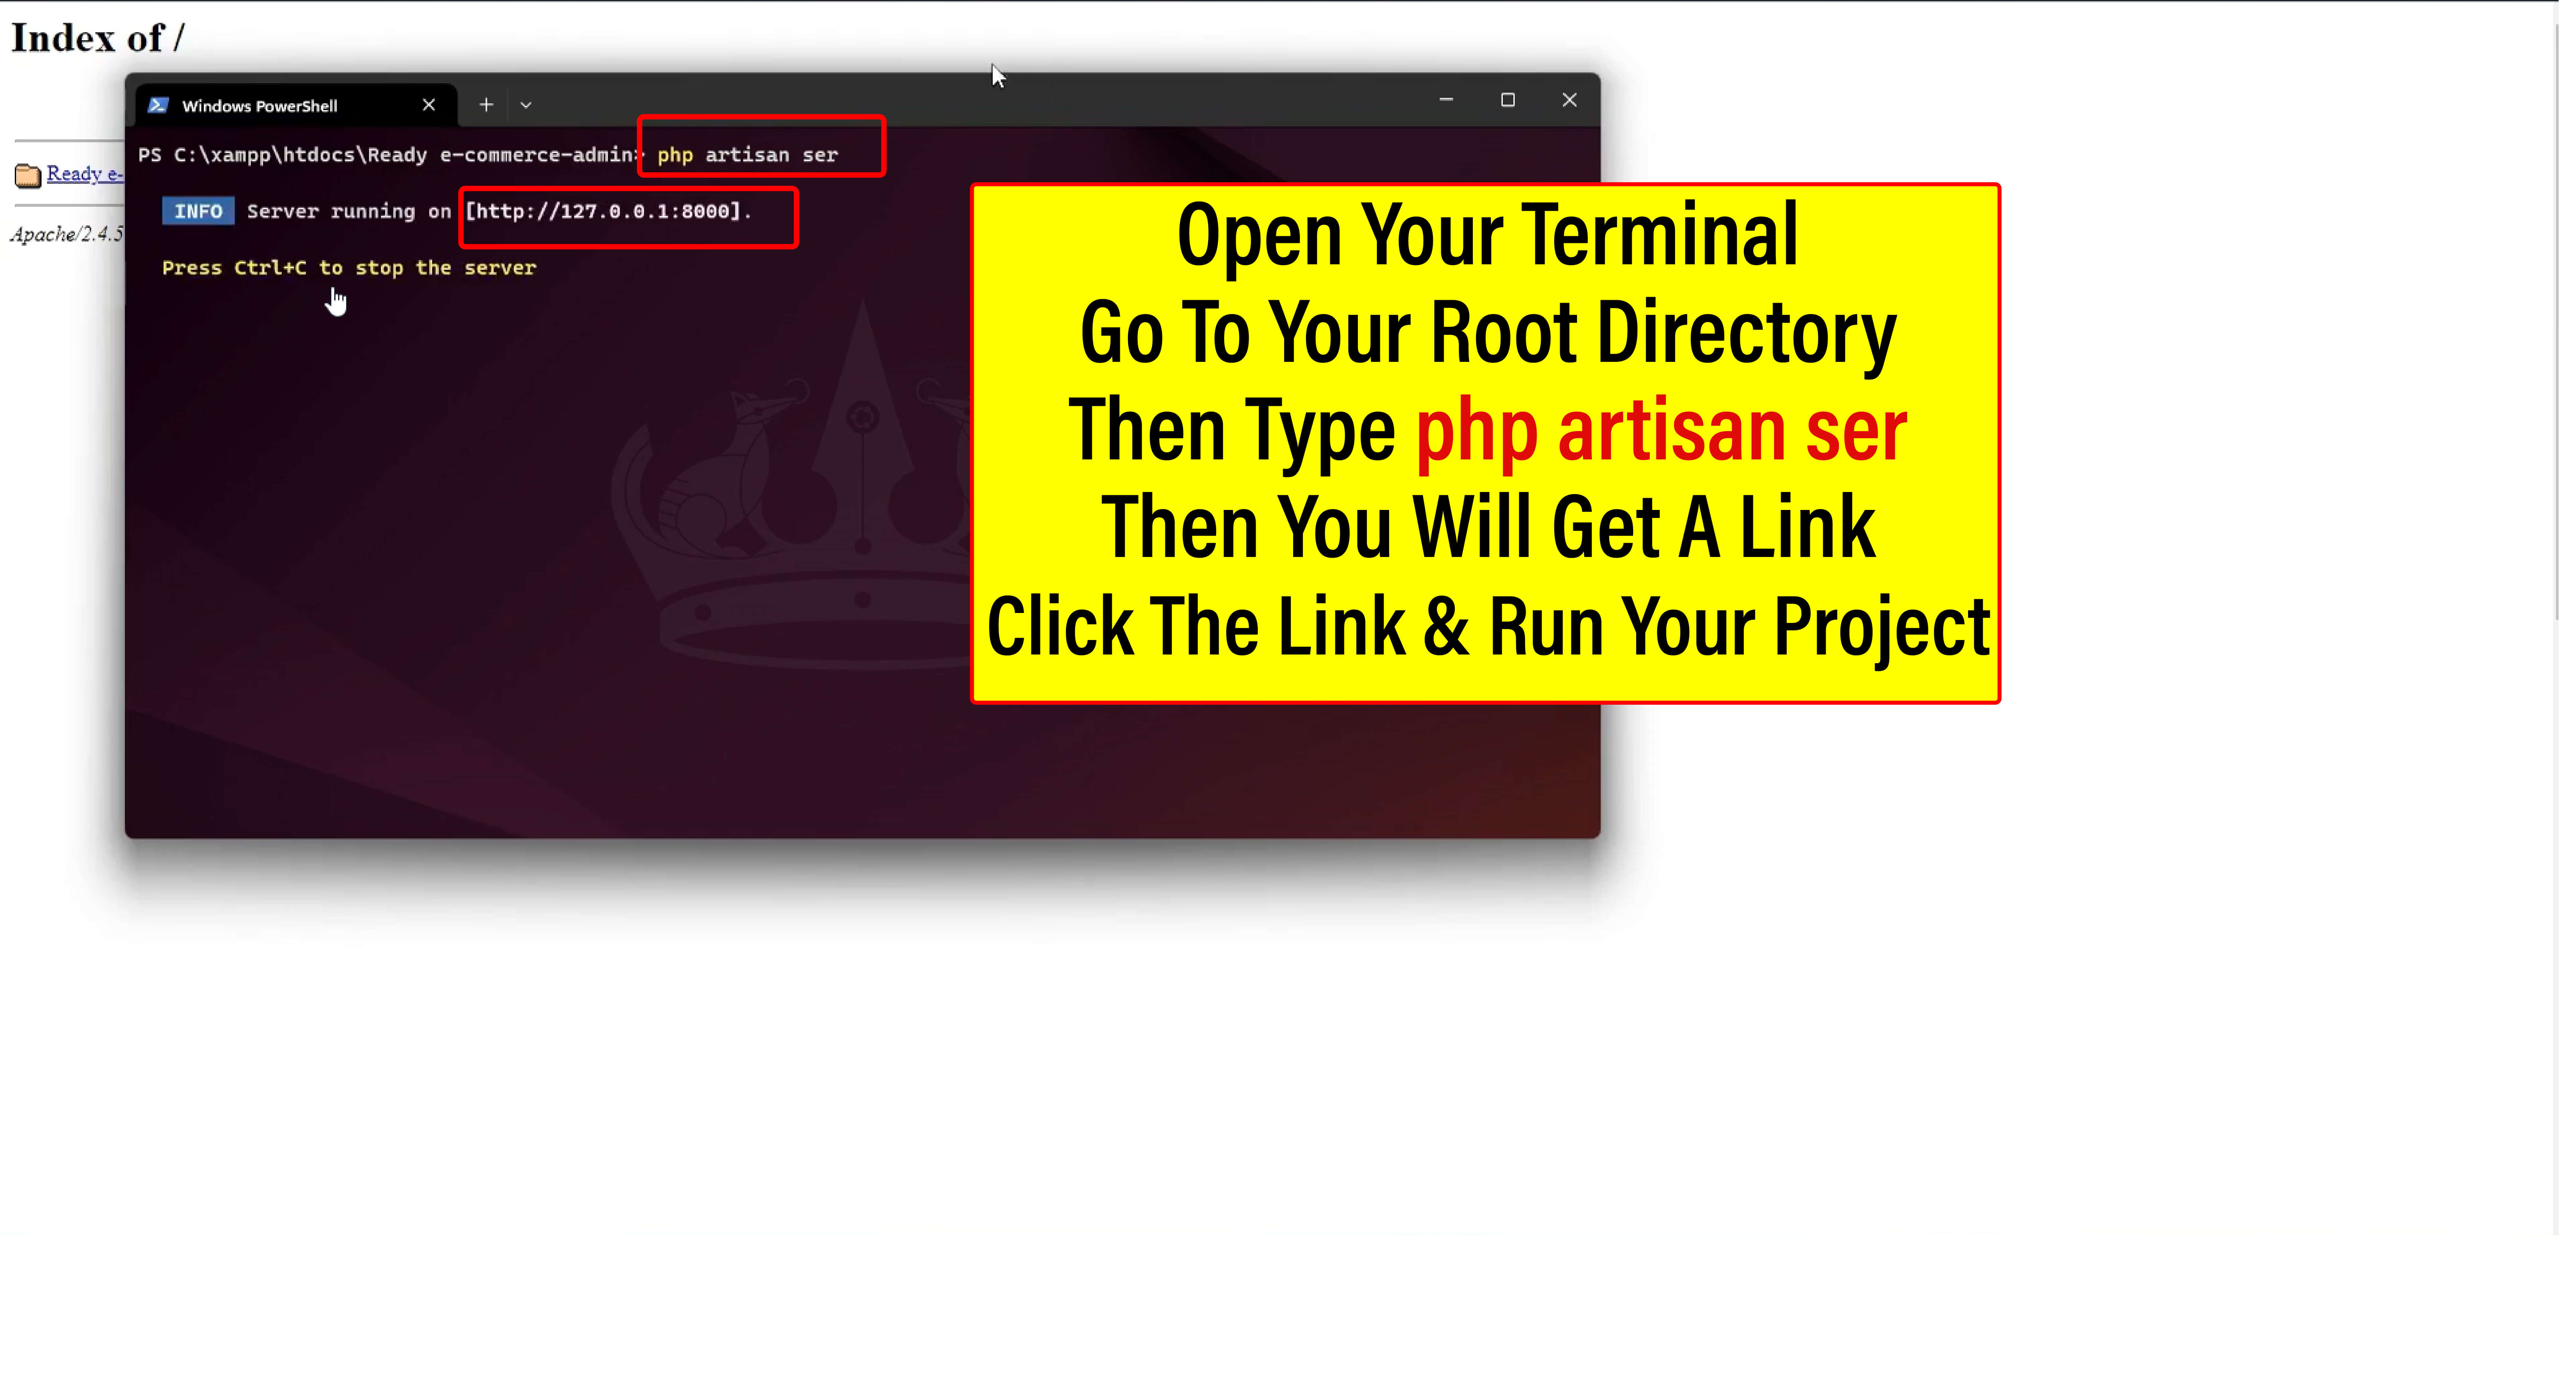
Run Installation Command
Open terminal/windows powershell and go to project folder directory
If a terminal exists On your cpanel
Open your terminal and go to root directory for example
(cd public_html/)
composer install
php artisan migrate:fresh --seed
php artisan storage:link
php artisan serve
Run Project
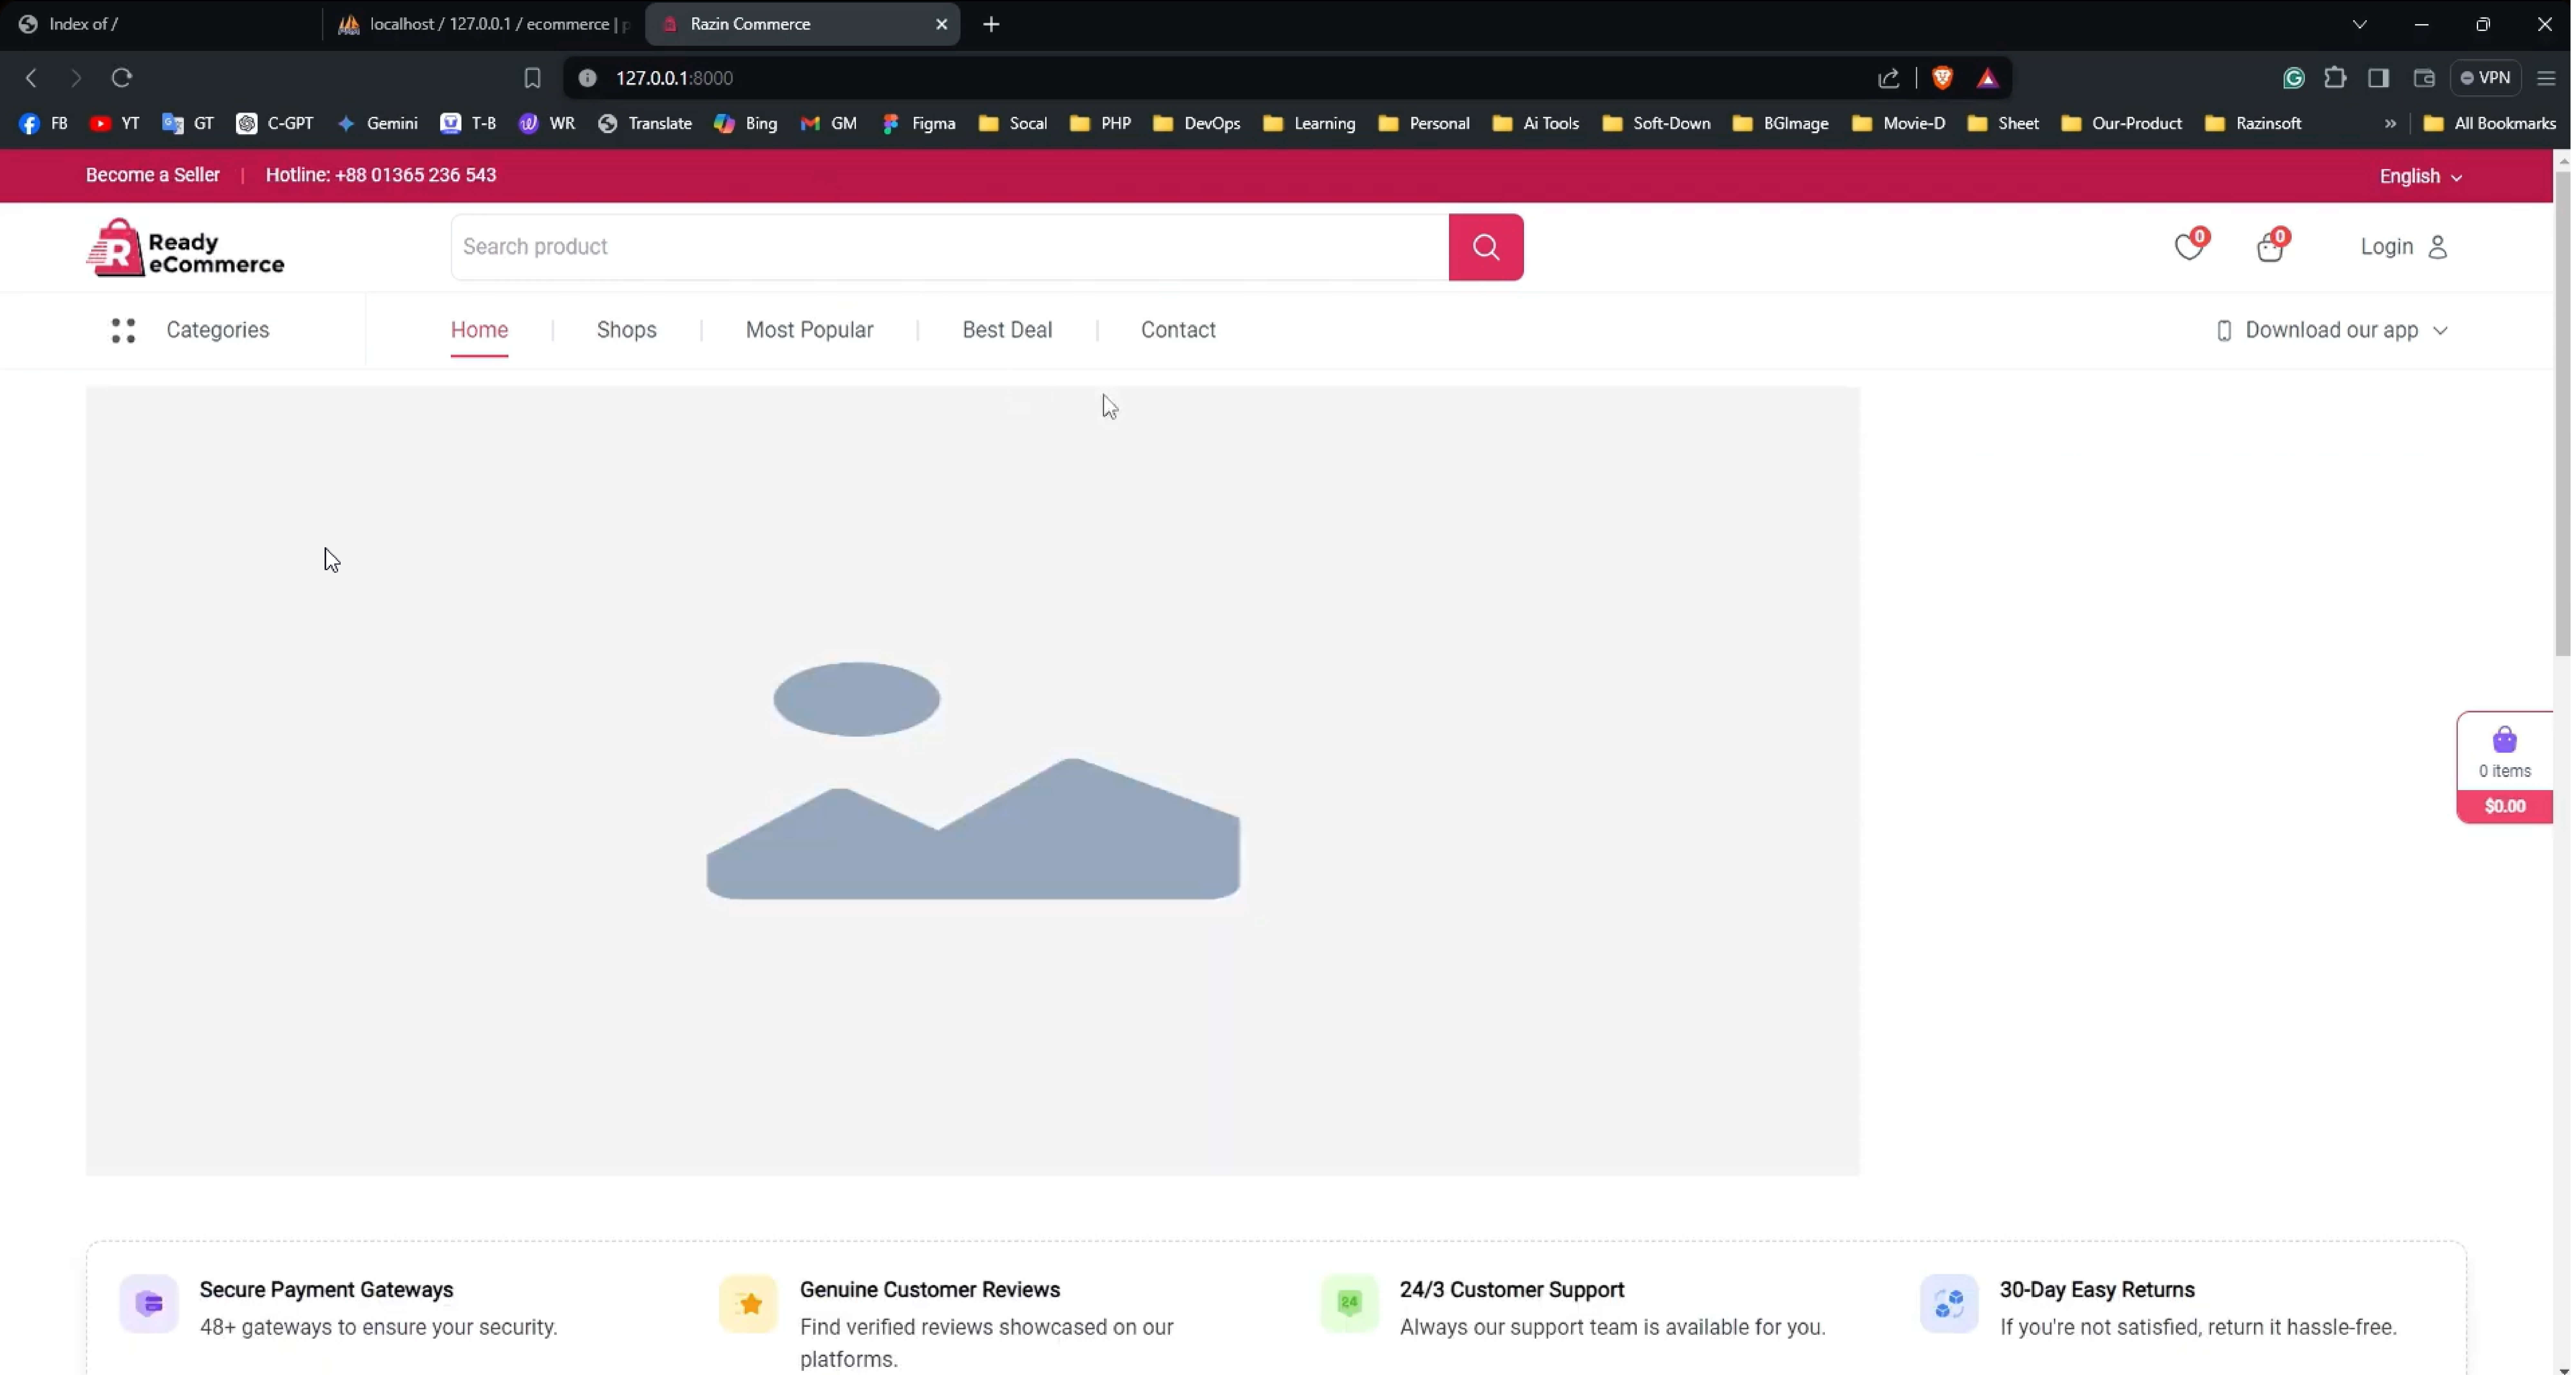
Open you browser
browse http://127.0.0.1:8000 Or http://localhost:8000
This instruction shows how to run it locally on your PC, but it works generally the
same on any hosting
portals. In most case in payed portals you have any web panels to configure your
public folder that
reference to /public folder in laravel folder's structure.
Full Installation Journey By Image Example:
COMPLETE
You'll see a success message after successfully following the above steps. You now
have the option to
browse your application through respected domain or IP.
.jpg)
.jpg)
.jpg)

.jpg)
.jpg)
.jpg)
.jpg)
.jpg)
.jpg)
.jpg)
.jpg)
.jpg)
.jpg)
.jpg)
.jpg)