Introduction Last updated: 2019-06-01

Introducing eCom POS, is an ecommerce solution designed to meet the specific needs of modern online businesses. This powerful system not only includes a comprehensive POS (Point of Sale) system but also provides a fully integrated website and an easy-to-manage admin panel. Whether you're running an online store or a physical shop with an ecommerce presence, eCom POS has everything you need to streamline your daily transactions and business operations.

Key Features:

  • All-in-One Solution: eCom POS combines a Point of Sale (POS) system, a fully integrated website, and a user-friendly admin panel, providing everything a modern online business needs in one package.
  • User-Friendly POS System: Specifically designed for ecommerce businesses, the POS system simplifies daily operations by streamlining transactions, managing sales, inventory, and customer interactions, allowing you to focus on business growth.
  • Fully Integrated Website: The beautifully designed website serves as an online store, enabling customers to browse, shop, and stay connected with your brand. Built with the latest technologies, it ensures a smooth and responsive user experience across all devices.
  • Easy-to-Manage Admin Panel: The intuitive admin panel gives you full control over your business operations. You can efficiently track sales, manage inventory, handle customer orders, and process payments, making it easier to make data-driven decisions and optimize your business performance.
  • Comprehensive HRM Features: The built-in HRM system allows you to manage employee records, track attendance, process payroll, and handle other HR-related tasks. This feature helps you streamline workforce management, ensuring your team operates efficiently.
  • Complete Documentation: eCom POS includes a comprehensive guide that assists with installation and resolving potential issues. This ensures that you can set up and operate the system smoothly without any hassle.
  • Streamlined Business Operations: With eCom POS, you can manage both your online store and physical shop smoothly, offering a cohesive experience that bridges the gap between online and offline commerce.
  • Technology-Driven: The solution leverages the latest web technologies to provide a fast, secure, and reliable platform for your ecommerce business, ensuring that your store runs smoothly and customers enjoy a top-notch experience.
  • Growth-Focused: eCom POS is designed to take the burden of day-to-day operations off your shoulders, allowing you to focus on growing your business and achieving your goals.

Why Choose eCom POS?

eCom POS is a comprehensive ecommerce solution that integrates a user-friendly POS system, an intuitive website, and an admin panel. It also includes HRM features for efficient employee management. Leveraging the latest technologies, eCom POS simplifies your business operations, ensures a smooth customer experience, and lets you focus on growth while handling daily tasks effortlessly.

What’s Included:

  • Full source code for website
  • Powerfull laravel-based admin panel
  • Step-by-step documentation for Installation and publication
  • Free updates & dedicated support [ website visit: https://support.razinsoft.com ]

Get Started Today!

Transform your business with eCom POS—an ecommerce solution featuring a user-friendly POS system, an intuitive website, and an easy-to-use admin panel. Benefit from built-in HRM features for streamlined employee management. Leverage the latest technologies to simplify your operations and focus on growing your business.

Website 1.1

Overview

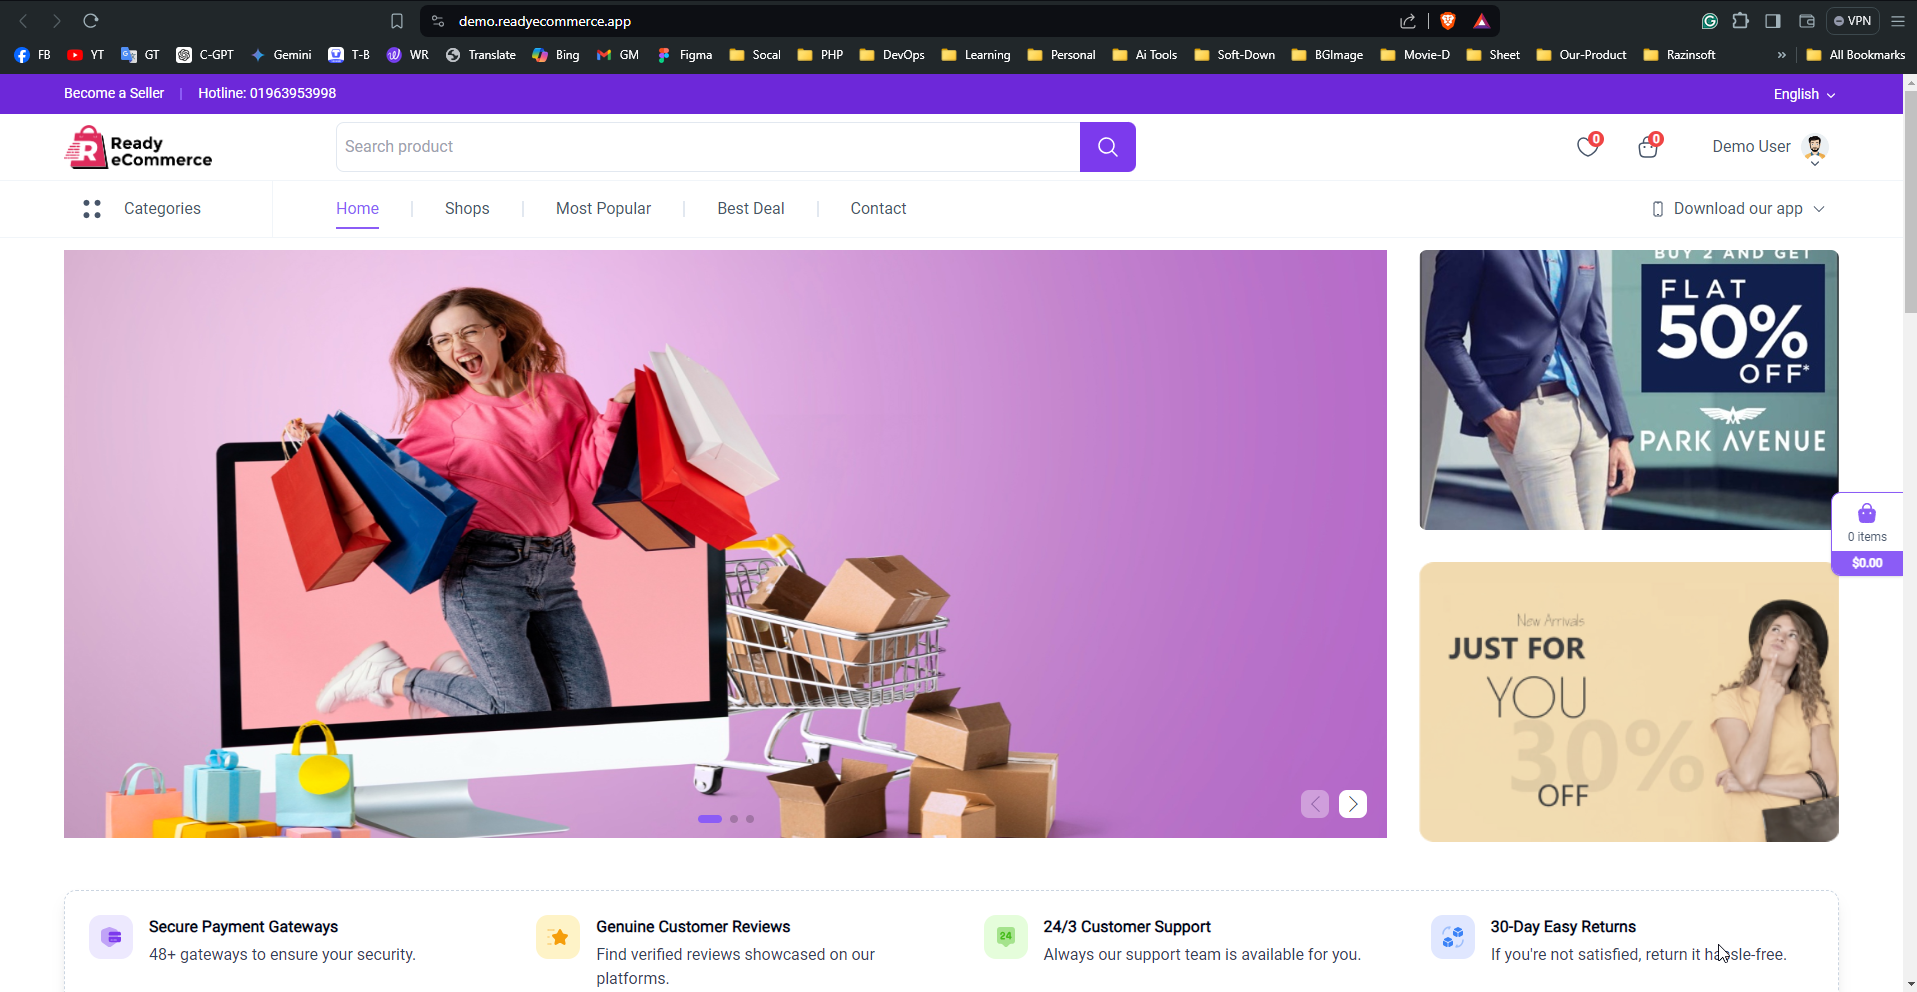
The eCom POS is an integrated e-commerce and point-of-sale (POS) system designed to streamline both online and in-store shopping experiences. Built with modern web technologies, eCom POS delivers a seamless and intuitive user experience, enabling businesses to manage sales and inventory efficiently while offering a superior shopping experience for customers.

Key Features

  1. Modern & Responsive Design

    • Cross-Browser Compatibility: Optimized for all major browsers, ensuring a consistent user experience across Chrome, Firefox, Safari, and Edge.
    • Responsive Layout: Adapts automatically to various screen sizes, providing a smooth experience on desktops, tablets, and smartphones.
    • Customizable Themes: Choose from dark and light themes to match user preferences or brand guidelines.
  2. Integrated eCommerce Functionality

    • Product Catalog: Display a wide range of products with detailed descriptions, images, and pricing.
    • Shopping Cart Management: Users can easily add, remove, and modify items in their cart.
    • Secure Checkout: Efficient and secure payment processing with support for multiple payment methods.
  3. POS System Features

    • Real-Time Inventory Management: Track inventory levels and update stock in real-time.
    • Sales Tracking: Monitor sales performance and generate reports to gain insights into business performance.
    • Customer Management: Manage customer profiles, including purchase history and preferences.
  4. Advanced Search & Discovery

    • Smart Search: Quickly find products with a powerful search engine offering predictive search suggestions.
    • Personalized Recommendations: Offer tailored product suggestions based on user preferences and browsing history.
  5. Order Management

    • Order Processing: Efficiently handle and process orders from both online and in-store purchases.
    • Order Tracking: Provide customers with real-time updates on their order status and shipping information.
  6. User Profiles & Accounts

    • User Registration & Login: Easy sign-up options with secure authentication, including social media integrations.
    • Profile Customization: Users can personalize their profiles with avatars and preferences.
    • Order History: Access and manage past orders and track order status.
  7. Integration & Social Features

    • Social Media Integration: Share products and promotions directly on social media platforms.
    • Promotions & Discounts: Create and manage special offers, discount codes, and loyalty programs.
  8. Subscription & Monetization

    • Flexible Subscription Plans: Offer various subscription options for premium features or services.
    • Ad Integration: Include advertisements in the free version to generate additional revenue.
  9. Notifications & Alerts

    • Push Notifications: Engage users with updates on new products, promotions, and order status.
    • In-App Alerts: Provide timely notifications within the system for important updates and reminders.
  10. Admin Panel

    • Content Management: Easily upload, organize, and manage products, categories, and promotions.
    • User Management: Monitor and manage user accounts and their activities.
    • Analytics & Reporting: Access detailed reports on sales, inventory, and user behavior.
  11. Security & Performance

    • Secure Authentication: Protect user data with robust authentication mechanisms, including two-factor authentication and encrypted passwords.
    • Scalable Architecture: Designed to handle high traffic and large volumes of transactions, ensuring smooth performance as the business grows.
    • Regular Updates: Continuous improvements, including new features, security patches, and performance enhancements.

Web Admin Panel 1.2

Dashboard:

  - Key Metrics Overview: Monitor critical statistics such as total sales, inventory levels, customer accounts, and transaction volume.

  - Recent Activity Feed: Stay updated with the latest actions, including recent orders, user logins, and system notifications.

User Management:

  - Profile Management: View and manage customer and admin profiles with ease.

  - Search and Filters: Efficiently locate users with advanced search and filter options.

  - Role and Permissions: Assign and manage admin roles, set permissions, and customize access levels.

Product Management:

  - Inventory Control: Add, edit, or remove products from your catalog.

  - Media Management: Upload and organize product images and videos.

  - Categorization: Group products by categories, brands, and tags for better organization.

Order Management:

  - Order Processing: View, edit, or cancel orders and track order statuses.

  - Customer Interaction: Access customer details and communicate order-related updates.

  - Shipping and Returns: Manage shipping options and process return requests.

Subscription and Payment Management:

  - Plan Administration: Define and manage subscription plans and pricing models.

  - Payment Processing: Handle transactions securely and integrate with various payment gateways.

  - Transaction Tracking: Monitor and report on payment histories and subscription status.

Analytics and Reporting:

  - Sales Reports: Generate detailed reports on sales performance, revenue trends, and product popularity.

  - Customer Insights: Analyze customer behavior, purchase patterns, and engagement metrics.

  - Performance Tracking: Track key performance indicators (KPIs) and visualize data through interactive dashboards.

Notification Management:

  - Communication Tools: Send targeted announcements, promotions, and updates to users.

  - Notification Settings: Configure and manage notification templates and delivery options.

Settings and Configuration:

  - Site Customization: Manage site-wide settings such as site name, contact details, and logo.

  - Integration Management: Configure integrations with third-party services like payment processors and social media platforms.

  - Admin Panel Customization: Personalize the admin panel’s look and feel to match your branding.

Backup and Recovery:

  - Data Backup: Schedule and manage regular database backups to safeguard your information.

  - Recovery Options: Access and restore data from backups to ensure business continuity.

Comprehensive HRM Features:

  - Employee Management: View and manage employee profiles, roles, and employment details.

  - Attendance Tracking: Monitor employee attendance, manage leave requests, and track working hours.

  - Payroll Management: Handle salary calculations, deductions, and generate pay slips.

  - Recruitment: Manage job postings, applicant tracking, and onboarding processes.

  - Performance Reviews: Conduct and record employee performance evaluations and feedback.

  - Training and Development: Track employee training, certifications, and development programs.

  - HR Reports: Generate reports on HR metrics such as attendance, payroll expenses, and employee turnover.

Web and Admin

Introducing eCom POS: an Advanced ecommerce solution featuring an advanced technology stack and a sleek, user-friendly interface. Designed for smooth navigation, it offers a smooth and intuitive shopping experience for customers. Elevate your online store with eCom POS’s modern design and powerful functionality

Website 3.1

Running eCom POS

This documentation provides a step-by-step guide to running a Vue.js-based eCom POS. Follow these instructions to set up your development environment and run the app locally.

1. Prerequisites

  • Node.js installed (version 12.x or higher).
  • npm or Yarn package manager installed.
  • Vue CLI installed (optional but recommended for easier setup).

2. Clone the Repository

Start by cloning the repository from your version control system:

git clone https://github.com/your-username/your-music-app.git

Navigate into the project directory:

cd your-music-app

3. Install Dependencies

Once inside the project directory, install the necessary dependencies:

  • If using npm:
  • npm install
  • If using Yarn:
  • yarn install

4. Running the Development Server

To start the development server and view the app in your browser, run:

  • If using npm:
  • npm run serve
  • If using Yarn:
  • yarn serve

The app will be available at http://localhost:8080 (or another port if specified). Open this URL in your browser to view the app.

5. Building for Production

To create a production build of your app, use the following command:

  • If using npm:
  • npm run build
  • If using Yarn:
  • yarn build

This command will create a dist/ directory containing the optimized files for production deployment.

6. Troubleshooting

If you encounter issues while running or building the app, consider the following troubleshooting steps:

  • Check Node.js Version: Ensure you are using a compatible version of Node.js. You can check your Node.js version by running node -v.
  • Clear Cache: Sometimes clearing the npm or Yarn cache can resolve issues. Use npm cache clean --force or yarn cache clean.
  • Delete Node Modules: Remove the node_modules directory and reinstall dependencies:
  • rm -rf node_modules
    npm install
  • Check Configuration: Verify your configuration files (e.g., vue.config.js, package.json) for any misconfigurations.
  • Consult Logs: Review the error messages in your terminal or browser console for clues on what might be going wrong.

7. Conclusion

By following these steps, you should be able to run your eCom POS locally and prepare it for production. If you encounter issues, refer to the troubleshooting section or consult the documentation for additional guidance.

Admin Panel 3.2

Running Laravel Admin Panel for eCom POS

This documentation provides a step-by-step guide to running a Laravel-based admin panel for a eCom POS. Follow these instructions to set up your development environment and run the admin panel locally.

1. Prerequisites

  • PHP installed (version 8.1 or higher).
  • Composer package manager installed.
  • Laravel installed globally (optional but recommended).
  • A MySQL or PostgreSQL database server running.
  • Node.js and npm installed (for managing frontend dependencies and assets).

How to Install eCom POS on cPanel Hosting

A step-by-step guide on setting up your eCom POS project in cPanel hosting.

Follow This Instructions

  1. Zip your project folder.
  2. Login to your cPanel.
  3. Go to the File Manager option and select it.
  4. Ensure you're in the root folder, then click "Upload".
  5. Select your zip folder and wait for the upload to complete. If the upload area is green, then go back to home.
  6. Unzip the uploaded folder.
  7. Selectall files and directory move to the root folder.
  8. Go back to Cpanel and navigate to Database.
  9. Created a database and add (create if non exist) a DB user.
  10. Example

    Example-01 Example-01 Example-01
  11. You can then run your domain in any browser after that
  12. Press the Start Installation Process button that appears on the screen
  13. Then go to the root folder to check permission and give permission to the mentioned folders
  14. After that, if the permissions of the files are all right, then press the Next button
  15. After that, if the server request extensions are enabled, then click on the next button. If any extension is shown as disabled, then go to select PHP version from the C panel and enable all the extensions that are shown as disabled, then refresh the browser and then click on the next button.
  16. Then fill up the written forms and press the next button
  17. Example

    Example-01
  18. Connect to the database you created and press the next button
  19. Example

    Example-01
  20. Then fill out the form using your Email Account, Domain, Codecanyon Username, and your Purchase Code, and click the Verify Purchases button.
  21. Example

    Example-01
  22. Click on the Final Submission button and complete the installation process by clicking on the Click to Redirect button.

Full Installation Journey Example

Example-01 Example-01 Example-01 Example-01 Example-01 Example-01 Example-01 Example-01 Example-01 Example-01 Example-01 Example-01 Example-01 Example-01 Example-01 Example-01 Example-01 Example-01 Example-01 Example-01 Example-01 Example-01

2. Clone the Repository

Start by cloning the repository from your version control system:

git clone https://github.com/your-username/your-music-admin-panel.git

Navigate into the project directory:

cd your-music-admin-panel

3. Install Dependencies

Once inside the project directory, install the necessary PHP and frontend dependencies:

  • Install PHP dependencies using Composer:
  • composer install
  • Install frontend dependencies using npm:
  • npm install

4. Configure Environment Variables

Copy the example environment file to create your local environment configuration:

cp .env.example .env

Edit the .env file to set up your database connection and other environment-specific settings:

DB_CONNECTION=mysql
DB_HOST=127.0.0.1
DB_PORT=3306
DB_DATABASE=your_database
DB_USERNAME=your_username
DB_PASSWORD=your_password

5. Generate Application Key

Generate a new application key for Laravel:

php artisan key:generate

6. Run Database Migrations

Run database migrations to set up your database schema:

php artisan migrate

7. Seed the Database (Optional)

If you have seed data, you can populate your database with initial data:

php artisan db:seed

8. Run the Development Server

Start the Laravel development server:

php artisan serve

The admin panel will be available at http://localhost:8000. Open this URL in your browser to view the admin panel.

9. Compile Frontend Assets

Compile your frontend assets for development:

npm run dev

For production builds, use:

npm run build

10. Troubleshooting

If you encounter issues while running the admin panel, consider the following troubleshooting steps:

  • Check PHP Version: Ensure you are using a compatible version of PHP. Check your PHP version with php -v.
  • Check Dependencies: Ensure that all PHP and frontend dependencies are installed correctly. Use composer install and npm install to reinstall.
  • Verify Database Configuration: Ensure that your .env file has the correct database credentials and that the database server is running.
  • Clear Caches: Sometimes clearing application caches can resolve issues:
  • php artisan cache:clear
    php artisan config:clear
    php artisan view:clear
  • Check Logs: Review the error messages in your terminal or log files (storage/logs/) for more information on what might be going wrong.

11. Conclusion

By following these steps, you should be able to run the Laravel-based admin panel for your eCom POS locally. If you encounter issues, refer to the troubleshooting section or consult the Laravel documentation for additional guidance.

Install on localhost

To install on localhost,and follow the installation prompts for seamless setup.

How to Install eCom POS on localhost

A step-by-step guide on setting up your eCom POS project in Localhost.

Follow This Instructions.

If you use windows operating system
  1. Download and install XAMPP in C drive.
  2. Start Your Xampp Server.
  3. Download and Install Composer in C drive.
  4. Unzip the downloaded archive package.
  5. Move the unzipped file to your htdocs folder.
  6. Creating Database
    • Point your browser to phpMyAdmin address by typing http://localhost/phpmyadmin .
    • In phpMyAdmin, click on Databases tab.
    • Enter the name of new database that you want created.
    • you may also need to select the collation for the database. Please select the collation match your language. If you do not know what to select, you can select utf8_general_ci or leave default (Collation).
    • Click Create button.
Example
Example-01
Configuration

Please copy the .env.example and rename it to .env and fill up the .env

  • APP_NAME = (Youe App Name)
  • APP_ENV = (Local Production)
  • APP_URL = (https:// Your Domain Link..)
  • DB_DATABASE = (Your Database Name)
  • DB_USERNAME = (Your Database Username)
  • DB_PASSWORD = (Your Database Password)
  • MAIL_MAILER = (SMTP Email Relay Services)
  • MAIL_HOST = Your Mail Host(For Example: smtp.gmail.com)
  • MAIL_PORT = Your Mail Port(For Example: 587)
  • MAIL_USERNAME = (Your Mail Username)
  • MAIL_PASSWORD = (Your Mail Password)
  • MAIL_ENCRYPTION = (SSL, TLS)
  • MAIL_FROM_ADDRESS = (For Example: no-reply@gmail.com)

You need to fill the database connection details, administration details, and store details to .env example file.

Run Installation Command
  • Open terminal/windows powershell and go to project folder directory
  • If a terminal exists On your cpanel
  • Open your terminal and go to root directory for example (cd public_html/)
  1. composer install
  2. php artisan migrate:fresh --seed
  3. php artisan storage:link
  4. php artisan serve

Run Project
  • Open you browser
  • browse http://127.0.0.1:8000 Or http://localhost:8000
  • This instruction shows how to run it locally on your PC, but it works generally the same on any hosting portals. In most case in payed portals you have any web panels to configure your public folder that reference to /public folder in laravel folder's structure.

COMPLETE

You'll see a success message after successfully following the above steps. You now have the option to browse your application through respected domain or IP.